Whirlpool MH3184XPB Installation Instructions - Page 5
Roof Venting Installation Only, IMPORTANT
 |
View all Whirlpool MH3184XPB manuals
Add to My Manuals
Save this manual to your list of manuals |
Page 5 highlights
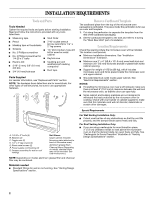
5. Rotate blower motor end over end. Roof Venting Installation Only 1. Repeat Step 1 from "Wall Venting Installation Only." 2. Repeat Step 2 from "Wall Venting Installation Only." 3. Repeat Step 3 from "Wall Venting Installation Only." 4. Repeat Step 4 from "Wall Venting Installation Only." 5. Rotate blower motor so that exhaust ports face the top of microwave oven, and flat sides of blower motor face back of microwave oven. Lower blower motor back into microwave oven. A 6. Rotate blower motor so that exhaust ports face the back of microwave oven, and lower blower motor back into the microwave oven. A A. Exhaust port 7. Reattach blower motor to back of microwave oven with 2 screws removed in Step 3. 8. Reattach damper plate. Make sure tabs at top and back of damper plate are inserted fully into their respective slots in the microwave oven. A. Exhaust port IMPORTANT: If blower motor is not positioned with flat sides facing the back of the microwave oven (as shown), performance will be poor. 6. Reattach blower motor to back of microwave oven with 2 screws removed in Step 3 of "Wall Venting Installation Only." Securely tighten screws. NOTE: If blower motor is not correctly oriented, the 2 screws removed in Step 3 cannot be reattached to the microwave oven. 7. Reattach damper plate. Make sure tabs at top and back of damper plate are inserted fully into their respective slots in the microwave oven. A B C D E A. Damper plate B. Tabs at back of damper plate C. Slots in back of microwave oven exterior D. Damper plate tabs E. Slots in top of microwave oven exterior 9. Secure damper plate with screw. A B C D E A. Damper plate B. Tabs at back of damper plate C. Slots in back of microwave oven exterior D. Damper plate tabs E. Slots in top of microwave oven exterior 8. Secure damper plate with screw. 5
-
 1
1 -
 2
2 -
 3
3 -
 4
4 -
 5
5 -
 6
6 -
 7
7 -
 8
8 -
 9
9 -
 10
10 -
 11
11 -
12
 |
 |
