Whirlpool RBD245PRB Installation Instructions - Page 6
Warning - installation
 |
UPC - 883049010700
View all Whirlpool RBD245PRB manuals
Add to My Manuals
Save this manual to your list of manuals |
Page 6 highlights
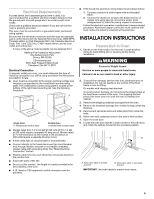
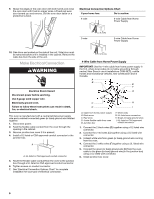
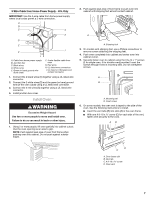
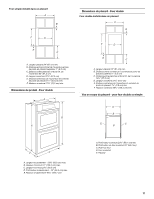
9. Grasp the edges of the oven door with both hands and close the oven door until it will no longer close. Lift and pull oven door toward you and remove. Set the oven door aside on a protective surface. Electrical Connection Options Chart If your home has: Go to section: 4-wire 4-wire Cable from Home Power Supply 3-wire ½" (1.3 cm) 3-wire Cable from Home Power Supply 10. Side trims are located on the side of the unit. Side trims must be removed before unit is installed in the cabinet. Remove the cable ties from the side of the unit. Make Electrical Connection WARNING Electrical Shock Hazard Disconnect power before servicing. Use 8 gauge solid copper wire. Electrically ground oven. Failure to follow these instructions can result in death, fire, or electrical shock. This oven is manufactured with a neutral (white) power supply wire and a cabinet-connected green (or bare) ground wire twisted together. 1. Disconnect power. 2. Feed the flexible cable conduit from the oven through the opening in the cabinet. 3. Remove junction box cover if it is present. 4. Install a UL listed or CSA approved conduit connector to the junction box. A A. UL listed or CSA approved conduit connector 5. Route the flexible cable conduit from the oven to the junction box through a UL listed or CSA approved conduit connector. 6. Tighten screws on conduit connector. 7. See "Electrical Connection Options Chart" to complete installation for your type of electrical connection. ½" (1.3 cm) 4-Wire Cable from Home Power Supply IMPORTANT: Use the 4-wire cable from home power supply in the U.S. where local codes do not allow grounding through neutral, New Branch circuit installations (1996 NEC), mobile homes and recreational vehicles, new construction and in Canada. A B E F G C H D I A. Cable from home power supply B. Black wires C. Red wires D. 4-wire flexible cable from oven E. Junction box F. White wires G. UL listed wire connectors H. Green (or bare) ground wires I. UL listed or CSA approved conduit connector 1. Connect the 2 black wires (B) together using a UL listed wire connector. 2. Connect the 2 red wires (C) together using a UL listed wire connector. 3. Untwist white wire from green (or bare) ground wire coming from the oven. 4. Connect the 2 white wires (F) together using a UL listed wire connector. 5. Connect the green (or bare) ground wire (H) from the oven cable to the green (or bare) ground wire (in the junction box) using a UL listed wire connector. 6. Install junction box cover. 6
-
 1
1 -
 2
2 -
 3
3 -
 4
4 -
 5
5 -
 6
6 -
 7
7 -
 8
8 -
 9
9 -
 10
10 -
 11
11 -
 12
12 -
13
-
14
-
15
-
16
 |
 |
