Whirlpool RCS2012RS Installation Instructions - Page 5
Install Cooktop - cutout
 |
UPC - 050946997094
View all Whirlpool RCS2012RS manuals
Add to My Manuals
Save this manual to your list of manuals |
Page 5 highlights
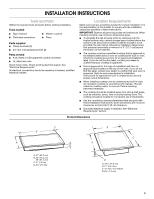
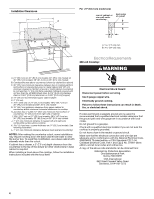
Before You Make the Electrical Connection: To properly install your cooktop, you must determine the type of electrical connection you will be using and follow the instructions provided for it here. s A 4-wire or 3-wire, single phase, 240 volt, 60 Hz., AC only electrical supply is required on a separate, 40-amp circuit, fused on both sides of the line. NOTE: The 15" (38.1 cm) model series requires a 20-amp circuit. s The cooktop should be connected directly to the junction box through flexible, armored or nonmetallic sheathed, copper cable. The flexible, armored cable extending from the fuse box or circuit breaker box should be connected directly to the junction box. s Locate the junction box to allow as much slack as possible between the junction box and the cooktop so that the cooktop can be moved if servicing becomes necessary in the future. s Do not cut the conduit. Use the length of conduit provided. s A UL listed or CSA approved conduit connector must be provided at each end of the power supply cable (at the cooktop and at the junction box). A listed conduit connector is already provided at the cooktop. s If the house has aluminum wiring, connect the aluminum wiring to the copper wire by using special connectors designed and UL listed for joining copper to aluminum. Follow the electrical connector manufacturer's recommended procedure. Aluminum/copper connection must conform with local codes and industry accepted wiring practices. 120 volt Cooktop: WARNING s For your personal safety, this cooktop must be grounded. This cooktop is equipped with a power supply cord having a NEMA 5-20P, 3 prong grounding plug. To minimize possible shock hazard, the cord must be plugged into a mating, NEMA 5-20R, 3 prong grounding-type outlet, grounded in accordance with the National Electrical Code, ANSI/NFPA 70 latest edition, and local codes and ordinances. s If a mating outlet is not available, it is the personal responsibility and obligation of the customer to have a properly grounded, NEMA 5-20R, 3 prong outlet installed by a qualified electrician. WARNING: Improper connection of the equipment grounding conductor can result in a risk of electric shock. Check with a qualified electrician or serviceman if you are in doubt as to whether the appliance is properly grounded. Do not modify the plug provided with the appliance, if it will not fit the outlet, have a proper outlet installed by a qualified electrician. Install Cooktop WARNING Excessive Weight Hazard Use two or more people to move and install cooktop. Failure to do so can result in back or other injury. 1. Remove the shipping materials and tape from the cooktop. Remove the hardware package from inside the literature bag. 2. Using 2 or more people, place the cooktop upside down on a protective surface. A C D B Electrical Shock Hazard Plug into a grounded 3 prong outlet. Do not remove ground prong. Do not use an adapter. Do not use an extension cord. Failure to follow these instructions can result in death, fire, or electrical shock. s A 120 volt, 60 Hz, AC only, 20-amp fuse, fused electrical supply is required. A time-delay fuse or circuit breaker is recommended. It is recommended that a separate circuit serving only this appliance be provided. A NEMA 5-20R, 3 prong grounding-type outlet must be used. E A. Attachment screw holes for optional front and back location B. Clamp bracket (end locations recommended) C. Burner box bottom D. Attachment screw E. Attachment screw location (recommended) 3. Two clamp brackets are provided to clamp the cooktop to the countertop. Install the clamp brackets on each end of the burner box bottom. If cabinet construction does not provide clearance for installing brackets at the burner box ends, install the brackets on the front and back of the burner box bottom. NOTE: For lift top models, the brackets may be installed before or after the cooktop is placed into the cutout. However, installing the brackets after is not recommended for lift top models. 5
-
 1
1 -
 2
2 -
 3
3 -
 4
4 -
 5
5 -
 6
6 -
 7
7 -
 8
8 -
 9
9 -
 10
10 -
 11
11 -
12
-
13
-
14
-
15
-
16
 |
 |
