Whirlpool RMC275PVS Microwave Use and Care - Page 9
Add A Minute, Cook A Bit More, Memory, Interrupt Cooking, Auto Cook, Cooking in Stages
 |
UPC - 883049142937
View all Whirlpool RMC275PVS manuals
Add to My Manuals
Save this manual to your list of manuals |
Page 9 highlights
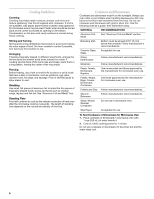
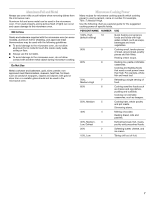
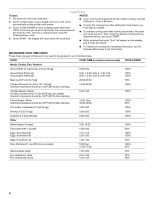
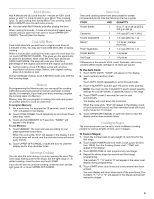
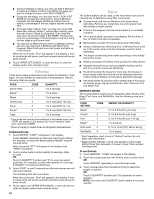
Add A Minute Add A Minute lets you cook food for 1 minute at 100% cook power or add 1 or more minutes to your Micro Time cooking cycle. To add cooking time during Micro Time cooking, touch ADD A MINUTE once for each extra minute. ■ You can enter Add A Minute only after closing the door. When cooking time ends, 4 tones will sound and repeat every minute until you open the oven door or touch UPPER OFF/ CANCEL. This will clear the display. Cook A Bit More Cook A Bit More lets you add time to original cook times of 4 minutes or less. You may use Cook A Bit More after or during cooking. Within a minute after cooking time ends, open the oven door. Do not touch UPPER OFF/CANCEL. This gives you the opportunity to check for doneness. Next, close the oven door and touch COOK A BIT MORE. The oven will cook your food for a percentage of the original cook time at the original cook power. ■ During cooking, Cook A Bit More works with all other microwave functions except Defrost, with original cooking times of 4 minutes or less. During multistage cooking, Cook A Bit More works only with the final cooking stage. Memory By programming the Memory pad, you can recall the cooking instructions previously placed in memory and begin cooking quickly. For example, if you heat a roll every morning, program the cooking steps into Memory. Memory also lets you program a cooking time and cook power for another person to cook at a later time. To program Memory: 1. Set a cook time. For example for 20 seconds, touch 2 and 0, ":20" will appear in the display. 2. Touch COOK POWER. Touch repeatedly to set a Cook Power other than 100%. 3. Touch and hold MEMORY for 5 seconds. "SAVED" will appear in the display. To use Memory: 1. Touch MEMORY. The oven will cook according to your preprogrammed instructions. When the cycle ends, "End" will appear in the display, 4 endof-cycle tones will sound, and the reminder tones will sound every minute. 2. Touch UPPER OFF/CANCEL or open the door to clear the display and/or stop reminder tones. Interrupt Cooking You can stop the oven during a cycle by opening the door. The oven stops heating and the fan stops, but the light stays on. To restart cooking, close the door and touch START. If you do not want to continue cooking, close the door and the light goes off, or touch UPPER OFF/CANCEL. Auto Cook Times and cooking power have been preset for certain microwavable foods. Use the following chart as a guide. FOOD PAD QUANTITY Frozen Entrée 1 9 oz, 11 oz or 26 oz (255 g, 312 g or 454 g) Casserole 2 2-8 cups (473 mL-1.89 L) Frozen Vegetables 3 1-4 cups (250 mL-1 L) Bacon* 4 1-6 slices, average thickness Fresh Vegetables 5 1-4 cups (250 mL-1 L) Frozen Burrito 6 1-4 pieces Hot Dogs 7 1-6 pieces *Differences in the amount of fat, meat, thickness, and curing process affect results. Average is 16 slices per pound. To Use Auto Cook: 1. Touch AUTO COOK. "CODE" will appear on the display. 2. Touch number pad from chart OR Touch AUTO COOK repeatedly to scroll through foods. 3. Touch 0 QUANTITY (number pad "0") pad to enter quantity. NOTE: You must use the 0 QUANTITY pad to select quantity settings for a frozen entree, a casserole, bacon or hot dogs. 4. Touch START or wait 5 seconds for oven to start automatically. The display will count down the cook time. When the cycle ends, "End" will appear in the display, 4 endof-cycle tones will sound, and then reminder tones will sound every minute for 15 minutes. 5. Touch UPPER OFF/CANCEL or open the door to clear the display and/or stop reminder tones. Cooking in Stages The microwave oven can be set to cook at different cooking powers for various lengths of time, up to 3 stages. To Cook in Stages: 1. Touch the number pads to set a length of cook time for the first stage. 2. Touch COOK POWER and then enter a cook power (if other than 100%) from the Cooking Power chart. "TIME" will appear in the display. 3. Touch MICRO TIME to start programming next stage. 4. Repeat the above steps for second and third stage programming. The numbers "1," "2" and/or "3" will appear in the upper oven display during programming. 5. Touch START when cook times and cook powers have been entered. The oven display will count down each of the cook times. The numbers "1," "2" or "3" will appear in the display during their respective stages. 9
-
 1
1 -
2
-
3
-
 4
4 -
 5
5 -
 6
6 -
 7
7 -
 8
8 -
 9
9 -
 10
10 -
 11
11 -
 12
12 -
 13
13 -
 14
14 -
15
-
16
-
17
-
18
-
19
-
20
-
21
-
22
-
23
-
24
-
25
-
26
-
27
-
28
 |
 |