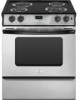
Whirlpool RY160LXTS Owners Manual - Page 10
Warning
 |
UPC - 883049065137
View all Whirlpool RY160LXTS manuals
Add to My Manuals
Save this manual to your list of manuals |
Page 10 highlights
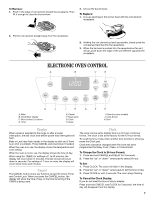
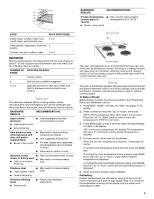
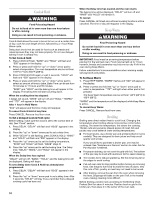
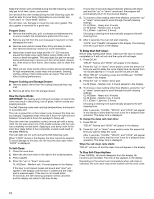
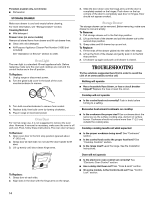
Cook & Hold WARNING Food Poisoning Hazard Do not let food sit in oven more than one hour before or after cooking. Doing so can result in food poisoning or sickness. Cook & Hold allows the oven to be set to turn on at a certain time of day, cook for a set length of time, followed by a 1-hour Keep Warm cycle. Delay start should not be used for food such as breads and cakes because they may not bake properly. Do not use delayed baking if oven is already hot. To Set Cook & Hold: 1. Press COOK & HOLD. "BAKE" and "HOLD" will flash and "000" appears in the display. 2. Press or press and hold the "up" or "down" arrow pad to select a temperature. The oven temperature can be set from 170°F (77°C) to 550°F (288°C). 3. Press COOK & HOLD again or wait 4 seconds. "HOLD" will flash and "000" appears in the display. 4. Press or press and hold the "up" or "down" arrow pad to select an amount of time to bake. Bake Time can be set from 10 minutes to 11 hours and 59 minutes. "BAKE" and "HOLD" and the baking time will appear in the display. The baking time will start counting down. When the cooking time has elapsed: 4 beeps will sound, "BAKE" will turn off and "HOLD," "WARM," and "170°" will appear in the display. After 1 hour in Hold Warm: "End" will appear and the time of day will reappear. To cancel Cook & Hold at any time: Press CANCEL. Remove food from oven. To Set a Delayed Cook & Hold cycle: Before setting, make sure the clock is set to the correct time of day. See "Clock" section. 1. Press DELAY. "DELAY" will flash and "00:00" appears in the display. 2. Press the "up" or "down" arrow pad to set a delay time. 3. While "DELAY" is still flashing, press COOK & HOLD. "BAKE" and "HOLD" will flash and "000" appears in the display. 4. Press the "up" arrow pad to set the baking temperature. "00:00" and "HOLD" will flash. "BAKE" stays lit. 5. Press the "up" arrow pad to set the baking time. The Delay time, "DELAY," "BAKE," and "HOLD" will appear in the display. When the Delay time has expired: "DELAY" will turn off. "BAKE," "HOLD," and the baking time will be displayed. Baking will begin. To set a Delay when Cook & Hold has already been programmed: 1. Press DELAY. "DELAY" will flash and "00:00" appears in the display. 2. Press the "up" or "down" arrow pad to set a delay time. After 4 seconds, "DELAY" will stay lit as a reminder that a delayed cooking cycle has been set. 10 When the Delay time has expired and the oven starts: The baking time will be displayed. "DELAY" will turn off and "BAKE" and "HOLD" will remain lit. To cancel: Press CANCEL. All timed and untimed cooking functions will be canceled. The time of day will reappear in the display. Keep Warm WARNING Food Poisoning Hazard Do not let food sit in oven more than one hour before or after cooking. Doing so can result in food poisoning or sickness. IMPORTANT: Food must be at serving temperature before placing it in the warmed oven. Food may be held up to 1 hour; however, breads and casseroles may become too dry if left in the oven during Keep Warm. Follow manufacturer's recommendations when warming empty serving bowls and plates. To Set Keep Warm: 1. Press KEEP WARM. "WARM" flashes and "000" will appear in the display. 2. Press or press and hold the "up" or "down" arrow pad to select a temperature. "170°" will light when either pad is first pressed. The Keep Warm temperature can be set from 145°F (63°C) to 190°F (88°C). "WARM" and the temperature will be displayed while Keep Warm is active. To cancel Keep Warm: Press CANCEL. Remove food from oven. Broiling Broiling uses direct radiant heat to cook food. Changing the temperature when broiling allows more precise control when cooking. The lower the temperature, the slower the cooking. Thicker cuts and unevenly shaped pieces of meat, fish and poultry may cook better at lower broiling temperatures. ■ For best results, use a broiler pan and grid (provided on some models). They are designed to drain juices and help avoid spatter and smoke. If you would like to purchase a broiler pan, one may be ordered. See "Assistance or Service" section to order. Ask for Part Number 12500100. ■ For proper draining, do not cover the grid with foil. The bottom of the pan may be lined with aluminum foil for easier cleaning. ■ Trim excess fat to reduce spattering. Slit the remaining fat on the edges to avoid curling. ■ Pull out oven rack to stop position before turning or removing food. Use tongs to turn food to avoid the loss of juices. Very thin cuts of fish, poultry or meat may not need to be turned. ■ After broiling, remove the pan from the oven when removing the food. Drippings will bake on the pan if left in the heated oven, making cleaning more difficult. Before broiling, position rack according to the Broiling Chart. Preheat Broil for about 4 minutes. Position food on grid in the broiler pan, then place it in the center of the oven rack.
-
 1
1 -
2
-
3
-
4
-
 5
5 -
 6
6 -
 7
7 -
 8
8 -
 9
9 -
 10
10 -
 11
11 -
 12
12 -
 13
13 -
 14
14 -
 15
15 -
16
 |
 |
