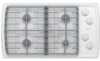
Whirlpool SCS3617RQ Installation Instructions - Page 2
Installation Requirements - appliances
 |
UPC - 050946997308
View all Whirlpool SCS3617RQ manuals
Add to My Manuals
Save this manual to your list of manuals |
Page 2 highlights
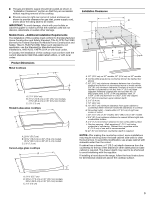
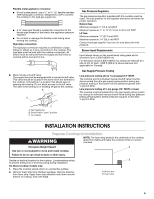
WARNING: For your safety, the information in this manual must be followed to minimize the risk of fire or explosion, or to prevent property damage, personal injury, or death. - Do not store or use gasoline or other flammable vapors and liquids in the vicinity of this or any other appliance. - WHAT TO DO IF YOU SMELL GAS: • Do not try to light any appliance. • Do not touch any electrical switch; do not use any phone in your building. • Clear the room, building, or area of all occupants. • Immediately call your gas supplier from a neighbor's phone. Follow the gas supplier's instructions. • If you cannot reach your gas supplier, call the fire department. - Installation and service must be performed by a qualified installer, service agency, or the gas supplier. In the State of Massachusetts, the following installation instructions apply: s Installations and repairs must be performed by a qualified or licensed contractor, plumber, or gasfitter qualified or licensed by the State of Massachusetts. s If using a ball valve, it shall be a T-handle type. s A flexible gas connector, when used, must not exceed 3 feet. INSTALLATION REQUIREMENTS Tools and Parts Gather the required tools and parts before starting installation. Tools needed s Tape measure s Marker or pencil s Flat-blade screwdriver s combination wrench s Pipe wrench s Channel lock pliers s Pipe-joint compound resistant to LP gas s Noncorrosive leak-detection solution Parts supplied s Gas pressure regulator s Burner grates s Burner caps s Clamp brackets (2) s 2¹⁄₂" (6.4 cm) clamping screws (2) Parts needed Check local codes and consult gas supplier. Check existing gas supply and electrical supply. See "Electrical Requirements" and "Gas Supply Requirements" sections. Location Requirements IMPORTANT: Observe all governing codes and ordinances. Do not obstruct flow of combustion and ventilation air. s It is the installer's responsibility to comply with installation clearances specified on the model/serial rating plate. The model/serial rating plate is located on the underside of the cooktop burner box. s To eliminate the risk of burns or fire by reaching over heated surface units, cabinet storage space located above the surface units should be avoided. If cabinet storage is to be provided, the risk can be reduced by installing a range hood that projects horizontally a minimum of 5" (12.7 cm) beyond the bottom of the cabinets. s The cooktop should be installed in a location away from strong draft areas, such as windows, doors and strong heating vents or fans. s All openings in the wall or floor where cooktop is to be installed must be sealed. s Cabinet opening dimensions that are shown must be used. Given dimensions are minimum clearances. s Grounded electrical supply is required. See "Electrical Requirements" section. Proper gas supply connection must be available. See "Gas Supply Requirements" section. s The cooktop is designed to hang from the countertop by its side or rear flanges. 2
-
 1
1 -
 2
2 -
 3
3 -
 4
4 -
 5
5 -
 6
6 -
 7
7 -
 8
8 -
9
-
10
-
11
-
12
-
13
-
14
-
15
-
16
-
17
-
18
-
19
-
20
 |
 |
