Whirlpool UXL5430BSS Installation Guide - Page 8
Installation Instructions - hood liner
 |
View all Whirlpool UXL5430BSS manuals
Add to My Manuals
Save this manual to your list of manuals |
Page 8 highlights
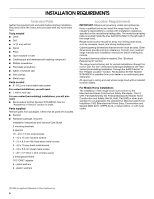
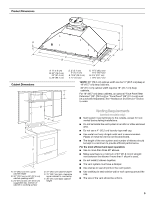
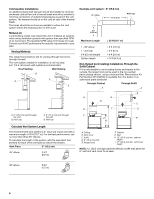
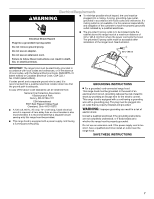
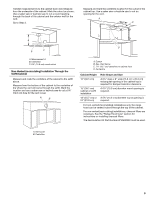
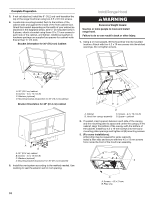
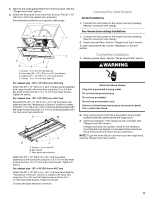
INSTALLATION INSTRUCTIONS Prepare Location ■ It is recommended that the vent system be installed before the range hood is installed. Venting Outside Through the Roof ■ Before making cutouts, make sure there is proper clearance within the ceiling or wall for vent fittings. ■ Making the cutout to the bottom of the cabinet may be easier to do prior to mounting the cabinet to the wall. 1. Disconnect power. 2. Determine which venting method to use: roof, wall, or nonvented. 3. Select a flat surface for assembling the range hood. Place covering over that surface. Measure and mark the lines as shown. Use a saber saw or keyhole saw to cut an opening through the top of the cabinet and the roof for the vent. Go to Step 3. A B* C WARNING Excessive Weight Hazard Use two or more people to move and install range hood. D Failure to do so can result in back or other injury. 4. Using 2 or more people, lift range hood onto covered surface. Range Hood Cabinet Cutout 1. Use a saber saw or keyhole saw to cut out the cabinet bottom inside the cabinet frame. NOTE: Frameless type cabinets require ¾" (1.9 cm) front lip in the cabinet bottom. A ¾" (1.9 cm) thick filler strip (not supplied) may be required for some types of cabinets. (See Step 3 in the "Install Range Hood" section.) E D A C A. Cutout B. 6¼" (15.9 cm)* C. 7³⁄₄" (19.7 cm) centerline to cabinet front D. Centerline *NOTE: For 12" (30.5 cm) high cabinets a 6¼" deep x 8" wide (14.6 cm x 20.3 cm) rectangular opening in the cabinet top is required for damper transition clearance. Venting Outside Through the Wall Install the 6" (15.2 cm) vent transition to the top of the range hood liner using two 3.5 x 9.5 mm screws. Assemble the vent duct that you will use over the 6" (15.2 cm) vent transition. Measure from the bottom of the range hood liner to the horizontal centerline of the vent opening (A). B B A. Bottom of cabinet cutout B. Bottom must be cut flush to the inside walls of the cabinet. C. 10³⁄₈" (26.4 cm) min. from the inside of the cabinet front face D 1.9 cm) thick front face required for cabinet bottom. E. Front of cabinet 2. Complete cabinet preparation following the instructions for your type of venting. Determine venting cutout locations and cut out vent openings in the cabinets, walls and/or soffit. A C A. Measurement A B. Horizontal centerline of vent opening C. Range hood liner Remove the vent duct from the range hood liner. 8
-
 1
1 -
2
-
 3
3 -
 4
4 -
 5
5 -
 6
6 -
 7
7 -
 8
8 -
 9
9 -
 10
10 -
 11
11 -
 12
12 -
 13
13 -
14
-
15
-
16
-
17
-
18
-
19
-
20
-
21
-
22
-
23
-
24
-
25
-
26
-
27
-
28
-
29
-
30
-
31
-
32
 |
 |