Whirlpool WDF310PAAD Installation Guide - Page 10
Option A, Waste disposer - no air gap, Option B, No waste disposer - no air gap, Option C, Waste
 |
View all Whirlpool WDF310PAAD manuals
Add to My Manuals
Save this manual to your list of manuals |
Page 10 highlights
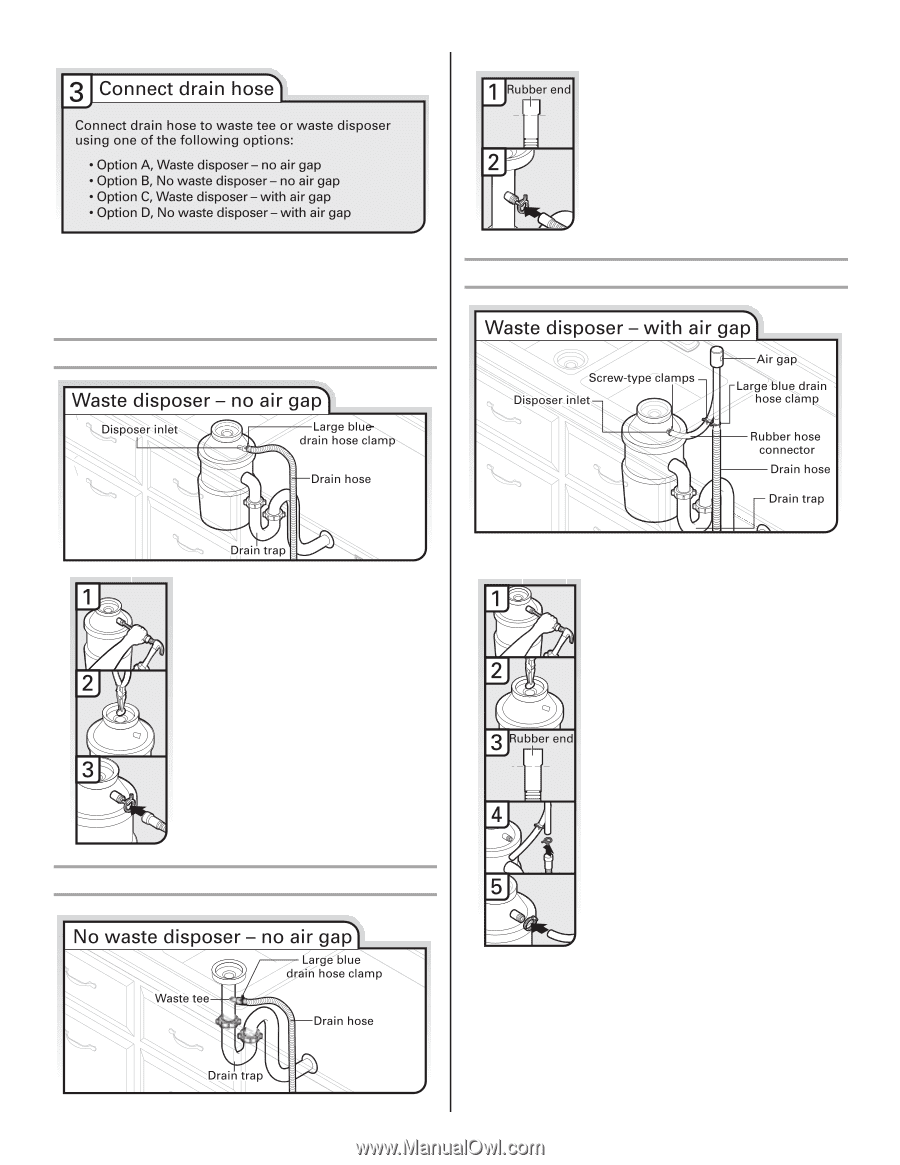
IMPORTANT: The drain hose connection of the disposer or a waste tee must be made before the drain trap and at least 20" (50.8 cm) above the floor where the dishwasher will be installed. Helpful Tip: To reduce vibration of the hose, keep the hose away from the floor. Option A, Waste disposer - no air gap 1. Fit rubber end of drain hose to waste tee and cut if needed. NOTE: Do not cut ribbed section. 2. Attach rubber end of drain hose to waste tee with a large blue drain hose clamp (provided). Use pliers to squeeze clamp open and move into position. If the drain hose was cut, use a 1¹⁄₂" to 2" (3.8 to 5 cm) screwtype clamp (not provided). Option C, Waste disposer - with air gap 1. Using a hammer and screwdriver, knock plug into disposer. 2. Use needle-nose pliers to remove plug. 3. Attach drain hose to disposer inlet with large blue drain hose clamp (provided). Use pliers to squeeze clamp open and move into position. Option B, No waste disposer - no air gap 10 1. Using a hammer and screwdriver, knock plug into disposer. 2. Use needle-nose pliers to remove plug. 3. Connect rubber end of drain hose to air gap and cut if needed. NOTE: Do not cut ribbed section. 4. Attach drain hose to air gap with large blue drain hose clamp (provided). Use pliers to squeeze clamp open and move into position. If the drain hose was cut, use a 1¹⁄₂" to 2" (3.8 to 5 cm) screw-type clamp (not provided). 5. Use a rubber hose (not provided) with screw-type clamps (not provided) to connect from air gap to disposer inlet.
-
 1
1 -
2
-
3
-
4
-
 5
5 -
 6
6 -
 7
7 -
 8
8 -
 9
9 -
 10
10 -
 11
11 -
 12
12 -
 13
13 -
 14
14 -
 15
15 -
16
-
17
-
18
-
19
-
20
-
21
-
22
-
23
-
24
-
25
-
26
-
27
-
28
-
29
-
30
-
31
-
32
-
33
-
34
-
35
-
36
-
37
-
38
-
39
-
40
-
41
-
42
-
43
-
44
-
45
-
46
-
47
-
48
 |
 |