Whirlpool WDT550SAPZ Owners Manual - Page 15
Connect Water Line to Fill Valve, If a Drain Hose Extension is Required
 |
View all Whirlpool WDT550SAPZ manuals
Add to My Manuals
Save this manual to your list of manuals |
Page 15 highlights
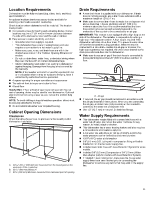
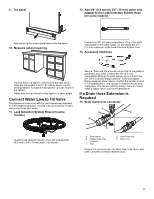
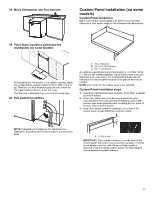
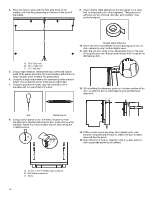
9. Toe panel 12. Add 3/8" (9.5 mm) to 3/4" (19 mm) water inlet adapter to the Leak Detection System Hose (on some models) After removing the access panel remove the toe panel. 10. Measure cabinet opening Connect the 3/8" (9.5 mm) compression fitting of the water inlet adapter to the water supply line and attach the 3/4" (19 mm) connection to the Leak Detection System hose . 13. Accessory inlet hose There is a leveling system on the front of the base carrier. Once the dishwasher is within the cabinet space, use the leveling adjuster to adjust the dishwasher up to the height of the cabinet. Adjust both front and back leveling legs to the same height. Connect Water Line to Fill Valve The dishwasher may come with the inlet hose already attached with a threaded connection. It needs to be connected to the inlet end on the house connection. 11. Leak Detection System Hose (on some models) See the "Tools and Parts" section at the front of the guide for part details and order. Connect the 3/8" (9.5 mm) compression fitting to the water supply line and Attach the 3/4" (19 mm) elbow fitting connection to the dishwasher facing upward as shown above. Confirm the flexible braided or non braided line is long enough to reach the house water connection. If the hose is not long enough, have a plumber install a supply valve closer to the dishwasher. If a Drain Hose Extension is Required 14. Slide clamp onto connector A D E B Use the Leak Detection System hose with included 3/8" (9.5 mm) to 3/4" (19 mm) water inlet adapter. C A. Silver clamp B. Rubber drain hose connector C. Stop D. Drain hose stop E. Drain hose Using pliers, squeeze open the silver drain hose clamp, and slide it onto the connector between stops. 15
-
 1
1 -
2
-
3
-
4
-
5
-
6
-
7
-
8
-
9
-
 10
10 -
 11
11 -
 12
12 -
 13
13 -
 14
14 -
 15
15 -
 16
16 -
 17
17 -
 18
18 -
 19
19 -
 20
20 -
21
-
22
-
23
-
24
-
25
-
26
-
27
-
28
-
29
-
30
-
31
-
32
-
33
-
34
-
35
-
36
-
37
-
38
-
39
-
40
-
41
-
42
-
43
-
44
-
45
-
46
-
47
-
48
-
49
-
50
-
51
-
52
-
53
-
54
-
55
-
56
-
57
-
58
-
59
-
60
-
61
-
62
-
63
-
64
 |
 |
