Whirlpool WDTA50SAHV Installation Guide - Page 22
Option A: Waste disposer - no air gap, CONNECT WATER LINE TO HOUSE, SHUT-OFF VALVE, CONNECT DRAIN
 |
View all Whirlpool WDTA50SAHV manuals
Add to My Manuals
Save this manual to your list of manuals |
Page 22 highlights
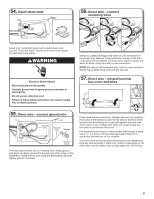
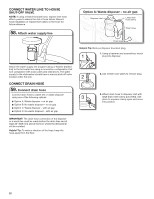
CONNECT WATER LINE TO HOUSE SHUT-OFF VALVE NOTE: If using a flexible braided hose, replace inlet hose after 5 years to reduce the risk of hose failure. Record hose installation or replacement dates on the hose for future reference. 58. Attach water supply line Option A: Waste disposer - no air gap Disposer inlet Large drain hose clamp Drain hose Drain trap Helpful Tip: Remove disposer knockout plug. 1. Using a hammer and screwdriver, knock 1 plug into disposer. Attach the water supply line (copper tubing or flexible braided line) to the hot water line using a connection configuration that is in compliance with local codes and ordinances. The water supply to the dishwasher should have a manual shut-off valve located under the sink. 2 CONNECT DRAIN HOSE 59. Connect drain hose Connect drain hose to waste tee or waste disposer using one of the following options: 3 ■■ Option A: Waste disposer - no air gap ■■ Option B: No waste disposer - no air gap ■■ Option C: Waste disposer - with air gap ■■ Option D: No waste disposer - with air gap IMPORTANT: The drain hose connection of the disposer or a waste tee must be made before the drain trap and at least 20" (508 mm) above the floor where the dishwasher will be installed. Helpful Tip: To reduce vibration of the hose, keep the hose away from the floor. 2. Use needle-nose pliers to remove plug. 3. Attach drain hose to disposer inlet with large drain hose clamp (provided). Use pliers to squeeze clamp open and move into position. 22
-
 1
1 -
2
-
3
-
4
-
5
-
6
-
7
-
8
-
9
-
10
-
11
-
12
-
13
-
14
-
15
-
16
-
 17
17 -
 18
18 -
 19
19 -
 20
20 -
 21
21 -
 22
22 -
 23
23 -
 24
24 -
 25
25 -
 26
26 -
 27
27 -
28
-
29
-
30
-
31
-
32
-
33
-
34
-
35
-
36
-
37
-
38
-
39
-
40
-
41
-
42
-
43
-
44
-
45
-
46
-
47
-
48
-
49
-
50
-
51
-
52
-
53
-
54
-
55
-
56
-
57
-
58
-
59
-
60
-
61
-
62
-
63
-
64
-
65
-
66
-
67
-
68
-
69
-
70
-
71
-
72
-
73
-
74
-
75
-
76
 |
 |
