Whirlpool WED7500GC Installation Instructions
Whirlpool WED7500GC Manual
 |
View all Whirlpool WED7500GC manuals
Add to My Manuals
Save this manual to your list of manuals |
Whirlpool WED7500GC manual content summary:
- Whirlpool WED7500GC | Installation Instructions - Page 1
of Contents Table des matières DRYER SAFETY 2 INSTALLATION REQUIREMENTS 4 Tools and Parts 4 LOCATION REQUIREMENTS 5 Installation Clearances 5 Dryer Dimensions 5 ELECTRICAL REQUIREMENTS - U.S.A. ONLY 6 Grounding Instructions 7 ELECTRIC DRYER POWER HOOKUP - CANADA ONLY.......... 7 Electrical - Whirlpool WED7500GC | Installation Instructions - Page 2
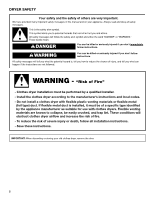
DRYER SAFETY IMPORTANT: When discarding or storing your old clothes dryer, remove the door. 2 - Whirlpool WED7500GC | Installation Instructions - Page 3
3 - Whirlpool WED7500GC | Installation Instructions - Page 4
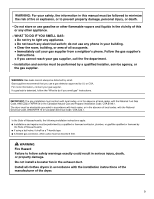
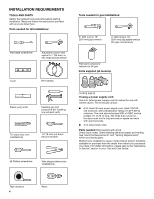
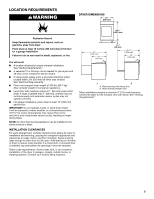
Requirements" before purchasing parts. Mobile home installations require metal exhaust system hardware available for purchase from the dealer from whom you purchased your dryer. For further information, please refer to the "Assistance or Service" section in your "Use and Care Guide." Tape measure - Whirlpool WED7500GC | Installation Instructions - Page 5
within 2 ft. (610 mm) of either side of dryer. See "Electrical Requirements." ■■ Floor must support dryer weight of 200 lbs. (90.7 kg). Also consider weight , consider allowing more space for ease of installation and servicing, spacing for companion appliances and clearances for walls, doors - Whirlpool WED7500GC | Installation Instructions - Page 6
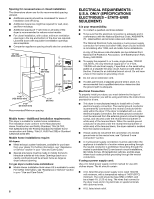
Part 280) or Standard CAN/CSA-Z240 MH. Mobile home installations require: All dryers: ■■ Metal exhaust system hardware, available for purchase from your dealer. For further information, see "Assistance or Service" section in your "Use and Care Guide instructions provided for it here. ■■ This dryer - Whirlpool WED7500GC | Installation Instructions - Page 7
. 4-wire receptacle (14-30R) For further information, please reference service numbers located in "Assistance or Service" section of your "Use and Care Guide." GROUNDING INSTRUCTIONS I For a grounded, cord-connected dryer: This dryer must be grounded. In the event of malfunction or breakdown - Whirlpool WED7500GC | Installation Instructions - Page 8
ed electrician or service representative or personnel if you are in doubt as to whether the dryer is properly grounded. Do not modify the plug provided with the dryer: if it will not t the outlet, have a proper outlet installed by a quali ed electrician. SAVE THESE INSTRUCTIONS 8 GAS TYPE Natural - Whirlpool WED7500GC | Installation Instructions - Page 9
manual shut-off valve must be installed within six (6) ft. (1.8 m) of the dryer A B D 1. Prepare dryer for leveling legs A. 3/8" flexible connector and the dryer gas pipe, as needed to avoid of dryer. Now stand the dryer on its feet. Slide the dryer until home use Gas dryers must be securely - Whirlpool WED7500GC | Installation Instructions - Page 10
the two clamp sections (C) into the hole below the terminal block opening (B) so that one tab is pointing toward the dryer (A) and the other is pointing away from the dryer (D), and hold in place. Tighten strain relief screws just enough to hold the two clamp sections (C) together. 2. Attach power - Whirlpool WED7500GC | Installation Instructions - Page 11
screw (A). Reinstall ground conductor screw (A). Connect remaining wires to outer terminal block screws. Tighten screws. Finally, reinsert tab of terminal block cover into slot of dryer rear panel. Secure cover with hold-down screw. Now, go to "Venting Requirements." 11 - Whirlpool WED7500GC | Installation Instructions - Page 12
center screw B Connect remaining wires to outer terminal block screws. Tighten screws. Finally, reinsert tab of terminal block cover into slot of dryer rear panel. Secure cover with hold-down screws. Now, go to "Venting Requirements." DIRECT WIRE CONNECTION Remove center terminal block screw - Whirlpool WED7500GC | Installation Instructions - Page 13
wire connections. 1. Prepare your 4-wire cable for direct connection 3½" (89 mm) (127 5" mm) Direct wire cable must have 5 ft. (1.52 m) of extra length so dryer may be moved if needed. Strip 5" (127 mm) of outer covering from end of cable, leaving bare ground wire at 5" (127 mm). Cut 11/2" (38 - Whirlpool WED7500GC | Installation Instructions - Page 14
screws. Finally, reinsert tab of terminal block cover into slot of dryer rear panel. Secure cover with hold-down screw. Now, go to "mm) (893m½m" ) Direct wire cable must have 5 ft. (1.52 m) of extra length so dryer may be moved if needed. Strip 31/2" (89 mm) of outer covering from end of cable. - Whirlpool WED7500GC | Installation Instructions - Page 15
copper ground wire (G) from the external ground conductor screw (A) to an adequate ground. Finally, reinsert tab of terminal block cover into slot of dryer rear panel. Secure cover with hold-down screw. Now, go to "Venting Requirements." Connect neutral ground wire (E) and neutral wire (white or - Whirlpool WED7500GC | Installation Instructions - Page 16
(Acceptable only if accessible to clean) ■■ Must be fully extended and supported in final dryer location. ■■ Remove excess to avoid sagging and kinking that may result rigid metal or flexible metal vents. Review Vent System Chart and, if necessary, modify existing vent system to achieve best drying - Whirlpool WED7500GC | Installation Instructions - Page 17
bottom and sides. You must contact your local dealer to have dryer converted. Vent products can be purchased from your dealer. For more information, see "Assistance or Service" section in your "Use and Care Guide." A B C A. Standard rear offset exhaust installation B. Left or right side exhaust - Whirlpool WED7500GC | Installation Instructions - Page 18
hood. 2. Connect vent to exhaust hood Vent must fit over the exhaust hood. Secure vent to exhaust hood with 4" (102 mm) clamp. Run vent to dryer location using straightest path possible. Avoid 90° turns. Use clamps to seal all joints. Do not use duct tape, screws, or other fastening devices that - Whirlpool WED7500GC | Installation Instructions - Page 19
be level for the moisture sensing system to operate correctly. Not Level LEVEL 2. Adjust leveling legs Not Level Move dryer to final location. Avoid crushing or kinking vent. If dryer is not level, prop up using a wood block. Use wrench to adjust legs up or down, and check again for levelness - Whirlpool WED7500GC | Installation Instructions - Page 20
first cycle. If you receive an L2 code, there may be a problem with your home power supply keeping the dryer's heater from turning on. See "Troubleshooting." If your Airflow screen reads "Check Vent", your dryer vent may be crushed or blocked. See "Troubleshooting." NOTE: You may notice an odor when - Whirlpool WED7500GC | Installation Instructions - Page 21
Lift door until top screws in dryer cabinet are in large part of hinge slot. Pull door forward off screws. Set door (handle side up) on top of dryer. Remove top screws from dryer cabinet. 4. Remove screws from hinges Open dryer door. Remove bottom screws from dryer cabinet side of hinges. Loosen - Whirlpool WED7500GC | Installation Instructions - Page 22
inner door panel so handle is on the side where hinges were just removed. Insert 4 door screws. Remove door strike and door strike label from dryer cabinet. Insert the door strike into hole where door strike label was removed and secure with screw. Cover original door strike hole with door strike - Whirlpool WED7500GC | Installation Instructions - Page 23
is needed, slide door catch left or right within slot to adjust alignment. TROUBLESHOOTING See the Use and Care Guide or visit our website and reference "Frequently Asked Questions" to possibly avoid the cost of a service call. NOTE: 2 people may be needed to reinstall door. Insert screws into the - Whirlpool WED7500GC | Installation Instructions - Page 24
SÉCURITÉ DE LA SÉCHEUSE IMPORTANT : Pour mettre l'ancienne sécheuse au rebut ou pour la remiser, enlever la porte. 24 - Whirlpool WED7500GC | Installation Instructions - Page 25
25 - Whirlpool WED7500GC | Installation Instructions - Page 26
EXIGENCES D'INSTALLATION OUTILLAGE ET PIÈCES Rassembler les outils et pièces nécessaires avant d'entreprendre l'installation. Lire et observer les instructions fournies avec chacun des outils de la liste ci-dessous. Outils nécessaires à toutes les installations : Outils nécessaires pour les - Whirlpool WED7500GC | Installation Instructions - Page 27
le marchand chez qui vous avez acheté votre sécheuse. Pour plus d'informations, voir la section "Assistance ou service" dans le "Guide d'utilisation et d'entretien". EXIGENCES D'EMPLACEMENT DISTANCES DE DÉGAGEMENT À RESPECTER POUR L'INSTALLATION Pour chaque configuration, on peut éventuellement - Whirlpool WED7500GC | Installation Instructions - Page 28
Un système d'évacuation en métal est disponible à l'achat chez votre revendeur. Pour plus d'informations, voir la section "Assistance ou service" dans le "Guide d'utilisation et d'entretien". ■■ Il faut prendre des dispositions spéciales dans les résidences mobiles pour l'apport d'air de l'extérieur - Whirlpool WED7500GC | Installation Instructions - Page 29
informations, consulter les numéros de dépannage dans la section "Assistance ou service" du "Guide d'utilisation et d'entretien". RACCORDEMENT ÉLECTRIQUE DE LA SÉCHEUSE À GAZ - ÉTATS-UNIS ET CANADA SPÉCIFICATIONS ÉLECTRIQUES INSTRUCTIONS DE LIAISON À LA TERRE Pour une sécheuse reliée à la terre et - Whirlpool WED7500GC | Installation Instructions - Page 30
type de gaz disponible, contacter votre revendeur ou composer les numéros de téléphone indiqués dans la section "Assistance ou service" de votre "Guide d'utilisation et d'entretien". Conduit d'aluminium ou de cuivre approuvé : ■■ La canalisation doit comprendre un connecteur obturé (filetage NPT de - Whirlpool WED7500GC | Installation Instructions - Page 31
au plancher. Les installations en résidence mobile nécessitent un ensemble d'ancrage au sol pour installation en résidence mobile. Pour le processus de commande, consulter le "Guide d'utilisation et d'entretien". 31 - Whirlpool WED7500GC | Installation Instructions - Page 32
RACCORDEMENT AU GAZ ÉTATS-UNIS ET CANADA 1. Raccorder l'alimentation en gaz à la sécheuse L'ÉVACUATION EXIGENCES CONCERNANT L'ÉVACUATION Raccord mâle Aconique Raccord mcoânleiqnuBoen Retirer le capuchon rouge de la canalisation de gaz. À l'aide d'une clé pour serrer, raccorder l'alimentation en - Whirlpool WED7500GC | Installation Instructions - Page 33
ériel d'évacuation peut être acheté auprès de votre revendeur. Pour plus d'informations, voir la section "Assistance ou service" du "Guide d'utilisation et d'entretien". PLANIFICATION DES CIRCUITS DE CONDUITS Installations d'évacuation recommandées Les installations typiques consistent à acheminer - Whirlpool WED7500GC | Installation Instructions - Page 34
Installations d'évacuation facultatives : Si vous préférez, la sécheuse peut être convertie pour évacuer par le bas et les côtés. Contactez votre revendeur local pour convertir la sécheuse. Déterminer la longueur du conduit et le nombre de coudes nécessaires pour une performance optimale de séchage - Whirlpool WED7500GC | Installation Instructions - Page 35
2. Raccordement du conduit d'évacuation au clapet 2. Placer la sécheuse à son emplacement final Le conduit doit être placé par dessus le clapet d'évacuation. Fixer ensemble le conduit et le clapet avec une bride de 4" (102 mm). Acheminer le conduit jusqu'à l'emplacement de la sécheuse en utilisant - Whirlpool WED7500GC | Installation Instructions - Page 36
de la sécheuse avec un chiffon humide pour éliminer toute trace de poussière. q Lire la section "Utilisation de la sécheuse" dans le "Guide d'utilisation et d'entretien". Modèles électriques : q Pour une installation avec cordon d'alimentation, brancher sur une prise reliée à la terre. Pour une - Whirlpool WED7500GC | Installation Instructions - Page 37
INVERSION DE L'OUVERTURE DE LA PORTE 1. Placer une serviette sur le sèche-linge 3. Soulever la porte pour la dégager des vis supérieures Placer la serviette sur le dessus du sèche-linge pour éviter d'endommager la surface. 2. Ôter les vis inférieures Soulever la porte jusqu'à ce que les vis supé - Whirlpool WED7500GC | Installation Instructions - Page 38
6. Ôter les vis de la porte 9. Fixer les charnières de porte Retirer les vis du sommet, du bas et du côté de la porte (4 vis). Conserver séparément les vis de porte et les vis de charnière, car elles sont de tailles différentes. 7. Séparer la partie interne du externe. En tenant la porte sur une - Whirlpool WED7500GC | Installation Instructions - Page 39
piton de retenue de la porte vers la gauche ou vers la droite à l'intérieur de l'encoche pour régler l'alignement. DÉPANNAGE Voir le guide d'utilisation et d'entretien ou consulter notre site Web et la Foire aux questions pour éventuellement éviter le coût d'une intervention de réparation. REMARQUE - Whirlpool WED7500GC | Installation Instructions - Page 40
W10904260B W10904262B-SP ®/™ ©2016. All rights reserved. Tous droits réservés. 12/16
-
 1
1 -
 2
2 -
 3
3 -
 4
4 -
 5
5 -
 6
6 -
 7
7 -
8
-
9
-
10
-
11
-
12
-
13
-
14
-
15
-
16
-
17
-
18
-
19
-
20
-
21
-
22
-
23
-
24
-
25
-
26
-
27
-
28
-
29
-
30
-
31
-
32
-
33
-
34
-
35
-
36
-
37
-
38
-
39
-
40
 |
 |

W10904260B
W10904262B-SP
Table of Contents
DRYER SAFETY
..........................................................................
2
INSTALLATION REQUIREMENTS
.........................................
4
Tools and Parts
....................................................................
4
LOCATION REQUIREMENTS
.....................................................
5
Installation Clearances
.......................................................
5
Dryer Dimensions
................................................................
5
ELECTRICAL REQUIREMENTS - U.S.A. ONLY
........................
6
Grounding Instructions
.......................................................
7
ELECTRIC DRYER POWER HOOKUP - CANADA ONLY
.........
7
Electrical Requirements
.....................................................
7
Grounding Instructions
.......................................................
7
GAS DRYER POWER HOOKUP - U.S.A. AND CANADA
..........
8
Electrical Requirements
.....................................................
8
Grounding Instructions
.......................................................
8
Gas Supply Requirements
..................................................
8
Gas Type
...............................................................................
8
Gas Supply Line
...................................................................
8
Gas Supply Connection Requirements
.............................
9
Burner Input Requirements
................................................
9
Dryer Gas Pipe
.....................................................................
9
INSTALL LEVELING LEGS
..........................................................
9
MAKE ELECTRICAL CONNECTION - U.S.A. ONLY
...............
10
Electrical Connection
........................................................
10
Power Supply Cord Connection
.......................................
10
Direct Wire Connection
.....................................................
12
MAKE GAS CONNECTION - U.S.A. AND CANADA
................
16
VENTING
....................................................................................
16
Venting Requirements
.......................................................
16
Plan Vent System
...............................................................
17
Install Vent System
............................................................
18
CONNECT VENT
.......................................................................
19
LEVEL DRYER
...........................................................................
19
COMPLETE INSTALLATION CHECKLIST
...............................
20
REVERSE DOOR SWING
..........................................................
21
TROUBLESHOOTING
...............................................................
23
INSTALLATION NOTES
Date of purchase:
_________________________________
Date of installation:
_______________________________
Installer:
________________________________________
Model number:
___________________________________
Serial number:
___________________________________
Date d’achat :
_____________________________________
Date d’installation :
________________________________
Installateur :
______________________________________
Numéro de modèle :
________________________________
Numéro de série :
__________________________________
NOTES CONCERNANT L’INSTALLATION
Table des matières
SÉCURITÉ DE LA SÉCHEUSE
..................................................
24
EXIGENCES D’INSTALLATION
............................................
26
Outillage et pièces
.............................................................
26
EXIGENCES D’EMPLACEMENT
...............................................
27
Distances de dégagement à respecter pour
l’installation
.........................................................................
27
Dimensions de la sécheuse
...............................................
27
RACCORDEMENT DE LA SÉCHEUSE
ÉLECTRIQUE – CANADA SEULEMENT
...................................
28
Spécifications électriques
.................................................
28
Instructions de liaison à la terre
.......................................
29
RACCORDEMENT ÉLECTRIQUE DE LA SÉCHEUSE
À GAZ - ÉTATS-UNIS ET CANADA
...........................................
29
Spécifications électriques
.................................................
29
Instructions de liaison à la terre
.......................................
29
Spécifications de l’alimentation en gaz
...........................
30
Type de gaz
.........................................................................
30
Canalisation de gaz
............................................................
30
Spécifications du raccordement de
l’alimentation en gaz
..........................................................
31
Spécifications de l’alimentation du bruler
.......................
31
INSTALLATION DES PIEDS DE NIVELLEMENT
......................
31
RACCORDEMENT AU GAZ - ÉTATS-UNIS ET CANADA
........
32
L’EVACUATION
...........................................................................
32
Exigences concernant l’evacuation
.................................
32
Planification des circuits de conduits
..............................
33
Installation du système d’évacuation
...............................
34
RACCORDEMENT DU SYSTÈME D’ÉVACUATION
.................
35
ÉTABLIR L’APLOMB DE LA SÉCHEUSE
..................................
36
ACHEVER L’INSTALLATION LISTE DE VÉRIFICATION
..........
36
INVERSION DU SENS D’OUVERTURE DE LA PORTE
............
37
DÉPANNAGE
..............................................................................
39
Gas and Electric Dryer
Installation Instructions
Para obtener acceso al “Instrucciones de instalación” en español, o para obtener información
adicional acerca de su producto, visite: www.whirlpool.com
Tenga listo su número de modelo completo. Puede encontrar el número de modelo
y de serie dentro de la cavidad superior de la puerta.
Instructions d’installation –
Sécheuse à gaz et électrique