Whirlpool WEG730H0DS Installation Guide - Page 24
Adjust Oven Broil Burner Flame if needed
 |
View all Whirlpool WEG730H0DS manuals
Add to My Manuals
Save this manual to your list of manuals |
Page 24 highlights
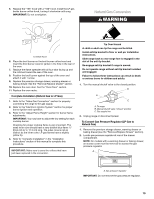
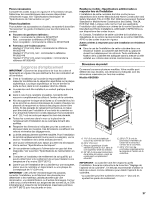
Adjust Oven Broil Burner Flame (if needed) Press BROIL, then press the start pad. Look through the oven window to check broil burner for proper flame. This flame should have a ½" (1.3 cm) long inner cone of bluish-green, with an outer mantle of dark blue, and should be clean and soft in character. No yellow tips, blowing or lifting of flame should be present. If flame needs to be adjusted: 1. Press the off pad. Let the oven cool. 2. Loosen the lock screw on the air shutter located at the rear of the broil burner. 3. Adjust the air shutter as needed. A 4. Tighten lock screw. B A. Lock screw B. Air shutter 5. Close the oven door. Press BROIL, then press the start pad. Look through the oven window to check broil burner for proper flame. If flame needs to be adjusted, repeat steps 1-5. 24
-
 1
1 -
2
-
3
-
4
-
5
-
6
-
7
-
8
-
9
-
10
-
11
-
12
-
13
-
14
-
15
-
16
-
17
-
18
-
 19
19 -
 20
20 -
 21
21 -
 22
22 -
 23
23 -
 24
24 -
 25
25 -
 26
26 -
 27
27 -
 28
28 -
 29
29 -
30
-
31
-
32
-
33
-
34
-
35
-
36
-
37
-
38
-
39
-
40
-
41
-
42
-
43
-
44
-
45
-
46
-
47
-
48
 |
 |
