Whirlpool WEG750H0H Instrucciones de instalacion - Page 14
Electronic Ignition System, Remove/Replace Drawer
 |
View all Whirlpool WEG750H0H manuals
Add to My Manuals
Save this manual to your list of manuals |
Page 14 highlights
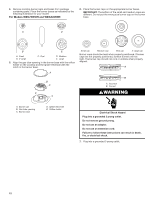
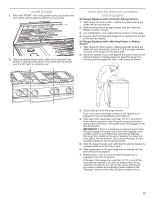
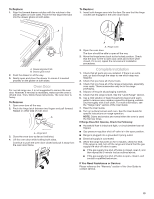
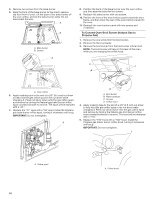
8. Move the range into its final location. Check that the range is level by placing a level on the oven bottom. See the "Level Range" section. IMPORTANT: If the range is moved to adjust the leveling legs, verify that the anti-tip bracket is engaged by repeating steps 1 to 8. Electronic Ignition System Initial Lighting and Gas Flame Adjustments Cooktop and oven burners use electronic igniters in place of standing pilots. When the cooktop control knob is turned to the ignite position, the system creates a spark to light the burner. All cooktop burners will spark, but only the burner with the control knob turned to the ignite position will produce a flame. This sparking continues as long as the control knob is turned to the ignite position. When the oven control is turned to the desired setting, sparking occurs and ignites the gas. Check Operation of Cooktop Burners Standard Surface Burners Push in and turn each control knob to the ignite position. The flame should light within 4 seconds. The first time a burner is lit, it may take longer than 4 seconds to light because of air in the gas line. If Burners Do Not Light Properly: ■■ Turn cooktop control knob to the off position. ■■ Check that the range is plugged into a grounded 3 prong outlet. Check that the circuit breaker has not tripped or the household fuse has not blown. ■■ Check that the gas shut-off valves are set to the open position. ■■ Check that burner caps are properly positioned on burner bases. Repeat start-up. If a burner does not light at this point, turn the control knobs to the off position and contact your dealer or authorized service company for assistance. Please reference the "Warranty" section of the User Guide to contact service If the cooktop "low" burner flame needs to be adjusted for any of the burners, see the "Adjust Flame Height" section. Check Operation of Oven Bake Burner 1. Press BAKE. 2. Press the Start pad. The oven burner should light within 8 seconds. The first time a burner is lit, it may take longer than 8 seconds to light because of air in the gas line. 3. After 2 minutes, open the oven door and check that the oven is warm. If Burner Does Not Light Properly: ■■ Press the Off pad. ■■ Check that the range is plugged into a grounded 3 prong outlet. Check that the circuit breaker has not tripped or the household fuse has not blown. ■■ Check that the gas shut-off valves are set to the open position. Repeat steps 1 to 3. If the burner does not light at this point, press the off pad and contact your dealer or authorized service company for assistance. Please reference the "Warranty" section of the User Guide to contact service If the bake burner flame needs to be adjusted, see the "Adjust Flame Height" section. Refer to the User Guide for proper operation of the oven controls. Check Operation of Oven Broil Burner 1. Close the oven door. 2. Press BROIL. 3. Press the Start pad. The oven burner should light within 8 seconds. The first time a burner is lit, it may take longer than 8 seconds to light because of air in the gas line. 4. After 2 minutes, open the oven door and check that the oven is warm. If Burner Does Not Light Properly: ■■ Press the Off pad. ■■ Check that the range is plugged into a grounded 3 prong outlet. Check that the circuit breaker has not tripped or the household fuse has not blown. ■■ Check that the gas shut-off valves are set to the open position. Repeat steps 1 to 3. If the burner does not light at this point, press the off pad and contact your dealer or authorized service company for assistance. Please reference the "Warranty" section of the User Guide to contact service If the broil burner flame needs to be adjusted, see the "Adjust Flame Height" section. Refer to the User Guide for proper operation of the oven controls. Remove/Replace Drawer (on some models) Remove all items from inside the baking drawer, warming drawer or premium storage drawer, and then allow the range to cool completely before attempting to remove the drawer. To Remove: 1. Open the drawer to its fully open position. 2. Using a flat-blade screwdriver, gently loosen the drawer from the glide alignment notch, and then lift up the drawer alignment tab from the glide. A B C A. Flat-blade screwdriver B. Drawer alignment tab C. Drawer glide notch 3. Repeat Step 2 on the other side. The drawer is no longer attached to the drawer glides. Using both hands, pick up the drawer to complete the removal. 14
-
 1
1 -
2
-
3
-
4
-
5
-
6
-
7
-
8
-
 9
9 -
 10
10 -
 11
11 -
 12
12 -
 13
13 -
 14
14 -
 15
15 -
 16
16 -
 17
17 -
 18
18 -
 19
19 -
20
-
21
-
22
-
23
-
24
-
25
-
26
-
27
-
28
-
29
-
30
-
31
-
32
-
33
-
34
-
35
-
36
-
37
-
38
-
39
-
40
-
41
-
42
-
43
-
44
-
45
-
46
-
47
-
48
-
49
-
50
-
51
-
52
-
53
-
54
-
55
-
56
-
57
-
58
-
59
-
60
-
61
-
62
-
63
-
64
-
65
-
66
-
67
-
68
-
69
-
70
-
71
-
72
 |
 |