Whirlpool WFG745H0FE Installation Guide - Page 12
Warming Drawer or Premium Storage, Drawer
 |
View all Whirlpool WFG745H0FE manuals
Add to My Manuals
Save this manual to your list of manuals |
Page 12 highlights
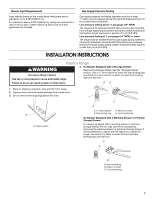
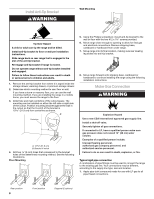
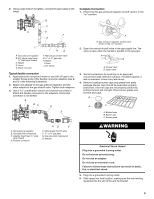
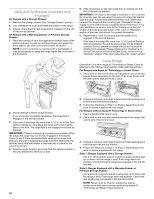
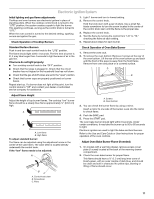
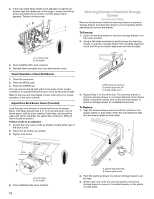
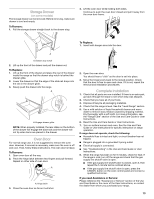
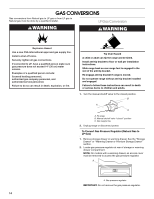
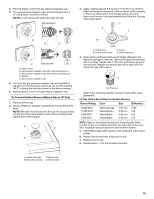
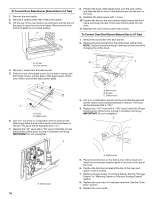
3. If the oven bake flame needs to be adjusted, locate the air shutter near the center rear of the range. Loosen the locking screw and rotate the air shutter until the proper flame appears. Tighten locking screw. A B Warming Drawer or Premium Storage Drawer (on some models) Remove all items from inside the warming drawer or premium storage drawer, and allow the range to cool completely before attempting to remove the drawer. To Remove: 1. Open the warming drawer or premium storage drawer to its fully open position. 2. Using a flat-blade screwdriver, gently loosen the warming drawer or premium storage drawer from the glide alignment notch and lift up the drawer alignment tab from the glide. A A. Locking screw B. Air shutter 4. Push CANCEL/OFF when finished. 5. Reinstall flame spreader and oven bake burner cover. Check Operation of Oven Broil Burner 1. Close the oven door. 2. Press the BROIL pad. 3. Press the START pad. The oven burner should light within 8 seconds. Under certain conditions, it may take the burner up to 50 to 60 seconds to light. Refer to the Use and Care Guide or User Instructions for proper operation of the oven controls. Adjust Oven Broil Burner Flame (if needed) Look through oven window to check broil burner for proper flame. This flame should have a ½" (1.3 cm) long inner cone of bluish-green, with an outer mantle of dark blue, and should be clean and soft in character. No yellow tips, blowing or lifting of flame should be present. If flame needs to be adjusted: 1. Loosen the lock screw on the air shutter located at the rear of the broil burner. 2. Adjust the air shutter as needed. 3. Tighten lock screw. B C A. Flat-blade screwdriver B. Drawer alignment tab C. Drawer glide notch 3. Repeat Step 2 on the other side. The warming drawer or premium storage drawer is no longer attached to the drawer glides. Using both hands, pick up the warming drawer or premium storage drawer to complete the removal. To Replace: 1. Align the forward drawer notches with the notches in the drawer glides on both sides. Place the rear alignment tabs into the drawer glides on both sides. A A B A. Lock screw B. Air shutter 4. Press CANCEL/OFF when finished. 12 B A. Drawer alignment tab B. Drawer glide notch 2. Push the warming drawer or premium storage drawer in all the way. 3. Gently open and close the warming drawer or premium storage drawer to ensure it is seated properly on the glides on both sides.
-
 1
1 -
2
-
3
-
4
-
5
-
6
-
 7
7 -
 8
8 -
 9
9 -
 10
10 -
 11
11 -
 12
12 -
 13
13 -
 14
14 -
 15
15 -
 16
16 -
 17
17 -
18
-
19
-
20
-
21
-
22
-
23
-
24
-
25
-
26
-
27
-
28
-
29
-
30
-
31
-
32
-
33
-
34
-
35
-
36
-
37
-
38
-
39
-
40
 |
 |
