Whirlpool WFG775H0H Owners Manual - Page 7
Surface Grates, Burner Size, To Clean
 |
View all Whirlpool WFG775H0H manuals
Add to My Manuals
Save this manual to your list of manuals |
Page 7 highlights
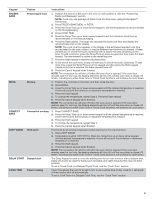
To Clean: IMPORTANT: Before cleaning, make sure all controls are off and the oven and cooktop are cool. Do not use oven cleaners, bleach, or rust removers. 1. Remove the burner cap from the burner base and clean according to the "General Cleaning" section. 2. Clean the gas tube opening with a damp cloth. 3. Clean clogged burner ports with a straight pin as shown. Do not enlarge or distort the port. Do not use a wooden toothpick. If the burner needs to be adjusted, contact a trained repair specialist. The surface grates interlock using the hook on one end of the grate and the indent on the other. To remove the grates, lift the rear of the left grate off the hook, and then lift the front of the right grate off the hook and pull apart. To replace the grates, replace the left grate first. Place the front indent of the right grate over the hook of the left grate, and then lift the rear of the left grate and place the indent over the hook on the right grate. 4. Replace the burner cap, making sure the alignment pins are properly aligned with the burner cap. A B A. Incorrect B. Correct 5. Turn on the burner. If the burner does not light, check cap alignment. If the burner still does not light, do not service the sealed burner yourself. Contact a trained repair specialist. Surface Grates The grates must be properly positioned before cooking. In the proper position, the grates should be flush and level. Improper installation of the grates may result in chipping or scratching of the cooktop. To ensure proper positioning, align bumpers on grate bottom with the indentations in the cooktop. B A A. Bumpers B. Alignment indentations A B A A. Hook B. Indent Although the burner grates are durable, they will gradually lose their shine and/or discolor due to the high temperatures of the gas flame. Burner Size Select a burner that best fits your cookware. See the following illustration and chart. X-Large (most powerful) Oval X-Large (most powerful) Burner Size Small Medium Oval Extra-Large Recommended Use ■■ Low-heat cooking ■■ Melting chocolate or butter ■■ Multipurpose burner ■■ Multipurpose burner ■■ Most powerful burner ■■ For large cookware 7
-
 1
1 -
 2
2 -
 3
3 -
 4
4 -
 5
5 -
 6
6 -
 7
7 -
 8
8 -
 9
9 -
 10
10 -
 11
11 -
 12
12 -
13
-
14
-
15
-
16
-
17
-
18
-
19
-
20
-
21
-
22
-
23
-
24
-
25
-
26
-
27
-
28
-
29
-
30
-
31
-
32
-
33
-
34
-
35
-
36
-
37
-
38
-
39
-
40
-
41
-
42
-
43
-
44
-
45
-
46
-
47
-
48
-
49
-
50
-
51
-
52
-
53
-
54
-
55
-
56
-
57
-
58
-
59
-
60
-
61
-
62
-
63
-
64
-
65
-
66
-
67
-
68
 |
 |
