Whirlpool WOS51EC7HB Owners Manual - Page 9
Aluminum Foil, Positioning Racks and Bakeware - wall oven
 |
View all Whirlpool WOS51EC7HB manuals
Add to My Manuals
Save this manual to your list of manuals |
Page 9 highlights
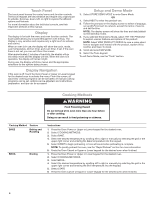
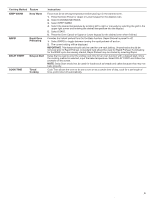
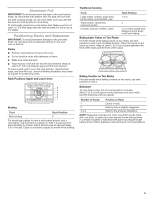
Aluminum Foil IMPORTANT: To avoid permanent damage to the oven bottom finish, do not line the oven bottom with any type of foil or liner. For best cooking results, do not cover entire oven rack with foil because air must be able to move freely. To catch spills, place foil on rack below dish. Make sure foil is at least 1/2" (13 mm) larger than the dish and that it is turned up at the edges. Positioning Racks and Bakeware IMPORTANT: To avoid permanent damage to the porcelain finish, do not place food or bakeware directly on the oven door or bottom. Racks ■■ Position racks before turning on the oven. ■■ Do not position racks with bakeware on them. ■■ Make sure racks are level. ■■ Place food so it will not rise into the broil element. Allow at least 1/2" (13 mm) between pans and the broil element. To move a rack, pull it out to the stop position, raise the front edge, and then lift it out. Use the following illustration and charts as a guide for positioning racks. Rack Positions: Upper and Lower Oven 6 5 4 3 2 1 Broiling Food Rack Position Most broiling 6 For hamburger patties to have a well-seared exterior and a rare interior, use a flat rack in position 6. Side 1 should cook for approximately 3 minutes. Side 2 should cook for approximately 3 to 4 minutes. Expect a moderate degree of smoke when broiling. Traditional Cooking Food Rack Position Large roasts, turkeys, angel food, bundt cakes, quick breads, pies 1 or 2 Yeast breads, casseroles, 2 meat and poultry Cookies, biscuits, muffins, cakes 2 or 3 when single-rack baking; 2 and 5 when multi-rack baking. Baking Layer Cakes on Two Racks For best results when baking cakes on two racks, use rack positions 2 and 5 with the Bake function. Place the cakes on the racks as shown. Keep at least 2" (5.0 cm) of space between the front of the racks and the front of the cakes. Baking Cookies on Two Racks For best results when baking cookies on two racks, use rack positions 2 and 5. Bakeware To cook food evenly, hot air must be able to circulate. Allow 2" (5.0 cm) of space around bakeware and oven walls. Use the following chart as a guide. Number of Pan(s) Position on Rack 1 Center of rack. 2 Side by side or slightly staggered. 3 or 4 Refer to the previous illustration. NOTE: Bakeware materials and color may affect results. Dark, dull, non-stick, or glass pans may require shorter baking times, in contrast insulated or stainless steel pans may require longer baking times. Follow bakeware manufacturer's recommendations. 22-Sep-2017 17:17:20 EDT | RELEASED In some European factories the letter "W" of the part code mentioned herein will be autom9atically replaced by the number "4000" (e.g. "W12345678" becomes "400012345678")
-
 1
1 -
2
-
3
-
 4
4 -
 5
5 -
 6
6 -
 7
7 -
 8
8 -
 9
9 -
 10
10 -
 11
11 -
 12
12 -
 13
13 -
 14
14 -
15
-
16
-
17
-
18
-
19
-
20
-
21
-
22
-
23
-
24
-
25
-
26
-
27
-
28
-
29
-
30
-
31
-
32
-
33
-
34
-
35
-
36
-
37
-
38
-
39
-
40
-
41
-
42
-
43
-
44
-
45
-
46
-
47
-
48
-
49
-
50
-
51
-
52
 |
 |