Whirlpool WRL767SIAM Use & Care Guide - Page 14
Ice Maker and Storage Bin, Water Filtration System
 |
View all Whirlpool WRL767SIAM manuals
Add to My Manuals
Save this manual to your list of manuals |
Page 14 highlights
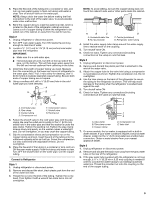
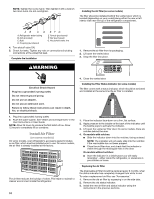
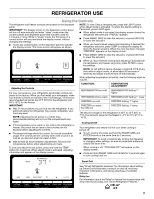
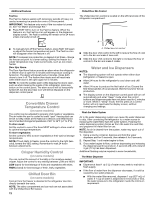
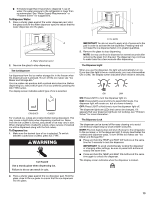
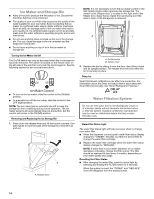
Ice Maker and Storage Bin ■ Allow 24 hours to produce the first batch of ice. Discard the first three batches of ice produced. ■ The quality of your ice will be only as good as the quality of the water supplied to your ice maker. Avoid connecting the ice maker to a softened water supply. Water softener chemicals (such as salt) can damage parts of the ice maker and lead to poor quality ice. If a softened water supply cannot be avoided, make sure the water softener is operating properly and is well maintained. ■ Do not use anything sharp to break up the ice in the storage bin. This can cause damage to the ice container and the dispenser mechanism. ■ Do not store anything on top of or in the ice maker or storage bin. Turning the Ice Maker On/Off The On/Off switch can only be accessed when the ice storage bin has been removed. The switch is located on the freezer door, on the left side of the wall that surrounds the ice storage bin. See the following section for bin removal instructions. NOTE: It is not necessary to turn the ice maker control to the OFF (right) position when removing the storage bin. The sensor cover ("flipper door"), located on the right wall of the freezer door, stops the ice maker from producing ice if the door is open or the storage bin is removed. A B A. On/Off switch B. Sensor cover 2. Replace the bin by sliding it onto the door, then tilting it back into an upright position. The release lever will click when the bin is securely in place. Delay Ice Smart Grid Event notifications can affect ice production. For information about the Delay Ice feature that is associated with Smart Grid functionality, see "Smart Refrigerator Features." ■ To turn on the ice maker, slide the control to the ON (left) position. ■ To manually turn off the ice maker, slide the control to the OFF (right) position. NOTE: The ice maker has an automatic shutoff to keep the storage bin from overfilling during normal operation. The ice maker sensors will automatically stop ice production, but the control will remain in the ON (left) position. Removing and Replacing the Ice Storage Bin 1. Press down the release lever and tilt the bucket outward. Use both hands to hold the base of the storage bin, then lift it up and out. A A. Release lever Water Filtration System Do not use with water that is microbiologically unsafe or of unknown quality without adequate disinfection before or after the system. Systems certified for cyst reduction may be used on disinfected waters that may contain filterable cysts. Water Filter Status Light The water filter status light will help you know when to change your water filter. ■ When the dispenser control panel's water filter status display changes to "ORDER," this tells you that it is almost time to change the water filter cartridge. ■ Replace the water filter cartridge when the water filter status display changes to "REPLACE." NOTE: If water flow to your water dispenser or ice maker decreases noticeably, change the filter sooner. The filter should be replaced at least every 6 months, depending on your water quality and usage. Resetting the Filter Status ■ After changing the water filter, reset the status light by pressing and holding the FILTER button for 3 seconds. When the system is reset, the "ORDER" and "REPLACE" icons will disappear from the display screen. 14
-
 1
1 -
2
-
3
-
4
-
5
-
6
-
7
-
8
-
 9
9 -
 10
10 -
 11
11 -
 12
12 -
 13
13 -
 14
14 -
 15
15 -
 16
16 -
 17
17 -
 18
18 -
 19
19 -
20
-
21
-
22
-
23
-
24
 |
 |
