Whirlpool WRS312SNHM Owners Manual - Page 10
REFRIGERATOR CARE, Cleaning - manual
 |
View all Whirlpool WRS312SNHM manuals
Add to My Manuals
Save this manual to your list of manuals |
Page 10 highlights
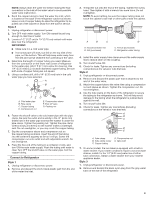
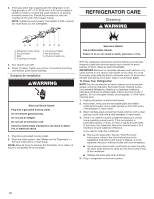
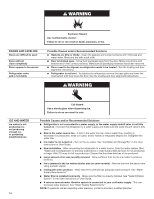
3. If the gray water tube supplied with the refrigerator is not long enough, a 1/4" x 1/4" (6.35 mm x 6.35 mm) coupling is needed in order to connect the water tubing to an existing household water line. Thread the provided nut onto the coupling on the end of the copper tubing. NOTE: Tighten the nut by hand. Then tighten it with a wrench two more turns. Do not overtighten. REFRIGERATOR CARE Cleaning WARNING AB C D EFG A. Refrigerator water tubing B. Nut (provided) C. Bulb D. Coupling (purchased) E. Ferrule (purchased) F. Nut (purchased) G. Household water line 4. Turn shutoff valve ON. 5. Check for leaks. Tighten any nuts or connections (including connections at the valve) that leak. Complete the Installation WARNING Electrical Shock Hazard Plug into a grounded 3 prong outlet. Do not remove ground prong. Do not use an adapter. Do not use an extension cord. Failure to follow these instructions can result in death, fire, or electrical shock. 1. Plug into a grounded 3 prong outlet. 2. Flush the water system. See "Water and Ice Dispensers" in the User Instructions or User Guide. NOTE: Allow 24 hours to produce the first batch of ice. Allow 72 hours to completely fill ice container. Explosion Hazard Use non ammable cleaner. Failure to do so can result in death, explosion, or re. Both the refrigerator and freezer sections defrost automatically. However, clean both sections about once a month to avoid buildup of odors. Wipe up spills immediately. IMPORTANT: Because air circulates between both sections, any odors formed in one section will transfer to the other. You must thoroughly clean both sections to eliminate odors. To avoid odor transfer and drying out of food, wrap or cover foods tightly. To Clean Your Refrigerator: NOTE: Do not use abrasive or harsh cleaners such as window sprays, scouring cleansers, flammable fluids, cleaning waxes, concentrated detergents, bleaches or cleansers containing petroleum products on plastic parts, interior and door liners or gaskets. Do not use paper towels, scouring pads, or other harsh cleaning tools. 1. Unplug refrigerator or disconnect power. 2. Hand wash, rinse, and dry removable parts and interior surfaces thoroughly. Use a clean sponge or soft cloth and a mild detergent in warm water. 3. Wash stainless steel and painted metal exteriors with a clean sponge or soft cloth and a mild detergent in warm water. 4. There is no need for routine condenser cleaning in normal home operating environments. If the environment is particularly greasy or dusty, or there is significant pet traffic in the home, the condenser should be cleaned every 2 to 3 months to ensure maximum efficiency. If you need to clean the condenser: ■■ Remove the base grille. See the "Door Removal" instructions, either in the User Instructions or the Installation Instructions and Owner's Manual, or in the separate instruction sheet provided with your refrigerator. ■■ Use a vacuum cleaner with a soft brush to clean the grille, the open areas behind the grille and the front surface area of the condenser. ■■ Replace the base grille when finished. 5. Plug in refrigerator or reconnect power. 10
-
 1
1 -
2
-
3
-
4
-
 5
5 -
 6
6 -
 7
7 -
 8
8 -
 9
9 -
 10
10 -
 11
11 -
 12
12 -
 13
13 -
 14
14 -
 15
15 -
16
-
17
-
18
-
19
-
20
-
21
-
22
-
23
-
24
-
25
-
26
-
27
-
28
-
29
-
30
-
31
-
32
-
33
-
34
-
35
-
36
 |
 |
