Whirlpool WRS586FLDM Use & Care Guide - Page 18
Refrigerator Care
 |
View all Whirlpool WRS586FLDM manuals
Add to My Manuals
Save this manual to your list of manuals |
Page 18 highlights
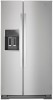
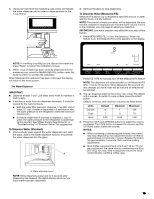
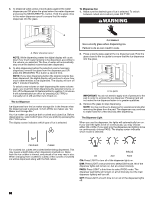
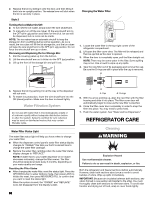
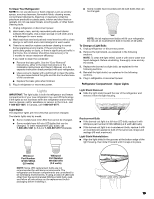
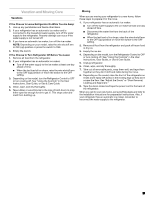
2. Replace the bin by sliding it onto the door, and then tilting it back into an upright position. The release lever will click when the bin is securely in place. Style 2 Turning the Ice Maker On/Off: ■ To turn ON the ice maker, simply lower the wire shutoff arm. ■ To manually turn off the ice maker, lift the wire shutoff arm to the OFF (arm up) position and listen for the click. Ice can still be dispensed, but no more can be made. NOTE: The ice maker has an automatic shutoff to keep the storage bin from overfilling during normal operation. As ice is made, the ice cubes will fill the ice storage bin, and the ice cubes will raise the wire shutoff arm to the OFF (arm up) position. Do not force the wire shutoff arm up or down. Removing and Replacing the Ice Storage Bin: 1. Pull the covering panel up from the bottom. 2. Lift the wire shutoff arm so it clicks into the OFF (up) position. 3. Lift up the front of the storage bin and pull it out. Changing the Water Filter 1. Locate the water filter in the top-right corner of the refrigerator compartment. 2. Lift open the filter cover door. The filter will be released and then be ejected as the door is opened. 3. When the door is completely open, pull the filter straight out. NOTE: There may be some water in the filter. Some spilling may occur. Use a towel to wipe up any spills. 4. Take the new filter out of its packaging and remove the cap. Be sure the O-rings are still in place after the cap is removed. B 4. Replace the bin by pushing it in all the way or the dispenser will not work. 5. To restart ice production, lower the wire shutoff arm into the ON (down) position. Make sure the door is closed tightly. Water Filtration System Do not use with water that is microbiologically unsafe or of unknown quality without adequate disinfection before or after the system. Systems certified for cyst reduction may be used on disinfected waters that may contain filterable cysts. Water Filter Status Light The water filter status light will help you know when to change your water filter. ■ When the dispenser control panel's water filter status display changes to "ORDER," this tells you that it is almost time to change the water filter cartridge. ■ Replace the water filter cartridge when the water filter status display changes to "REPLACE." NOTE: If water flow to your water dispenser or ice maker decreases noticeably, change the filter sooner. The filter should be replaced at least every 6 months, depending on your water quality and usage. Resetting the Filter Status ■ After changing the water filter, reset the status light. Press the OPTIONS button to enter Options mode, then press LOCK to initiate the reset, then press MEASURED FILL to confirm that you want to reset the status light. When the system is reset, the "ORDER" and "REPLACE" icons will disappear from the display screen. A B A. Cap B. O-rings 5. With the arrow pointing up, align the new filter with the filter housing and slide it into place. The filter cover door will automatically begin to close as the new filter is inserted. 6. Close the filter cover door completely in order to snap the filter into place. You may need to press hard. 7. Flush the water system. See "Water and Ice Dispensers." REFRIGERATOR CARE Cleaning WARNING Explosion Hazard Use nonflammable cleaner. Failure to do so can result in death, explosion, or fire. Both the refrigerator and freezer sections defrost automatically. However, clean both sections about once a month to avoid buildup of odors. Wipe up spills immediately. IMPORTANT: Because air circulates between both sections, any odors formed in one section will transfer to the other. You must thoroughly clean both sections to eliminate odors. To avoid odor transfer and drying out of food, wrap or cover foods tightly. 18
-
 1
1 -
2
-
3
-
4
-
5
-
6
-
7
-
8
-
9
-
10
-
11
-
12
-
 13
13 -
 14
14 -
 15
15 -
 16
16 -
 17
17 -
 18
18 -
 19
19 -
 20
20 -
 21
21 -
 22
22 -
 23
23 -
24
-
25
-
26
-
27
-
28
-
29
-
30
-
31
-
32
-
33
-
34
-
35
-
36
-
37
-
38
-
39
-
40
-
41
-
42
-
43
-
44
-
45
-
46
-
47
-
48
-
49
-
50
-
51
-
52
-
53
-
54
-
55
-
56
-
57
-
58
-
59
-
60
-
61
-
62
-
63
-
64
-
65
-
66
-
67
-
68
-
69
-
70
-
71
-
72
-
73
-
74
-
75
-
76
-
77
-
78
-
79
-
80
-
81
-
82
-
83
-
84
-
85
-
86
-
87
-
88
 |
 |
