Whirlpool WRT112CZJW Owners Manual - Page 4
Install Levelers, Location Requirements
 |
View all Whirlpool WRT112CZJW manuals
Add to My Manuals
Save this manual to your list of manuals |
Page 4 highlights
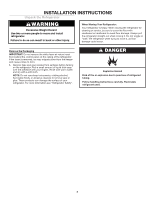
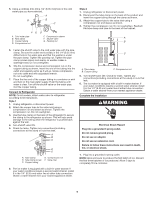
Install Levelers IMPORTANT: Lay down the refrigerator ONLY to your left-hand side (as you are looking at the front of the refrigerator) to avoid damaging the refrigerator. 1. Locate the levelers. They are enclosed in a plastic bag inside the crisper drawer. 2. Using two or more people, access the bottom of the refrigerator either by tilting it first to one side and then the other or by laying it down on the floor to your left-hand side as shown. ■■ Tilt the refrigerator to the side enough to access the bottom. Using a 3/8" hex driver, remove the two screws attaching the wooden runner to the bottom of the refrigerator. Then install a leveler to the front corner. Repeat for the opposite side. NOTE: The refrigerator cabinet should not touch the floor without a leveler installed. Clean Before Using After you remove all of the package materials, clean the inside of your refrigerator before using it. See the cleaning instructions in "Refrigerator Care." Important information to know about glass shelves and covers: Do not clean glass shelves or covers with warm water when they are cold. Shelves and covers may break if exposed to sudden temperature changes or impact, such as bumping. Tempered glass is designed to shatter into many small, pebble-size pieces. This is normal. Glass shelves and covers are heavy. Use both hands when removing them to avoid dropping. Location Requirements WARNING A B A. Remove runner. B. Install leveler. OR ■■ Using the packaging corner posts (left-hand side, front and back) as a cushion, lay the refrigerator down on the floor (to your left-hand side only) as shown in the following graphic. NOTE: Using the packaging as a cushion will help to avoid possible damage to the refrigerator. ■■ Using a 3/8" hex driver, remove the two screws attaching each wooden runner to the bottom of the refrigerator. Install a leveler to each of the front corners. Explosion Hazard Keep flammable materials and vapors, such as gasoline, away from refrigerator. Failure to do so can result in death, explosion, or fire. IMPORTANT: This refrigerator is designed for indoor, household use only. To ensure proper ventilation for your refrigerator, it is recommended to allow a 1/2" (1.25 cm) space on each side. Allow 1½" (3.81 cm) of space between overhead cabinets and refrigerator top. Allow at least 1" (2.54 cm) between back of cabinet and the wall (consider the condenser as back in case is present). If your refrigerator has an ice maker, make sure you leave extra space at the back for the water line connections. If you are installing your refrigerator next to a fixed wall, leave enough space on the hinge side to allow the door to swing open. A B C A. Remove runner. B. Install leveler. C. Packaging corner post. 4
-
 1
1 -
 2
2 -
 3
3 -
 4
4 -
 5
5 -
 6
6 -
 7
7 -
 8
8 -
 9
9 -
 10
10 -
11
-
12
-
13
-
14
-
15
-
16
-
17
-
18
-
19
-
20
-
21
-
22
-
23
-
24
-
25
-
26
-
27
-
28
 |
 |
