Whirlpool WRT371SZBB Use & Care Guide - Page 6
Refrigerator Doors
 |
View all Whirlpool WRT371SZBB manuals
Add to My Manuals
Save this manual to your list of manuals |
Page 6 highlights
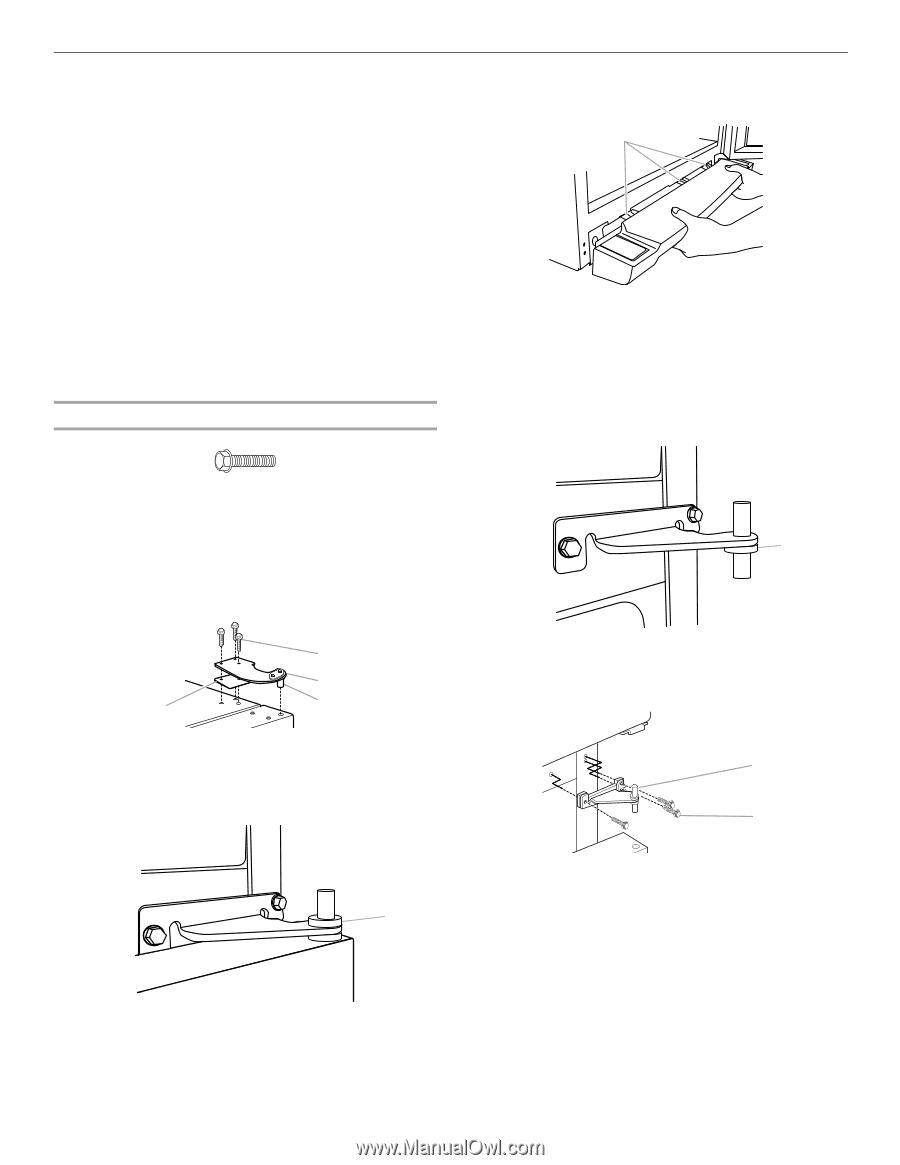
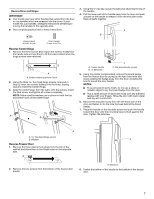
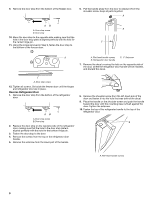
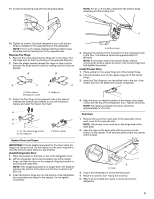
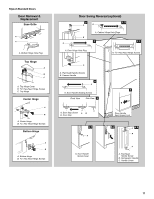
Refrigerator Doors Depending on the width of your doorway, you may need to remove the doors to move the refrigerator into your home. Also, the door hinges are factory installed on the right-hand side. If you want the door to open from the other direction, you must reverse the door swing. IMPORTANT: ■ Before you begin, turn the refrigerator control OFF, unplug refrigerator or disconnect power. Remove food and any adjustable door or utility bins from doors. 5. Open refrigerator door and remove base grille from the bottom front of the refrigerator. A ■ Depending on your model, your refrigerator has either Style 1-Contour Doors or Style 2-Standard Doors. Reference the graphic specific to your model later in this section following "Final Steps." NOTE: For contour door models only - A Reversibility Kit, which includes a new Brand Badge and hole covers, is available. To purchase a Reversibility Kit, see "Accessories" for contact information, and order Part Number W10395148. Tools Needed hex head socket wrench, #2 Phillips screwdriver, flat-blade screwdriver open-end wrench, flat 2" putty knife. A. Clips 6. Using a hex head socket wrench, remove the two hex head hinge screws from the bottom hinge and pull the hinge from the bottom of the refrigerator door. NOTE: For 21 cu ft models, remove both the Bottom Hinge assembly and the leveling foot. Remove Doors and Hinges 7. Lower the refrigerator door from the Center Hinge. 8. Remove the washer from the bottom of the Center Hinge pin. Hex Head Hinge Screw 1. Unplug refrigerator or disconnect power. 2. Using a hex head socket wrench, remove the three hex head hinge screws from the top hinge and lift up to remove A the hinge. NOTE: Provide additional support for the doors while the hinges are being moved. Do not depend on the door magnets to hold the doors in place while you are working. A B D C A Hex head hinge screws B. Top hinge C. Hinge pin D. Spacer 3. Lift the freezer door off of the center hinge and set it aside. 4. Remove the washer from the top of the Center Hinge pin. A. Washer 9. Using a hex head socket wrench, remove the three screws from the center hinge and remove the hinge. Set aside. A B A. Center hinge B Hex head hinge screws A A. Washer 6
-
 1
1 -
 2
2 -
 3
3 -
 4
4 -
 5
5 -
 6
6 -
 7
7 -
 8
8 -
 9
9 -
 10
10 -
 11
11 -
 12
12 -
13
-
14
-
15
-
16
-
17
-
18
-
19
-
20
-
21
-
22
-
23
-
24
-
25
-
26
-
27
-
28
-
29
-
30
-
31
-
32
-
33
-
34
-
35
-
36
-
37
-
38
-
39
-
40
-
41
-
42
-
43
-
44
-
45
-
46
-
47
-
48
-
49
-
50
-
51
-
52
-
53
-
54
-
55
-
56
-
57
-
58
-
59
-
60
-
61
-
62
-
63
-
64
-
65
-
66
-
67
-
68
-
69
-
70
-
71
-
72
-
73
-
74
-
75
-
76
-
77
-
78
 |
 |