Whirlpool WRT771REYB Use & Care Guide - Page 8
Water Dispenser, Tubing Connection, Wiring Connection
 |
View all Whirlpool WRT771REYB manuals
Add to My Manuals
Save this manual to your list of manuals |
Page 8 highlights
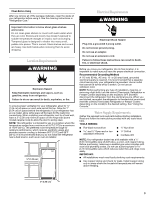
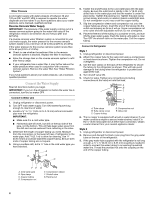
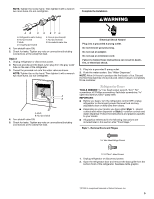
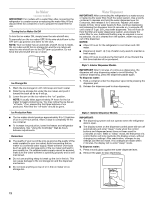
Style 2 - Exterior Dispenser Models WARNING Electrical Shock Hazard Disconnect power before removing doors. Failure to do so can result in death or electrical shock. Wiring Connection A A A. Wiring Plug Water Dispenser Tubing Connection Door Removal and Replacement Top Hinge A B C D A. Top Hinge Cover B Hex-Head Hinge Screws C. Top Hinge D. Hinge Pin Center Hinge A B A. Center Hinge B. 12-24 Torx ® Head Screws Bottom Hinge A A A. Face of Fitting Base Grille A B C A. Bottom Hinge B. Screws C. Leveling Leg (on some models) 8
-
 1
1 -
2
-
 3
3 -
 4
4 -
 5
5 -
 6
6 -
 7
7 -
 8
8 -
 9
9 -
 10
10 -
 11
11 -
 12
12 -
 13
13 -
14
-
15
-
16
-
17
-
18
-
19
-
20
-
21
-
22
-
23
-
24
-
25
-
26
-
27
-
28
-
29
-
30
-
31
-
32
-
33
-
34
-
35
-
36
-
37
-
38
-
39
-
40
-
41
-
42
-
43
-
44
-
45
-
46
-
47
-
48
-
49
-
50
-
51
-
52
-
53
-
54
-
55
-
56
-
57
-
58
-
59
-
60
-
61
-
62
-
63
-
64
-
65
-
66
-
67
-
68
-
69
-
70
 |
 |

8
Style 2 -
Exterior Dispenser Models
WARNING
Electrical Shock Hazard
Disconnect power before removing doors.
Failure to do so can result in death or electrical shock.
Door Removal and Replacement
Top Hinge
A. Top Hinge Cover
B.
⁵⁄₁₆
" Hex-Head Hinge Screws
C. Top Hinge
D. Hinge Pin
A
B
C
D
Center Hinge
A. Center Hinge
B. 12-24
Torx
®
Head Screws
A
B
Base Grille
Water Dispenser
Tubing Connection
A. Face of Fitting
A
Wiring Connection
A. Bottom Hinge
B. Screws
C. Leveling Leg (on some models)
Bottom Hinge
A
C
B
A
A. Wiring Plug
A
A