Whirlpool WTW6800WL Installation Instructions - Page 8
Secure the Drain Hose, Level the Washer - model
 |
UPC - 883049177267
View all Whirlpool WTW6800WL manuals
Add to My Manuals
Save this manual to your list of manuals |
Page 8 highlights
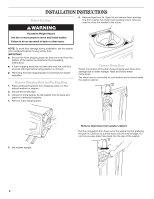
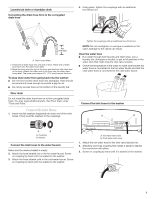
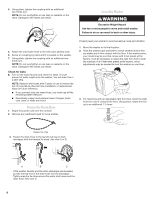
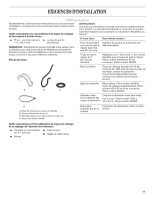
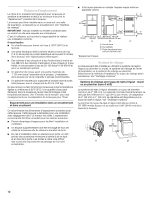
4. Using pliers, tighten the coupling with an additional two-thirds turn. NOTE: Do not overtighten or use tape or sealants on the valve. Damage to the valves can result. HOT COLD Level the Washer WARNING Excessive Weight Hazard Use two or more people to move and install washer. Failure to do so can result in back or other injury. 5. Attach the cold water hose to the inlet valve labeled cold. 6. Screw on coupling by hand until it is seated on the washer. 7. Using pliers, tighten the coupling with an additional two- thirds turn. NOTE: Do not overtighten or use tape or sealants on the valve. Damage to the valves can result. Check for leaks Turn on the water faucets and check for leaks. A small amount of water might enter the washer. You will drain this in a later step. NOTE: Replace inlet hoses after 5 years of use to reduce the risk of hose failure. Record hose installation or replacement dates for future reference. If you connect only one water hose, you must cap off the remaining water inlet port. Periodically inspect and replace hoses if bulges, kinks, cuts, wear, or leaks are found. Secure the Drain Hose 1. Drape the power cord over the console. 2. Remove any cardboard used to move washer. Properly level your washer to avoid excessive noise and vibration. 1. Move the washer to its final location. 2. Rock the washer back and forth to check whether all four feet are stable and in firm contact with the floor. If the washer rocks, your model may be one that comes with 3 feet preset at the factory. It will be necessary to adjust the right front foot to level the machine. If all 4 feet were preset at the factory, minor adjustments may be needed to level the washer on your floor. 3. For machines with an adjustable right front foot, lower the right front foot until it contacts the floor. Using pliers, rotate the foot up to an additional 1 ½ turns. Beaded tie strap 3. Fasten the drain hose to the laundry tub leg or drain standpipe with the beaded tie strap. See view A or B. A B C If the washer faucets and the drain standpipe are recessed, put the formed end of the drain hose into the standpipe. Tightly wrap the tie strap around the water inlet hoses and the drain hose. See view C. 8
-
 1
1 -
2
-
 3
3 -
 4
4 -
 5
5 -
 6
6 -
 7
7 -
 8
8 -
 9
9 -
 10
10 -
 11
11 -
 12
12 -
 13
13 -
14
-
15
-
16
-
17
-
18
-
19
-
20
 |
 |
