Whirlpool WTW8900BC Installation Guide - Page 8
Complete Installation, Checklist
 |
View all Whirlpool WTW8900BC manuals
Add to My Manuals
Save this manual to your list of manuals |
Page 8 highlights
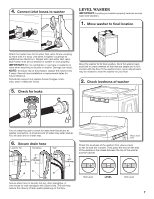
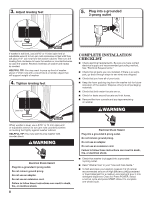
3. Adjust leveling feet 5. Plug into a grounded 3-prong outlet Jam nut If washer is not level, use a 9/16" or 14 mm open-end or adjustable wrench to turn jam nuts clockwise on feet until they are about 1/2" (13 mm) from the washer cabinet. Then turn the leveling foot clockwise to lower the washer or counterclockwise to raise the washer. Recheck levelness of washer and repeat as needed. HELPFUL TIP: You may want to prop up front of washer about 4" (102 mm) with a wood block or similar object that will support weight of washer. 4. Tighten leveling feet COMPLETE INSTALLATION CHECKLIST ■■ Check electrical requirements. Be sure you have correct electrical supply and recommended grounding method. See "Electrical Requirements." ■■ Check that all parts are now installed. If there is an extra part, go back through steps to see what was skipped. ■■ Check that you have all of your tools. ■■ Keep the foam packing ring from the washer tub for future relocation of the washer. Dispose of/recycle all packaging materials. ■■ Check that both water faucets are on. ■■ Check for leaks around faucets and inlet hoses. ■■ Remove film from console and any tape remaining on washer. Jam nut When washer is level, use a 9/16" or 14 mm open-end or adjustable wrench to turn jam nuts counterclockwise on leveling feet tightly against washer cabinet. HELPFUL TIP: You may want to prop washer with wooden block. ■■ Check that washer is plugged into a grounded 3-prong outlet. ■■ Read "Washer Use" in your "Use and Care Guide." ■■ To test and clean your washer, measure 1/2 of normal recommended amount of High Efficiency (HE) powdered or liquid detergent for a medium-size load and pour it into detergent dispenser. Close lid. Press POWER. Select a normal cycle and press START. Allow it to complete one whole cycle. 8
-
 1
1 -
2
-
 3
3 -
 4
4 -
 5
5 -
 6
6 -
 7
7 -
 8
8 -
 9
9 -
 10
10 -
 11
11 -
 12
12 -
 13
13 -
14
-
15
-
16
 |
 |
