Xerox 3220DN User Guide - Page 102
Installing Software for Network Printing, Typical Installation
 |
UPC - 095205754346
View all Xerox 3220DN manuals
Add to My Manuals
Save this manual to your list of manuals |
Page 102 highlights
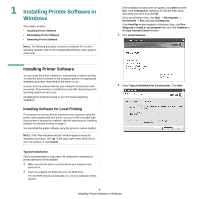
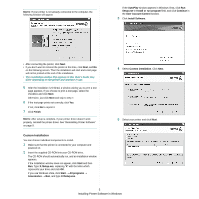
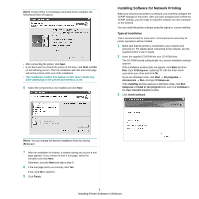
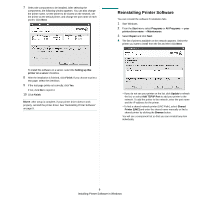
NOTE: If your printer is not already connected to the computer, the following window will appear. • After connecting the printer, click Next. • If you don't want to connect the printer at this time, click Next, and No on the following screen. Then the installation will start and a test page will not be printed at the end of the installation. • The installation window that appears in this User's Guide may differ depending on the printer and interface in use. 6 Select the components to be installed and click Next. Installing Software for Network Printing When you connect your printer to a network, you must first configure the TCP/IP settings for the printer. After you have assigned and verified the TCP/IP settings, you are ready to install the software on each computer on the network. You can install the printer software using the typical or custom method. Typical Installation This is recommended for most users. All components necessary for printer operations will be installed. 1 Make sure that the printer is connected to your network and powered on. For details about connecting to the network, see the supplied printer's User's Guide. 2 Insert the supplied CD-ROM into your CD-ROM drive. The CD-ROM should automatically run, and an installation window appears. If the installation window does not appear, click Start and then Run. Type X:\Setup.exe, replacing "X" with the letter which represents your drive and click OK. If you use Windows Vista, click Start → All programs → Accessories → Run, and type X:\Setup.exe. If the AutoPlay window appears in Windows Vista, click Run Setup.exe in Install or run program field, and click Continue in the User Account Control window. 3 Click Install Software. NOTE: You can change the desired installation folder by clicking [Browse]. 7 After the installation is finished, a window asking you to print a test page appears. If you choose to print a test page, select the checkbox and click Next. Otherwise, just click Next and skip to step 9. 8 If the test page prints out correctly, click Yes. If not, click No to reprint it. 9 Click Finish. 6 Installing Printer Software in Windows
-
 1
1 -
2
-
3
-
4
-
5
-
6
-
7
-
8
-
9
-
10
-
11
-
12
-
13
-
14
-
15
-
16
-
17
-
18
-
19
-
20
-
21
-
22
-
23
-
24
-
25
-
26
-
27
-
28
-
29
-
30
-
31
-
32
-
33
-
34
-
35
-
36
-
37
-
38
-
39
-
40
-
41
-
42
-
43
-
44
-
45
-
46
-
47
-
48
-
49
-
50
-
51
-
52
-
53
-
54
-
55
-
56
-
57
-
58
-
59
-
60
-
61
-
62
-
63
-
64
-
65
-
66
-
67
-
68
-
69
-
70
-
71
-
72
-
73
-
74
-
75
-
76
-
77
-
78
-
79
-
80
-
81
-
82
-
83
-
84
-
85
-
86
-
87
-
88
-
89
-
90
-
91
-
92
-
93
-
94
-
95
-
96
-
 97
97 -
 98
98 -
 99
99 -
 100
100 -
 101
101 -
 102
102 -
 103
103 -
 104
104 -
 105
105 -
 106
106 -
 107
107 -
108
-
109
-
110
-
111
-
112
-
113
-
114
-
115
-
116
-
117
-
118
-
119
-
120
-
121
-
122
-
123
-
124
-
125
-
126
-
127
-
128
-
129
-
130
-
131
-
132
-
133
-
134
-
135
-
136
-
137
-
138
-
139
-
140
 |
 |
