Xerox 7300DX Specialty Printing - Page 5
Printing side 2 - phaser driver
 |
UPC - 042215476973
View all Xerox 7300DX manuals
Add to My Manuals
Save this manual to your list of manuals |
Page 5 highlights
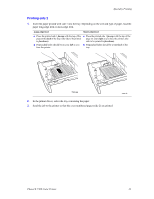
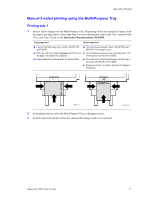
Specialty Printing Printing side 2 1. Insert the paper printed with side 1 into the tray. Depending on the size and type of paper, load the paper long-edge feed or short-edge feed. Long-edge feed Short-edge feed I Place the printed side 1 faceup with the top of the page at the back of the tray; (the side to be printed is facedown). I Prepunched holes should be on your left as you face the printer. I Place the printed side 1 faceup with the top of the page on your right as you face the printer; (the side to be printed is facedown). I Prepunched holes should be at the back of the tray. 20)5-4 %! 7300-44 2. In the printer driver, select the tray containing the paper. 3. Send the job to the printer so that the even-numbered pages (side 2) are printed. 7300-45 Phaser® 7300 Color Printer 16
-
 1
1 -
 2
2 -
 3
3 -
 4
4 -
 5
5 -
 6
6 -
 7
7 -
 8
8 -
 9
9 -
 10
10 -
 11
11 -
12
-
13
-
14
 |
 |
