Yamaha 400 BWS251-300/400 Installation Manual EN image - Page 2
Yamaha
 |
View all Yamaha 400 manuals
Add to My Manuals
Save this manual to your list of manuals |
Page 2 highlights
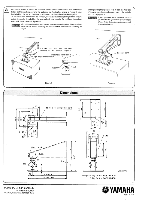
Mount the fixture to which the speaker has been fastened on the wall installation fixture so that washers come to the fastening nut (bottom) as shown in Figure 3. Next, firmly tighten the nut and bolt that hold the two sections of the bracket together. To set the vertical direction for the speaker, loosen the two M8 angle adjustment screws, adjust the angle, then tighten the screws back down again. Do not force the adjustment with the screws still tightened. Warning Since the angle adjustment screws may come out altogether if they are loosened too far, loosen them only the bare minimum necessary for adjusting the angle. When passing the speaker cord in from the rear side of the wall, use the speaker cord hole in the installation fixture (Figure 4). Warning If your speaker's owner's manual instructs you to install the speakers at specific angles, please follow those instructions when attaching the bracket. Nut and bolt that hold the two sections of the bracket .together Tighten Wall installation fixture Angle adjustment screw Wall Speaker cord Iktritti Washer Nut Figure 3 Dimensions Figure 4 O rOo 1O 60 09 Hole for the speaker cord O r 6 07 9.0 64 88 0 cNr. N 0 rOo 9.0 1st 64 to 88 120 4 90 3.0 50 3.0 -0 M8 M24 M24 M8 r. 40 L= 300, 400 L= 340 , 440 O ti (.0 N 3.0 A ti 0 O N O Unit : mm Weight : 4.4kg for the BWS251-300 5.2kg for the BWS251-400 YAMAHA CORPORATION Pro Audio Division, #18/3 P.O.Box3, Hamamatsu, 430-8651, Japan YAMAHA Printed in Japan
-
 1
1 -
 2
2
 |
 |
