Yamaha BBT500-110 Owner's Manual - Page 16
MIDI Settings, Selecting a Patch with MIDI
 |
View all Yamaha BBT500-110 manuals
Add to My Manuals
Save this manual to your list of manuals |
Page 16 highlights
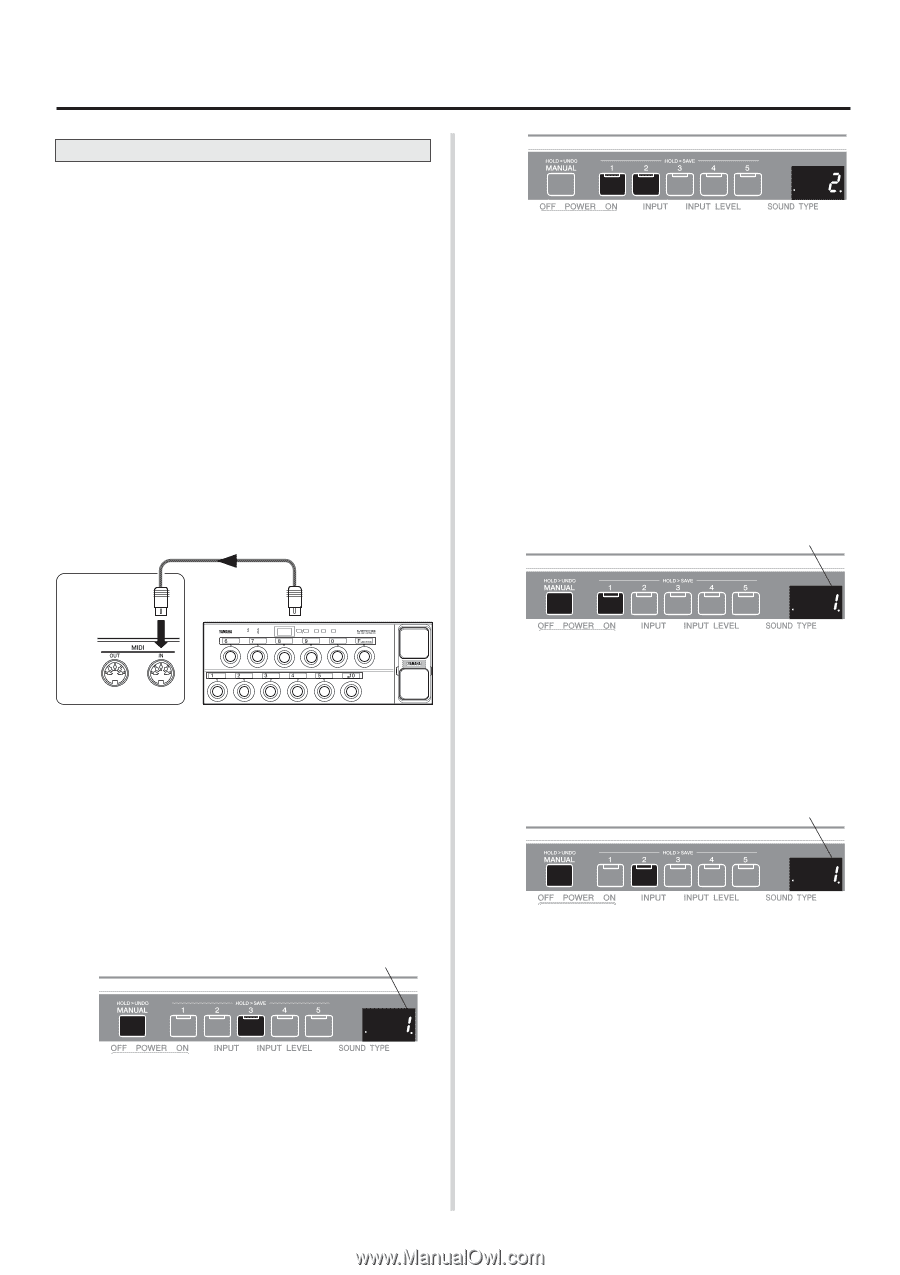
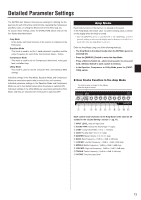
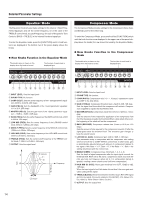
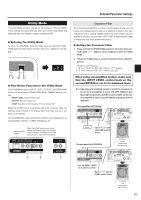
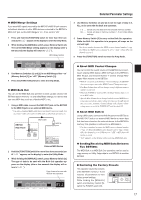
Detailed Parameter Settings MIDI Settings The BBT500 is MIDI* compatible and equipped with MIDI IN and MIDI OUT jacks. * What is MIDI? The acronym for Musical Instruments Digital Interface, MIDI is a worldwide standard communication interface that allows MIDI compatible musical instruments, computers, and other MIDI devices to share musical information and control one another regardless of instrument type or maker. With MIDI functions you can do things like select a patch from the BBT500's memory using an external MIDI device like the MFC10 Yamaha MIDI Foot Controller, etc. You can also backup data by sending the contents in the unit's memory to a device that is capable of saving MIDI data (Yamaha MDF3, etc.). ● Selecting a Patch with MIDI 1 Using a MIDI cable, connect the MIDI IN jack on the BBT500 to the MIDI OUT jack on the external MIDI device. * Use only a standard MIDI cable that is less than 15 meters in length. Use of a longer cable can result in trouble such as abnormal operation, etc. BBT500 Rear Panel MIDI IN MIDI Cable MIDI OUT STATUS DATA/CTRL BANK MSB/MAX BANK LSB/MIN TOGGLE ON-OFF /NUMBER OF PGM 8.8.8. DEC /NO ±10 INC /YES MEMORY PC EDIT EDIT WRITE /EXIT External MIDI Device 2 Set the MIDI receive channel on the BBT500 and the MIDI transmit channel on the external device to the same MIDI channel. (Default channel: 1) * MIDI data can not be transmitted or received if the MIDI channels are not properly matched. 2-1 Press and hold the [FUNCTION] switch for more than three seconds (until "utL" appears on the display) to enter the Utility Mode. 2-2 While holding the [MANUAL] switch, press Memory Switch [3]. The currently assigned MIDI receive channel appears on the display (after a few seconds, the display will return to "utL"). MIDI Receive Channel 2-3 Use Memory Switches [1] and [2] to set the MIDI receive channel (1-16, ALL, oFF). Use Memory Switch [2] to increase the value, and Memory Switch [1] to decrease the value. * "ALL" is set to Omni On. When "oFF" is set, MIDI data will not be received. 3 Create a Program Change Map*. (Default → Program Change No: Memory No = 1:1, 2:2, 3:3, 4:4, 5:5, 6:1, 7:2, 8:3 ...) * What is a Program Change Map? A Program Change Map assigns a program change number (received via MIDI) to a memory number. For example, when the BBT500 receives "Program Change Number 1" from an external MIDI device, it will recall memory number "3". This is also called a Program Change Table. 3-1 Press and hold the [FUNCTION] switch for more than 3 seconds (until "utL" appears on the display) to enter the Utility Mode. 3-2 While holding the [MANUAL] switch, press Memory Switch [1]. The currently assigned MIDI program change number appears on the display (after a few seconds, the display will return to "utL"). Receive Program Change Number 3-3 Use Memory Switches [1] and [2] to set the program change number (1-128) that is received by the BBT500. Use Memory Switch [2] to increase the value and Memory Switch [1] to decrease the value. 3-4 While holding the [MANUAL] switch, press Memory Switch [2]. The memory number that will be recalled when the program change number that was set in step 3-3, appears on the dis- play. (After a few seconds, the display will return to "utL"). Memory Number 3-5 Use Memory Switches [1] and [2] to set the memory number (1-5) that corresponds to the program change number received by the BBT500. Uses Memory Switch [2] to increase the value and Memory Switch [1] to decrease the value. 3-6 If necessary, repeat steps 3-2 through 3-5. 3-7 Press the [FUNCTION] switch to enter the Amp Mode. 4 Now, when a program change number transmitted from an external MIDI device is received by the BBT500, it will recall the corresponding memory number that is set in the program change map you just created will be recalled. * Refer to the Owner's Manual that came with your MIDI device on how to receive or transmit program change data. 16
-
 1
1 -
2
-
3
-
4
-
5
-
6
-
7
-
8
-
9
-
10
-
 11
11 -
 12
12 -
 13
13 -
 14
14 -
 15
15 -
 16
16 -
 17
17 -
 18
18 -
 19
19 -
 20
20 -
 21
21
 |
 |