Yamaha CLP-153S Owner's Manual - Page 23
Montieren Sie die Tastatureinheit A.
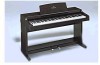 |
View all Yamaha CLP-153S manuals
Add to My Manuals
Save this manual to your list of manuals |
Page 23 highlights
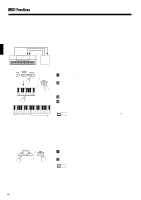
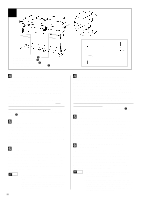
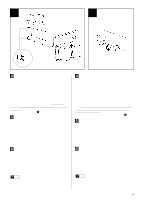
4 A D A 6 x 16 mm flat-head screws 3 D 6 x 16 mm Senkschrauben 3 Vis à tête plate de 6 x 16 mm 3 Tornillos de cabeza plana de 6 x 16 mm 3 V Install the main unit (A). Place the main unit (A) on the side panels (D) with the screws on its bottom panel (toward the rear of the main unit) just behind the grooves in the brackets located at the top of the side panels. Then slide the main unit forward until it stops. WATCH YOUR FINGERS WHEN DOING THIS!! Align the holes on the bottom panel of the main unit with the holes in the brackets on the side panels (also center the main unit to produce equal clearance on the left and right sides, as shown in the illustration), then screw in and securely tighten the four 6 x 16 millimeter flat-head screws 3. B Connect the pedal cord. Pass the pedal cord through the two cord holders on the side panel. Plug the free end of the cord into the connector on the bottom of the main unit (A). The plug only goes in one way (the lug on the connector should face the keyboard-side of the main unit, as shown in the illustration) - don't try to force it in the wrong way around. NSet the adjuster. For stability, an adjuster is provided on the bottom of the pedal box (C). Rotate the adjuster until it comes in firm contact with the floor surface. The adjuster ensures stable pedal operation and facilitates pedal effect control. If the adjuster is not in firm contact with the floor surface, distorted sound may result. IMPORTANT • After assembling the Clavinova, check once more to make sure that all screws have been securely fastened. • If the stand leans to the side, makes unusual noises, or otherwise seems unstable during use, check and tighten all screws while following the assembly instructions given above. iii V Montieren Sie die Tastatureinheit (A). Setzen Sie die Tastatureinheit (A) so auf den fertigen Ständer, daß die beiden Schrauben an ihrer Unterseite hinter den Winkelblechen mit Führungsschlitz an der Hinterseite des Ständers zu liegen kommen. Schieben Sie die Tastatureinheit dann bis zum Anschlag in die Schlitze. KLEMMEN SIE IHRE FINGER DABEI NICHT EIN!! Richten Sie die Schraubenbohrungen an der Unterseite der Tastatureinheit mit den Bohrungen der Winkelbleche aus (achten Sie auch darauf, daß sie mittig auf dem Ständer steht, wie in der Abbildung gezeigt). Schrauben Sie die Tastatureinheit dann mit den vier 6 x 16 mm Senkschrauben 3 am Ständer fest. B Schließen Sie das Pedalkabel an. Sichern Sie das Pedalkabel in den beiden Kabelhaltern an den Seitenwänden. Der Stecker wird an die zugehörige Buchse an der Unterseite der Tastatureinheit (A) angeschlossen. Der Stecker paßt nur in einer Richtung in die Buchse (mit der Führungsnase zur Tastaturseite des Instruments weisend - siehe Abbildung). Versuchen Sie nicht, den Stekker falsch herum mit Gewalt in die Buchse zu drücken! N Justieren Sie schließlich Höhenversteller. noch den Zur Stabilisierung ist an der Unterseite des Pedalkastens (C) ein Höhenversteller vorgesehen. Schrauben Sie den Höhenversteller heraus, bis er fest auf dem Fußboden steht. Der Höhenversteller sorgt für stabile Pedalbetätigung und ermöglicht eine präzise Regelung des Betätigungshubs. Wenn er nicht fest auf dem Boden steht, können beim Treten der Pedale Klangverzerrungen auftreten. WICHTIG • Vergewissern Sie sich nach Zusammenbau und Aufstellung des Clavinova noch einmal davon, daß alle Schrauben fest angezogen sind. • Wenn der Ständer schief steht, komische Geräusch erzeugt oder sich beim Spielen wackelig anfühlt, prüfen Sie gemäß den unter "Zusammenbau und Aufstellung" gegebenen Anweisungen, ob der Ständer richtig zusammengebaut wurde, und ziehen dabei die einzelnen Schrauben noch einmal nach.
-
 1
1 -
2
-
3
-
4
-
5
-
6
-
7
-
8
-
9
-
10
-
11
-
12
-
13
-
14
-
15
-
16
-
17
-
 18
18 -
 19
19 -
 20
20 -
 21
21 -
 22
22 -
 23
23 -
 24
24 -
 25
25 -
 26
26 -
 27
27 -
 28
28
 |
 |
