Yamaha DG130HA Owner's Manual - Page 11
Easy to Use Functions
 |
View all Yamaha DG130HA manuals
Add to My Manuals
Save this manual to your list of manuals |
Page 11 highlights
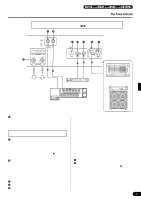
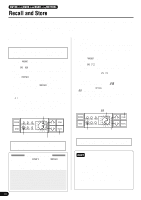
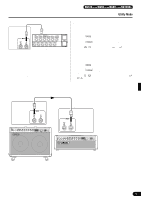
Easy to Use Functions DG100-212A/DG80-210A/DG80-112A/DG130HA MIDI commands can be used to select memory numbers, control the reverb, tremolo, chorus and tape echo effects, and control volume on the DG amplifier. A speaker simulator can also be applied to the LINE OUT signal. What is MIDI? MIDI is the acronym for Musical Instruments Digital Interface. MIDI is a world-wide standard communication interface that allows MIDI compatible musical instruments, computers and other MIDI devices to share musical information and control one another regardless of instrument type or maker. s Using MIDI to Recall Memory Program changes sent from a Yamaha MIDI Foot Controller MFC10, etc., or an external MIDI device can be used to recall settings in the DG amplifier's memory. 1. With a MIDI cable, connect the DG amplifier's MIDI IN jack to the MIDI OUT jack on an external MIDI device. * Use only a standard MIDI cable that is less than 15 meters in length. Use of a longer cable may result in abnormal operation. MIDI Cable DG amplifier Rear Panel MIDI IN MIDI OUT STATUS DATA/CTRL BANK MSB/MAX BANK LSB/MIN TOGGLE ON-OFF /NUMBER OF PGM 8.8.8. DEC /NO ±10 INC /YES MEMORY PC EDIT EDIT WRITE /EXIT External MIDI Device 2. Set the DG amplifier's MIDI receive channel and the MIDI transmit channel on the external device to the same MIDI channel number (the factory preset channel number is 1). → For setting instructions see page 12 "Set the MIDI Receive Channel". 3. Create a program change table*1. (The factory preset is, program change number = memory number). → For setting instructions see page 12 "Creating a Program Change Table". *1 For example, "the received program change number 1, recalls the DG amplifier's memory number 5". To achieve this, the received program change number must be assigned to the corresponding memory number. 4. When program memory data is transmitted from an external MIDI device, data in the corresponding memory assigned to the program change table will be recalled. * For instructions on how to transmit program change data, check the owner's manual of the external MIDI device you are using. s Using MIDI to Control Volume You can control the DG amplifier's overall volume from an external MIDI device using a number 7 control change message (main volume) sent from the MIDI OUT jack of an external MIDI device to the DG amplifier's MIDI IN jack. By connecting a Yamaha MIDI Foot Controller MFC10, etc., or a MIDI device equipped with a foot pedal, you can use the foot pedal to control the volume during performance. Using the following three positions, you can select the control position as to where the volume is changed. • "bP" : Before Pre Amp. Controls the volume before the preamp. • "AP" : After Pre Amp. Controls the volume after the preamp. • "Ar" : After REVERB: Controls the volume after the reverb. INPUT Pre Amp Reverb SPEAKER Power Amp 1. Using procedures 1. and 2. in the previous "MIDI Memory Recall" section, connect the external MIDI device and set the MIDI receive channel. 2. Next, select the volume control position. → For instructions on the setting procedure, refer to page 13 "Set the Volume Pedal Position". 3. In this condition, number 7 control change data transmitted from an external MIDI device will now control the DG amplifier's volume. * The DG amplifier does not except MIDI control changes other than numbers 7 and 91 to 94. * For more information on transmitting control data, refer to your external MIDI device's owner's manual. * Even if another memory number is selected, main volume data will not change. * When the power is switched ON, main volume data is set to its maximum level. * After the main volume data is changed, and the external MIDI device is disconnected, the volume level may be insufficient. In this case, transmit the volume change again or, turn the power OFF and then ON again. s Controlling Reverb, Tremolo, Chorus and Tape Echo via MIDI You can adjust the Reverb Level (No. 91), Tremolo Depth (No. 92), Chorus Level (No. 93) and Tape Echo Level (No. 94) settings by transmitting control change messages from an external MIDI device's MIDI OUT jack to the DG Guitar Amp's MIDI IN jack. 1. Connect an external MIDI device as described steps 1 and 2 of the "Using MIDI to Recall Memory" section on this page and set the MIDI receive channel. 2. Transmit the parameter control change number and control change data from the external MIDI device and you can control the effect parameters listed above. * For further information regarding the transmission of control change data, refer to your external MIDI device's owner's manual. s Speaker Simulator The DG amplifier's speaker simulator provides the line signal with a realistic simulation of the natural sound of a speaker. The speaker simulator can be used on the line signal when the LINE OUT jack is connected to a mixer or recorder. → For setting instructions, refer to the "Speaker Simulator ON/OFF" section in this manual. bP AP Ar LINE OUT 11
-
 1
1 -
2
-
3
-
4
-
5
-
 6
6 -
 7
7 -
 8
8 -
 9
9 -
 10
10 -
 11
11 -
 12
12 -
 13
13 -
 14
14 -
 15
15 -
 16
16 -
17
-
18
-
19
-
20
-
21
-
22
-
23
-
24
-
25
-
26
-
27
-
28
-
29
-
30
-
31
-
32
-
33
-
34
-
35
-
36
-
37
-
38
-
39
-
40
-
41
-
42
-
43
-
44
-
45
-
46
-
47
-
48
-
49
-
50
-
51
-
52
-
53
-
54
-
55
-
56
-
57
-
58
-
59
-
60
-
61
-
62
-
63
-
64
-
65
-
66
-
67
-
68
-
69
-
70
-
71
-
72
-
73
-
74
-
75
-
76
-
77
-
78
-
79
-
80
-
81
-
82
-
83
-
84
 |
 |
