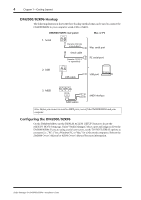
Yamaha DM2000 Studio Manager Installation Guide - Page 10
When the driver is located, YAMAHA USB MIDI Driver is displayed, as shown below.
 |
View all Yamaha DM2000 manuals
Add to My Manuals
Save this manual to your list of manuals |
Page 10 highlights
The following window appears. USB MIDI Driver 7 6 Select "Specify a location," and specify "D:\USBdrv_" (replacing "D" with the drive letter of your CD-ROM drive), and then click Next. When the driver is located, "YAMAHA USB MIDI Driver" is displayed, as shown below. 7 Click Next. Note: You may be prompted to insert your Windows CD-ROM. Do not insert it! Click OK, and in the "Copy files from" section of the subsequent dialog box, enter "D:\USBdrv_" (replacing "D" with the drive letter of your CD-ROM drive), and then click OK. The driver is installed, and the following window appears when the installation is complete. 8 Click Finish, and then restart your computer. Studio Manager for DM2000/02R96-Installation Guide
-
 1
1 -
2
-
3
-
4
-
 5
5 -
 6
6 -
 7
7 -
 8
8 -
 9
9 -
 10
10 -
 11
11 -
 12
12 -
 13
13 -
 14
14 -
 15
15 -
16
-
17
-
18
-
19
-
20
-
21
-
22
 |
 |

USB MIDI Driver
7
Studio Manager for DM2000/02R96—Installation Guide
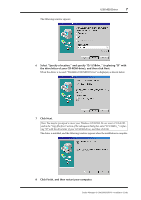
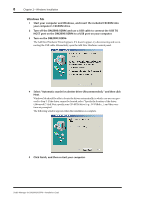
The following window appears.
6
Select
“
Specify a location,
”
and specify
“
D:\USBdrv_
”
(replacing
“
D
”
with
the drive letter of your CD-ROM drive), and then click Next.
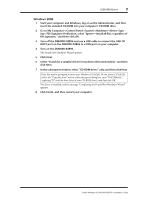
When the driver is located, “YAMAHA USB MIDI Driver” is displayed, as shown below.
7
Click Next.
The driver is installed, and the following window appears when the installation is complete.
8
Click Finish, and then restart your computer.
Note: You may be prompted to insert your Windows CD-ROM. Do not insert it! Click OK,
and in the “Copy files from” section of the subsequent dialog box, enter “D:\USBdrv_” (replac-
ing “D” with the drive letter of your CD-ROM drive), and then click OK.