Yamaha DP-U50 Owner's Manual - Page 42
Adjusting the virtual 3D effect, Adjusting the dynamic range, Operating the graphic equalizer
 |
View all Yamaha DP-U50 manuals
Add to My Manuals
Save this manual to your list of manuals |
Page 42 highlights
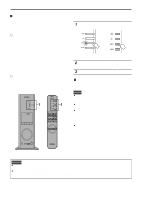
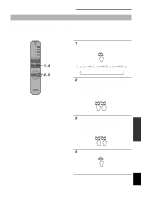
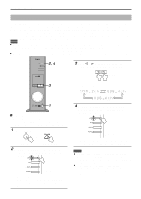
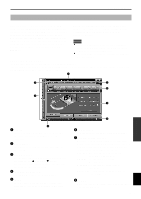
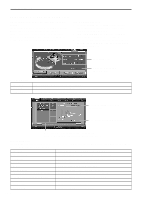
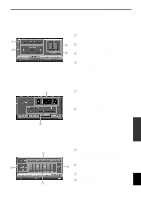
ADVANCED OPERATION Adjusting the virtual 3D effect The surround sound effect of the virtual 3D sound field is affected by the room configuration and the position of the listener, resulting in sound unique to each environment. The procedure below shows you how to adjust the effect of the virtual 3D to suit your preferences and environment. Select the VIRTUAL tab at the bottom of the Main Panel. The following screen appears. 1 Balance adjustment You can adjust the volume balance between the right 1 and left speakers. 3 2 Virtual rear speaker position setting You can set the position of the virtual rear speakers 2 (the speakers are positioned symmetrically.) 4 3 HRTF (Head-related Transfer Function) adjustment You can make an adjustment to personal characteristics. 4 Test tone You can output a test tone successively from the speakers at their current positions, allowing setting and adjustment while listening to the tone. Adjusting the dynamic range You can set the dynamic range for playing a source with Dolby Digital decoded. This is especially effective for low-volume listening. Select the D-RANGE tab at the bottom of the Main Panel. The following screen appears. 1 2 1 Dynamic range setting Select the dynamic range for playing a source with Dolby Digital decoded from MIN, STANDARD, and MAX. The MAX setting provides a dynamic range of a movie theater while MIN provides a dynamic range suitable for late night, low-volume listening. 2 Dynamic range adjustment This setting becomes available when you choose STANDARD for the dynamic range. This adjusts highlevel cut scale (H-LEVELCut) and low-level boost scale (L-LEVELBST), allowing you to freely adjust the dynamic range between MAX and MIN. Operating the graphic equalizer The 7-band graphic equalizer allows you to set the frequency characteristics according to the type of the music that is played and to compensate for the room characteristics and the speakers' frequency characteristics. This panel is always shown when no DSP sound field program is selected. When a DSP sound field program is selected, selecting the EQUALIZER tab at the bottom of the Main Panel will show this panel. 1 Preset patterns 1 Five patterns of frequency characteristics have been preset for different types of music, such as "ROCK" and "POPS". Click a button to select the effect that suits the music type. 2 Storing and calling user's patterns 2 3 You can store and call up to two patterns of frequency characteristics you specify. 3 FLAT This makes the frequency response curves flat. 4 Graphic equalizer 4 The 7-band equalizer allows you to set your desired frequency response curves. By dragging the indicator for each frequency band, you can adjust the frequencies within the range of +6 to -6 dB. E-17 ADVANCED OPERATION English
-
 1
1 -
2
-
3
-
4
-
5
-
6
-
7
-
8
-
9
-
10
-
11
-
12
-
13
-
14
-
15
-
16
-
17
-
18
-
19
-
20
-
21
-
22
-
23
-
24
-
25
-
26
-
27
-
28
-
29
-
30
-
31
-
32
-
33
-
34
-
35
-
36
-
 37
37 -
 38
38 -
 39
39 -
 40
40 -
 41
41 -
 42
42 -
 43
43 -
 44
44 -
 45
45 -
 46
46 -
 47
47
 |
 |
