Yamaha DV-SL100 Owner's Manual - Page 7
Functional Overview, Front and Rear Panels
 |
View all Yamaha DV-SL100 manuals
Add to My Manuals
Save this manual to your list of manuals |
Page 7 highlights
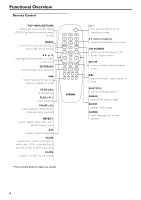
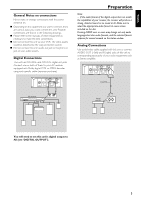
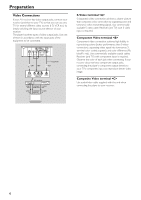
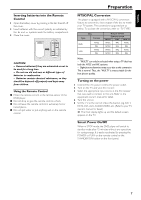
English Front and Rear Panels STANDBY/ON - to turn this unit to standby mode or ON Disc Tray / OPEN/CLOSE - to open/close the disc tray B PLAY - to start playback Functional Overview 9 STOP - to stop playback ; PAUSE - to interrupt playback S-VIDEO - connect to S-Video input of your AV receiver COMPONENT VIDEO - connect to component video inputs of your AV receiver VIDEO - connect to Video inputs of your AV receiver AC Power Cord - connect to a standard AC outlet AUDIO OUT (Left/Right) - connect to AUDIO inputs of your AV receiver or stereo system OPTICAL - connect to DIGITAL INPUT of your AV receiver COAXIAL - connect to DIGITAL INPUT of your AV receiver Caution: Do not touch the inner pins of the jacks on the rear panel. Electrostatic discharge may cause permanent damage to the unit. 3
-
 1
1 -
 2
2 -
 3
3 -
 4
4 -
 5
5 -
 6
6 -
 7
7 -
 8
8 -
 9
9 -
 10
10 -
 11
11 -
 12
12 -
13
-
14
-
15
-
16
-
17
-
18
-
19
-
20
-
21
-
22
-
23
-
24
-
25
-
26
-
27
-
28
-
29
-
30
 |
 |
