Yamaha HTR-3064 Owners Manual
Yamaha HTR-3064 Manual
 |
View all Yamaha HTR-3064 manuals
Add to My Manuals
Save this manual to your list of manuals |
Yamaha HTR-3064 manual content summary:
- Yamaha HTR-3064 | Owners Manual - Page 1
AV Receiver Owner's Manual English for North America - Yamaha HTR-3064 | Owners Manual - Page 2
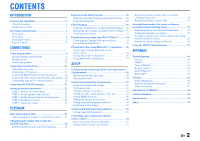
53 Resetting all remote control codes 54 Extended functionality that can be configured as needed (Advanced Setup menu 55 Displaying/Setting the Advanced Setup menu 55 Setting the impedance of speakers 55 Avoiding crossing remote control signals when using multiple Yamaha receivers 56 - Yamaha HTR-3064 | Owners Manual - Page 3
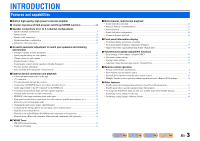
high-power 5-channel amplifier ■ 1-button input/sound field program switching (SCENE function 26 ■ Speaker connections for 2- to 5.1-channel configurations - Speaker channels and functions ...9 - Speaker layout...10 - Speaker cable connection...10 - Speaker impedance configuration...10 - Subwoofer - Yamaha HTR-3064 | Owners Manual - Page 4
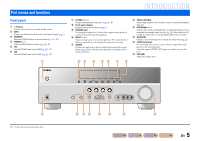
Front panel Rear panel Front panel display Remote control Supplied accessories Check that you received all of the following parts. • Remote control • Batteries (AAA, R03, UM-4) x 2 • AM loop antenna • Indoor FM antenna • VIDEO AUX input cover ■ Attaching the VIDEO AUX input cover (included) To - Yamaha HTR-3064 | Owners Manual - Page 5
Power CONTROL Adjusts high-frequency/low-frequency output of speakers/headphones (☞p. 25). m PROGRAM l / h Switches between the sound field effect (sound field program) you are using and the surround sound decoder SCENE TV CD TONE CONTROL PROGRAM RADIO STRAIGHT VIDEO AUX PORTABLE VIDEO L AUDIO - Yamaha HTR-3064 | Owners Manual - Page 6
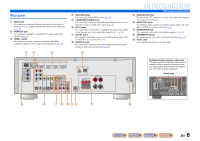
jack For connecting a subwoofer with a built-in amplifier (☞p. 12). l SPEAKER terminals For connecting the front, center, and surround speakers (☞p. 12). m Power cord For connecting this unit to an AC wall outlet. d DOCK COMPONENT VIDEO PR ARC HDMI OUT PR (BD/DVD) HDMI 1 HDMI 2 PB PB - Yamaha HTR-3064 | Owners Manual - Page 7
corresponding cursors on the remote control are available for operations. i Multi information display Displays a range of information on menu items and settings. j Speaker indicators Indicate speaker terminals from which signals are output. Subwoofer Front speaker L Surround speaker L SW L CR SL - Yamaha HTR-3064 | Owners Manual - Page 8
Remote control a b c d e f g h i j k l m SOURCE 1 1 5 TRANSMIT CODE SET SLEEP RECEIVER HDMI 2 3 4 AV 2 3 4 AUDIO 1 2 V-AUX [ A ] [ B ] DOCK TUNER FM AM PRESET TUNING INFO MEMORY MOVIE ENHANCER SUR. DECODE MUSIC STEREO STRAIGHT BD DVD SETUP SCENE TV CD RADIO OPTION - Yamaha HTR-3064 | Owners Manual - Page 9
This unit uses acoustic field effects and sound decoders to bring you the impact of a real movie theater or concert hall. These effects will be brought to you with ideal speaker positioning and connections in your listening environment. Speaker channels and functions ■ Front left and right - Yamaha HTR-3064 | Owners Manual - Page 10
5.1-channel speaker layout (5 speakers + subwoofer) Front speaker R Front speaker L Subwoofer Connecting speakers CONNECTIONS Connecting speakers ■ Changing speaker impedance This unit is configured for 8Ω speakers when it is dispatched from the factory. When connecting to 6Ω speakers, carry - Yamaha HTR-3064 | Owners Manual - Page 11
the speaker cable does not touch anything or come into contact with the metal areas of this unit. This may damage this unit or the speakers. If the speaker cables short circuit, "CHECK SP WIRES!" will appear on the front panel display when this unit is switched on. CONNECTIONS Connecting speakers - Yamaha HTR-3064 | Owners Manual - Page 12
the terminal. 3 Lift the tab to fix the speaker cable in place. CONNECTIONS Connecting speakers ■ Connecting the subwoofer 1 Connect the subwoofer input jack to the SUBWOOFER jack on this unit with an audio pin cable. 2 Set the subwoofer volume as follows. Volume: Set to approximately half volume - Yamaha HTR-3064 | Owners Manual - Page 13
appropriate for components that you are going to connect. ■ Audio/Video jacks HDMI jacks Digital video and digital sound are transmitted through a single jack. Only use an HDMI cable. ■ Audio jacks OPTICAL jacks These jacks transmit optical digital audio signals. Use fiber-optic cables for optical - Yamaha HTR-3064 | Owners Manual - Page 14
an HDMI video monitor Connect the HDMI cable to the HDMI OUT jack. HDMI DOCK COMPONENT VIDEO PR ARC HDMI OUT PR (BD/DVD) HDMI 1 HDMI 2 PB PB Y MONITOR OUT Y COMPONENT VIDEO VIDEO HDMI 3 HDMI 4 MONITOR OUT OPTICAL AV 1 COAXIAL AV 2 COAXIAL (CD) AV 3 OPTICAL ( TV ) AV 4 AV 5 AV OUT - Yamaha HTR-3064 | Owners Manual - Page 15
COMPONENT VIDEO PR ARC HDMI OUT PR (BD/DVD) HDMI 1 HDMI 2 PB PB Y MONITOR OUT Y COMPONENT VIDEO VIDEO HDMI 3 HDMI 4 MONITOR OUT OPTICAL COAXIAL COAXIAL (CD) OPTICAL AV OUT AUDIO OUT You can control your TV using the receiver's remote control by entering the TV's remote control code - Yamaha HTR-3064 | Owners Manual - Page 16
TRANSMIT CODE SET SLEEP RECEIVER HDMI 2 3 4 AV 2 3 4 AUDIO 1 2 V-AUX [ A ] [ B ] DOCK TUNER FM AM PRESET TUNING INFO MEMORY MOVIE ENHANCER SUR. DECODE MUSIC STEREO STRAIGHT BD DVD SETUP SCENE TV CD RADIO OPTION ENTER VOLUME RETURN DISPLAY TOP MENU REC POP-UP MENU - Yamaha HTR-3064 | Owners Manual - Page 17
COMPONENT VIDEO PR ARC HDMI OUT PR PR (BD/DVD) HDMI 1 HDMI 2 PB PB Y Y MONITOR OUT PB Y COMPONENT VIDEO VIDEO HDMI 3 HDMI 4 MONITOR OUT O O OPTICAL AV 1 COAXIAL AV 2 COAXIAL (CD) AV 3 OPTICAL ( TV ) AV 4 AV 5 AV OUT AUDIO 1 AUDIO 2 AUDIO OUT BD/DVD player Using coaxial digital - Yamaha HTR-3064 | Owners Manual - Page 18
TV AV 5 AV OUT AUDIO 1 AUDIO 2 AUDIO OUT BD/DVD player Using coaxial digital audio output sources Select the AV3 input that the external device is connected to for playback. BD/DVD player Video / Audio (Coaxial) output VIDEO V COAXIAL C BD/DVD player DOCK COMPONENT VIDEO PR ARC HDMI - Yamaha HTR-3064 | Owners Manual - Page 19
DOCK COMPONENT VIDEO PR ARC HDMI OUT PR (BD/DVD) HDMI 1 HDMI 2 HDMI 3 HDMI 4 PB PB Y MONITOR OUT Y COMPONENT VIDEO VIDEO MONITOR OUT L OPTICAL AV 1 COAXIAL AV 2 COAXIAL (CD) AV 3 OPTICAL ( TV ) AV 4 R AV 5 AV OUT AUDIO 1 AUDIO 2 AUDIO OUT CD player Using optical digital output - Yamaha HTR-3064 | Owners Manual - Page 20
devices. Video / Audio input VIDEO V AUDIO L R ARC DOCK COMPONENT VIDEO PR HDMI OUT PR (BD/DVD) HDMI 1 HDMI 2 HDMI 3 HDMI 4 PB Y MONITOR OUT PB V Y COMPONENT VIDEO VIDEO MONITOR OUT L L R R OPTICAL AV 1 COAXIAL AV 2 COAXIAL (CD) AV 3 OPTICAL ( TV ) AV 4 AV 5 AV OUT AUDIO - Yamaha HTR-3064 | Owners Manual - Page 21
AM loop antenna Position the AM antenna away from the receiver. The wires of the AM antenna have no polarity. You can connect either wire to the AM jack or the GND jack. HDMI 3 HDMI 4 FM GND AM MONITOR OUT SURROUND CENTER SPEAKERS FRONT Connecting the AM loop antenna Press and hold Insert - Yamaha HTR-3064 | Owners Manual - Page 22
on the remote control. The Setup menu that allows you to configure all parameters on this unit appears. J1 SETUP VOL. SW Speaker Setup L CR SL SR 3 Check that "Speaker Setup" appears and press jENTER. SP SET Config This completes step 1. VOL. SW L CR SL SR CONNECTIONS STEP 2: Set - Yamaha HTR-3064 | Owners Manual - Page 23
TRANSMIT CODE SET SLEEP RECEIVER HDMI 2 3 4 AV 2 3 4 AUDIO 1 2 V-AUX [ A ] [ B ] DOCK TUNER FM AM PRESET TUNING INFO MEMORY MOVIE ENHANCER SUR. DECODE MUSIC STEREO STRAIGHT BD DVD SETUP SCENE TV CD RADIO OPTION ENTER VOLUME RETURN DISPLAY TOP MENU REC POP-UP MENU - Yamaha HTR-3064 | Owners Manual - Page 24
SOURCE 1 1 5 TRANSMIT CODE SET SLEEP RECEIVER HDMI 2 3 4 AV 2 3 4 AUDIO 1 2 V-AUX [ A ] [ B ] DOCK TUNER FM AM PRESET TUNING INFO MEMORY MOVIE ENHANCER SUR. DECODE MUSIC STEREO STRAIGHT BD DVD SETUP SCENE TV CD RADIO OPTION STEP 4: Playback a test tone 10 Press - Yamaha HTR-3064 | Owners Manual - Page 25
TRANSMIT CODE SET SLEEP RECEIVER HDMI 2 3 4 AV 2 3 4 AUDIO 1 2 V-AUX [ A ] [ B ] DOCK TUNER FM AM PRESET TUNING INFO MEMORY MOVIE ENHANCER SUR. DECODE MUSIC STEREO STRAIGHT BD DVD SETUP SCENE TV CD RADIO OPTION ENTER VOLUME RETURN DISPLAY TOP MENU REC POP-UP MENU - Yamaha HTR-3064 | Owners Manual - Page 26
TRANSMIT CODE SET SLEEP RECEIVER HDMI 2 3 4 AV 2 3 4 AUDIO 1 2 V-AUX [ A ] [ B ] DOCK TUNER FM AM PRESET TUNING INFO MEMORY MOVIE ENHANCER SUR. DECODE MUSIC STEREO STRAIGHT BD DVD SETUP SCENE TV CD RADIO OPTION ENTER VOLUME RETURN DISPLAY TOP MENU REC POP-UP MENU - Yamaha HTR-3064 | Owners Manual - Page 27
TRANSMIT CODE SET SLEEP RECEIVER HDMI 2 3 4 AV 2 3 4 AUDIO 1 2 V-AUX [ A ] [ B ] DOCK TUNER FM AM PRESET TUNING INFO MEMORY MOVIE ENHANCER SUR. DECODE MUSIC STEREO STRAIGHT BD DVD SETUP SCENE TV CD RADIO OPTION ■ Enjoying unprocessed playback (Straight decoding mode - Yamaha HTR-3064 | Owners Manual - Page 28
video sources such as movies, TV programs, and games. Standard Spectacle Sci-Fi Adventure Drama Mono Movie Sports Action Game This program creates a sound field emphasizing the surround feeling without disturbing the original acoustic positioning of multi-channel audio such as Dolby Digital - Yamaha HTR-3064 | Owners Manual - Page 29
from the front left and right speakers. Use this program to output sound from all speakers. When you play back multi-channel sources, this unit down-mixes the source to 2 channels, and then outputs the sound from all speakers. This program creates a larger sound field and is ideal for background - Yamaha HTR-3064 | Owners Manual - Page 30
TRANSMIT CODE SET SLEEP RECEIVER HDMI 2 3 4 AV 2 3 4 AUDIO 1 2 V-AUX [ A ] [ B ] DOCK TUNER FM AM PRESET TUNING INFO MEMORY MOVIE ENHANCER SUR. DECODE MUSIC STEREO STRAIGHT BD DVD SETUP SCENE TV CD RADIO OPTION ENTER VOLUME RETURN DISPLAY TOP MENU REC POP-UP MENU - Yamaha HTR-3064 | Owners Manual - Page 31
this unit to receive in a monaural mode. V-AUX [ A ] [ B ] DOCK TUNER 1 d Press dTUNER to switch to the tuner input. FM AM PRESET TUNING INFO MEMORY MOVIE ENHANCER SUR. DECODE MUSIC STEREO e 2 Press qOPTION to display the Option menu. J1 STRAIGHT BD DVD SETUP SCENE TV CD RADIO - Yamaha HTR-3064 | Owners Manual - Page 32
TRANSMIT CODE SET SLEEP RECEIVER HDMI 2 3 4 AV 2 3 4 AUDIO 1 2 V-AUX [ A ] [ B ] DOCK TUNER FM AM PRESET TUNING INFO MEMORY MOVIE ENHANCER SUR. DECODE MUSIC STEREO STRAIGHT BD DVD SETUP SCENE TV CD RADIO OPTION ENTER VOLUME RETURN DISPLAY TOP MENU REC POP-UP MENU - Yamaha HTR-3064 | Owners Manual - Page 33
TRANSMIT CODE SET SLEEP RECEIVER HDMI 2 3 4 AV 2 3 4 AUDIO 1 2 V-AUX [ A ] [ B ] DOCK TUNER FM AM PRESET TUNING INFO MEMORY MOVIE ENHANCER SUR. DECODE MUSIC STEREO STRAIGHT BD DVD SETUP SCENE TV CD RADIO OPTION ENTER VOLUME RETURN DISPLAY TOP MENU REC POP-UP MENU - Yamaha HTR-3064 | Owners Manual - Page 34
TRANSMIT CODE SET SLEEP RECEIVER HDMI 2 3 4 AV 2 3 4 AUDIO 1 2 V-AUX [ A ] [ B ] DOCK TUNER FM AM PRESET TUNING INFO MEMORY MOVIE ENHANCER SUR. DECODE MUSIC STEREO STRAIGHT BD DVD SETUP SCENE TV CD RADIO OPTION ENTER VOLUME RETURN DISPLAY TOP MENU REC POP-UP MENU - Yamaha HTR-3064 | Owners Manual - Page 35
CODE SET SOURCE 1 1 SLEEP HDMI 2 3 AV 2 3 RECEIVER 4 4 ■ To charge the iPod/iPhone when this unit is in standby mode If you connect an iPod/iPhone to the iPod universal AUDIO 5 1 2 dock the iPod/iPhone will always charge when this V-AUX [ A ] [ B ] DOCK TUNER d unit is turned - Yamaha HTR-3064 | Owners Manual - Page 36
the rear panel of this unit. The Bluetooth wireless audio receiver connection will be j complete when this unit is turned on. COMPONENT VIDEO PR ARC HDMI OUT PR PB PB Y MONITOR OUT Y COMPON VIDEO OPTICA AV Yamaha Bluetooth wireless audio receiver CAUTION To prevent accidents, place this unit - Yamaha HTR-3064 | Owners Manual - Page 37
RECEIVER HDMI 2 3 4 AV 2 3 4 AUDIO 1 2 V-AUX [ A ] [ B ] DOCK TUNER FM AM PRESET TUNING INFO MEMORY MOVIE ENHANCER SUR. DECODE MUSIC STEREO STRAIGHT BD DVD SETUP SCENE TV CD RADIO OPTION ENTER VOLUME RETURN DISPLAY TOP MENU REC POP-UP MENU MUTE Using Bluetooth - Yamaha HTR-3064 | Owners Manual - Page 38
1 1 5 TRANSMIT CODE SET SLEEP RECEIVER HDMI 2 3 4 AV 2 3 4 AUDIO 1 2 V-AUX [A] [ B ] DOCK TUNER AM MEMORY PRESET TUNING ENHANCER SUR. DECODE MUSIC STEREO STRAIGHT BD DVD SETUP SCENE TV CD RADIO OPTION ENTER VOLUME RETURN DISPLAY TOP MENU REC POP-UP MENU MUTE - Yamaha HTR-3064 | Owners Manual - Page 39
-4 or AV1-2) as the video input first, and then select audio input jacks in this menu. J 1 : AV5 or AUDIO1-2 are also available when the "Audio Return Channel" function is on, and the source is used for the TV audio input (TVAudio). SETUP Configuring the settings specific for each input source - Yamaha HTR-3064 | Owners Manual - Page 40
while the receiver is in standby mode (☞p. 35). SETUP Configuring the settings specific for each input source (Option menu) ■ Bluetooth™ wireless connections Connect Disconnect Input source: Bluetooth (DOCK) Enables/disables the Bluetooth wireless connection (☞p. 37). Select "Connect" to establish - Yamaha HTR-3064 | Owners Manual - Page 41
Setup menu SETUP Setup menu items Setup menu Speaker Setup Config Level Distance Equalizer Test Tone Sound Setup Lipsync Adaptive DRC D.Range Max Volume Init.Volume HDMI Setup Control TVAudio ARC Audio Func. Setup Input Rename AutoPowerDown Dimmer DSP Parameter Memory Guard Subwoofer Front - Yamaha HTR-3064 | Owners Manual - Page 42
. J1 Select this when you do not have a subwoofer connected. The front speakers will produce audio from the LFE (low-frequency effect) channel and bass frequency audio from other channels. SETUP Setting various functions (Setup menu) Front Selects the size (sound reproduction capacity) of the front - Yamaha HTR-3064 | Owners Manual - Page 43
FR / SWFR) -1.0 dB (C / SL / SR) Adjustment increments 0.5 dB SETUP Setting various functions (Setup menu) ■ Manually setting speaker distance Distance Adjusts the timing at which the speakers produce audio so that sounds from the speakers reach the listening position at the same time. Selecting - Yamaha HTR-3064 | Owners Manual - Page 44
, press iSETUP to close the Setup menu. SETUP Setting various functions (Setup menu) ■ Generating test tones Test Tone Turns the test tone generator on or off. Off (Default) On Does not generate test tones. Generates test tones. While "On" is selected, test tones are produced constantly. You - Yamaha HTR-3064 | Owners Manual - Page 45
initial volume for when this receiver is turned on. ■ Synchronizing audio/video output Lipsync Adjusts the delay between audio and video output (Lipsync function). HDMI Auto When connecting to a TV via HDMI, automatically adjusts output timing if the TV supports an automatic lipsync function. Off - Yamaha HTR-3064 | Owners Manual - Page 46
home menu) Setting HDMI functions SETUP HDMI Setup VOL. SW L CR SL SR HDMI Setup submenu Control TVAudio J2 ARC J2 Audio J2 Turns the HDMI Control on or off. Chooses automatically selected audio input in conjunction with TV operation when the HDMI Control is turned on. Transmits audio/video - Yamaha HTR-3064 | Owners Manual - Page 47
CR SL SR • "ARC" is only displayed with the HDMI Control function (Control) is set to "On." • Please refer to "Single HDMI cable input to TV audio with Audio Return Channel function" (☞p. 59) for setting instructions. SETUP Setting various functions (Setup menu) ■ Changing the output destination - Yamaha HTR-3064 | Owners Manual - Page 48
TRANSMIT CODE SET SLEEP RECEIVER HDMI 2 3 4 AV 2 3 4 AUDIO 1 2 V-AUX [ A ] [ B ] DOCK TUNER FM AM PRESET TUNING INFO MEMORY MOVIE ENHANCER SUR. DECODE MUSIC STEREO STRAIGHT BD DVD SETUP SCENE TV CD RADIO OPTION ENTER VOLUME RETURN DISPLAY TOP MENU REC POP-UP MENU - Yamaha HTR-3064 | Owners Manual - Page 49
the parameters for the sound field programs (☞p. 50). SETUP VOL. SW DSP Parameter L CR SL SR Prohibiting setting changes SETUP VOL. Memory Guard SW L CR SL SR Prohibits setting changes to prevent careless changes being made to the settings on Setup menu. Off (Default) On Settings - Yamaha HTR-3064 | Owners Manual - Page 50
TRANSMIT CODE SET SLEEP RECEIVER HDMI 2 3 4 AV 2 3 4 AUDIO 1 2 V-AUX [ A ] [ B ] DOCK TUNER FM AM PRESET TUNING INFO MEMORY MOVIE ENHANCER SUR. DECODE MUSIC STEREO STRAIGHT BD DVD SETUP SCENE TV CD RADIO OPTION ENTER VOLUME RETURN DISPLAY TOP MENU REC POP-UP MENU - Yamaha HTR-3064 | Owners Manual - Page 51
source are emphasized excessively. ■ Parameters usable in surround decoder q PLII Music only Panorama Adjusts the soundscape of the front sound field. Sends front left/ right channels sounds to the surround speakers as well as the front speakers for a wraparound effect. Off (Default) On Disables - Yamaha HTR-3064 | Owners Manual - Page 52
video inputs of TV Mutes TV volume temporarily. Controls the volume of TV Switches TV channels. Turns on and off TV The following remote control codes are assigned to input sources as factory default settings. For a complete list of available remote control codes, please refer to "Remote Control - Yamaha HTR-3064 | Owners Manual - Page 53
MEMORY MOVIE ENHANCER SUR. DECODE MUSIC STEREO STRAIGHT BD DVD SETUP SCENE TV CD RADIO OPTION ENTER VOLUME RETURN DISPLAY TOP MENU REC POP-UP MENU MUTE 1 2 3 4 5 6 7 8 9 INPUT MUTE 0 10 TV TV VOL TV CH ENT n Registering remote control codes d for external component - Yamaha HTR-3064 | Owners Manual - Page 54
SUR. DECODE MUSIC STEREO STRAIGHT BD DVD SETUP SCENE TV CD RADIO OPTION ENTER VOLUME RETURN DISPLAY TOP MENU REC POP-UP MENU MUTE 1 2 3 4 5 6 7 8 9 INPUT MUTE 0 10 TV TV VOL TV CH ENT n Resetting all remote control codes Resetting all remote control codes for external - Yamaha HTR-3064 | Owners Manual - Page 55
SCENE TV CD TONE CONTROL PROGRAM RADIO STRAIGHT 3 Use PROGRAM to select the item to be set from the following items. In the Advanced Setup menu, you can set the following settings. SP IMP. REMOTE ID INIT Sets the impedance of speakers. Changes the remote control ID of a receiver. Initializes - Yamaha HTR-3064 | Owners Manual - Page 56
sound field programs. Resets this unit to default factory settings. Does not initialize. Registration successful: blinks twice Registration failed: blinks 6 times SOURCE TRANSMIT SLEEP HDMI CODE SET RECEIVER • If setup fails, repeat from step 1. • Returns to ID1 after the remote control code - Yamaha HTR-3064 | Owners Manual - Page 57
. - Set the TV's HDMI Control function to "On" - Follow the AV amplifier connection instructions, and connect this unit to the TV 1 Connect the TV, DVD recorder supporting HDMI Control to this unit's HDMI output jack. 2 Turn on the TV and this unit. Refer to the TV's instruction manual on how to - Yamaha HTR-3064 | Owners Manual - Page 58
TRANSMIT CODE SET SLEEP RECEIVER HDMI 2 3 4 AV 2 3 4 AUDIO 1 2 V-AUX [ A ] [ B ] DOCK TUNER FM AM PRESET TUNING INFO MEMORY MOVIE ENHANCER SUR. DECODE MUSIC STEREO STRAIGHT BD DVD SETUP SCENE TV CD RADIO OPTION ENTER VOLUME RETURN DISPLAY TOP MENU REC POP-UP MENU - Yamaha HTR-3064 | Owners Manual - Page 59
CODE SET SLEEP RECEIVER HDMI 2 3 4 AV 2 3 4 AUDIO 1 2 V-AUX [ A ] [ B ] DOCK TUNER FM AM PRESET TUNING INFO MEMORY MOVIE ENHANCER SUR. DECODE MUSIC STEREO STRAIGHT BD DVD SETUP SCENE TV CD RADIO OPTION ■ Single HDMI cable input to TV audio with Audio Return Channel - Yamaha HTR-3064 | Owners Manual - Page 60
to request repair. The power cable is not completely Connect the power cable properly to an AC inserted. wall outlet. The speaker impedance settings are incorrect. Set the speaker impedance to match your speakers. (When this unit is turned back on and "CHECK SP WIRES!" is displayed.) The - Yamaha HTR-3064 | Owners Manual - Page 61
input is not Select an appropriate video input on the TV. - selected on the TV. APPENDIX Troubleshooting Problem No sound is output from a specific speaker. Only the center speaker outputs substantial sound. Cause The speaker is malfunctioning. Check the Speaker indicators on the front panel - Yamaha HTR-3064 | Owners Manual - Page 62
decoding mode. Sound may not be output from certain channels depending on input sources or sound field programs. Try another sound field program. A subwoofer is not connected, or it is disabled. Check that a subwoofer is connected correctly, and from the Setup menu "Subwoofer" ("Speaker Setup - Yamaha HTR-3064 | Owners Manual - Page 63
remote control of the TV. (When using Audio Return Channel function) The Audio Return Channel Make sure that your TV supports Audio 47 Return Channel. Set the Audio Return Channel function to function is not working. on (Setup menu → HDMI Setup → ARC input. Check the antenna connections. - Yamaha HTR-3064 | Owners Manual - Page 64
and properly grounding an outdoor AM antenna. Buzzing and whining A TV set is being used nearby. Move this unit away from the TV set. - noises are heard. Remote control APPENDIX Troubleshooting Problem The remote control does not work or function properly. Cause Wrong distance or angle - Yamaha HTR-3064 | Owners Manual - Page 65
on the Bluetooth component and this unit simultaneously. Check if the Bluetooth component is in pairing mode. During connecting: - check if the Bluetooth component is turned on. - check if the Bluetooth component is within 32 feet (10 m) of the Yamaha Bluetooth wireless audio receiver. See page - Yamaha HTR-3064 | Owners Manual - Page 66
home theater experience. Supporting bitrates up to 24.5 Mbps for Blu-ray Disc, DTS-HD Master Audio can carry up to 7.1 discrete channels of 24-bit/96 kHz audio simultaneously. Supported by HDMI version 1.3 and designed for the optical disc players and AV receivers/amplifiers of the future, DTS-HD - Yamaha HTR-3064 | Owners Manual - Page 67
as set-top boxes or AV receivers) and audio/video monitors (such as digital TV), HDMI supports standard, enhanced or high-definition video as well as multichannel digital audio using a single cable. HDMI transmits all ATSC HDTV standards and supports 8-channel digital audio, with bandwidth to spare - Yamaha HTR-3064 | Owners Manual - Page 68
, HD DVD, etc. • If the input source component can decode the bitstream audio signals of audio commentaries, you can play back the audio sources with the audio commentaries mixed down by using the digital audio input (optical or coaxial) connections. • Refer to the supplied instruction manuals of - Yamaha HTR-3064 | Owners Manual - Page 69
[Audio/Video] HDMI x 1 [Video] Component video jack x 1, video jack x 1 • AV output x 2 [Audio] Analog jack x 1 [Video] Video jack x 1 • AUDIO output x 1 [Audio] Analog jack x 1 ■ HDMI • HDMI Specification: Deep Color, "x.v.Color," Auto Lips Sync, ARC (Audio Return Channel) • Video Format (Repeater - Yamaha HTR-3064 | Owners Manual - Page 70
34 J Jack 13 O Option menu 38 R Rear panel 6 Remote control, Controlling other components 52 Remote control, Part names and functions 8 S SCENE function 26 Setup menu 41 Sound field program 26 Sound field program parameter setting 50 Speaker connection 9 Speaker setting 22 Supplied - Yamaha HTR-3064 | Owners Manual - Page 71
© 2011 Yamaha Corporation YD283A0/OMEN1 - Yamaha HTR-3064 | Owners Manual - Page 72
is added for U.S.A. model as well as "Specifications" in the Owner's Manual. • Rated Output Power for Front, Center, Surround (1 kHz, 0.9% THD, 8Ω, 2 channels driven simultaneously) FRONT L/R 80 W + 80 W CENTER 80 W SURROUND L/R 80 W + 80 W © 2011 Yamaha Corporation Printed in China WY69390 - Yamaha HTR-3064 | Owners Manual - Page 73
RL AV Receiver For more detailed information, refer to the Owner's Manual on the CD-ROM. To view the Owner's Manual, click "English" in the screen displayed automatically when you insert the CD-ROM into your PC. Then follow the on-screen instructions. If the screen is not displayed automatically, - Yamaha HTR-3064 | Owners Manual - Page 74
this unit itself is turned off by A. This state is called the standby mode. In this state, this unit is designed to consume a very small quantity of power. WARNING TO REDUCE THE RISK OF FIRE OR ELECTRIC SHOCK, DO NOT EXPOSE THIS UNIT TO RAIN OR MOISTURE. ■ Notes on remote controls and batteries • Do - Yamaha HTR-3064 | Owners Manual - Page 75
rendimiento de este aparato, lea atentamente este manual. Y luego guárdelo en un lugar No utilice una fuerza excesiva con los conmutadores, los controles y/o los cables. 10 Cuando desconecte el cable de os en el aparato y/o lesiones a las personas. Yamaha no se hará responsable de ningún daño debido - Yamaha HTR-3064 | Owners Manual - Page 76
© 2011 Yamaha Corporation Printed in China WW72190 - Yamaha HTR-3064 | Owners Manual - Page 77
battery compartment cover back into place. 2 ■ Items necessary for connection Speakers Ex. Front speaker Ex. Center speaker Ex. Surround speaker Ex. Active subwoofer • Use speakers with an impedance of at least 6Ω. • If you are using a CRT TV, we recommend that you use magnetically shielded - Yamaha HTR-3064 | Owners Manual - Page 78
2 Front speaker L 4 This unit Center speaker Front speaker R Subwoofer 1 Surround speaker R Surround 1 speaker L BD/DVD player (recorder) 1 Connect the speakers 2 Connect a TV 3 Connect playback device such as BD/DVD players and recorders 4 Connect the AC power cord, and turn the power on - Yamaha HTR-3064 | Owners Manual - Page 79
, "CHECK SP WIRES!" will appear on the front panel display when this unit is switched on. • When connecting 6Ω speakers, set the speaker impedance to 6Ω on this unit before making connections. Refer to Owner's Manual for information on settings. Subwoofer Center speaker Connecting front speakers - Yamaha HTR-3064 | Owners Manual - Page 80
carried out on the TV, and that makes TV sound control easier to use. For the connections and settings, refer to "Single HDMI cable input to TV audio with Audio Return Channel function" in Owner's Manual. When using a TV that supports HDMI Control functions When HDMI Control functions are enabled on - Yamaha HTR-3064 | Owners Manual - Page 81
Owner's Manual for details. 4 Connect the AC power cord, and turn the power on AC power cord Be sure to aim the remote control directly at the remote control sensor on this unit during operation. To the power outlet. within 30 30 20 ft SOURCE 1 1 5 TRANSMIT CODE SET SLEEP RECEIVER HDMI - Yamaha HTR-3064 | Owners Manual - Page 82
TV VOL TV CH ENT RECEIVER A SETUP Cursor ENTER RETURN STEP 1: Display the setting menu 1 Press RECEIVER A on the remote control to switch this unit on. 2 Press SETUP on the remote control. SETUP VOL. Speaker Setup SW L CR SL SR 3 Check that "Speaker Setup" appears and press ENTER. SP - Yamaha HTR-3064 | Owners Manual - Page 83
balance for all speakers to your preference. 17 Press RETURN when setting is complete. Return to the previous menu. This completes step 5. 18 Repeat procedures 10-12 (step 4) to stop playback of the test tone. 19 Once you have completed all settings, press SETUP to close the Setup menu. - 7 - - Yamaha HTR-3064 | Owners Manual - Page 84
for speakers and headphones separately. Connect the headphones when adjusting the headphone tone control. - If you set an extreme tone balance, sounds may not match those from other channels. © 2011 Yamaha Corporation - 8 - SOURCE 1 1 5 TRANSMIT CODE SET SLEEP RECEIVER HDMI 2 3 4 AV - Yamaha HTR-3064 | Owners Manual - Page 85
List of remote control codes Liste des codes de commande Lista de códigos de mando a distancia TV A.R. Systems 0320 Acme 0342 Bell & Howell 0019, 0054 Benq 0097, 0242, 0361 Beon 0320, 0349, 0350 Best 0161 Bestar 0161, 0320, 0350 Binatone 0282, 0342 Blue Sky 0320, 0340 Blue Star - Yamaha HTR-3064 | Owners Manual - Page 86
, 0282, 0320, 0323, 0341, 0342, 0343, 0344, 0346, 0349 Murphy 0277, 0342 NAD 0026, 0031, 0111 - 2 - Naonis NEC Neckermann NEI Net-TV Neufunk New Tech New World NewTech Nicamagic Nikkai Nikko Nobliko Nokia Norcent Nordic Nordmende Nordvision Novatronic Oceanic Okano Olevia ONCEAS Onwa Opera - Yamaha HTR-3064 | Owners Manual - Page 87
0339 Radiotone 0161, 0320, 0323, 0350 Rank 0344 RCA 0008, 0021, 0024, 0025, 0026, 0027, 0042 0254, 0326, 0343, 0344, 0371, 0374, 0457, 0475 Sound & Vision 0340, 0341 Soundesign 0008, 0026, 0031, 0058, Wincom 0101, 0106 Xrypton 0320 Yamaha 0008, 0026, 0050, 0053, 0080, 0081 - Yamaha HTR-3064 | Owners Manual - Page 88
1068 Quelle 1026, 1028 Radialva 1008 RadioShack 1071 RadioShack/Realistic 1065, 1068, 1069, 1070, 1071 Radiola 1028 Radix 1071 Randex 1071 RCA 1019, 1068, 1070, 1075, 1110, 1113, 1122, 1125 Realistic 1065, 1068, 1069, 1070, 1071 ReplayTV 1022, 1123 Rex 1027 RFT 1008 - Yamaha HTR-3064 | Owners Manual - Page 89
1031 XR-1000 1068, 1069 Yamaha 1064, 1065 Yamishi 1008, 1029 2367 BBK 2364 Bellagio 2363 Best Buy 2359 Blaupunkt 2131 Blue Parade Digital 2339 Dmtech 2176 Dual 2380 Durabrand 2136 DVX 2355 Easy Home Solutions 2355 Global Sphere 2355 Go Video 2133, 2213 Goodmans 2165, - Yamaha HTR-3064 | Owners Manual - Page 90
2355, 2357 Theta Digital 2157 Thomson 2183 Hitachi Panasonic Philips Pioneer RCA Samsung Sharp Sony Toshiba Yamaha 2110 2090 2066, Video 2222 2240 2146 2213 Hitachi Insignia Irradio JVC LG Liteon Panasonic Philips Pioneer Pye Samsung Sansui Sanyo Sony Sylvania Toshiba Yamaha NEC 3064 NET - Yamaha HTR-3064 | Owners Manual - Page 91
Axiel 4216 Axis 4008, 4009, 4024, 4050 Best 4008, 4024 Blaupunkt 4015 Blue Sky 4217 Boca 4213 Canal+ 4213 CaptiveWorks 4099 Channel Master 4007, 4110 Chaparral 4075 4007 Delega 4007 Dew 4050 Diamond 4051 Digiality 4219 Digital Stream 4105 DIRECTV 4056, 4064, 4067, 4068, - Yamaha HTR-3064 | Owners Manual - Page 92
Digital Yamaha 5082, 5095 CD Recorder Yamaha 5083 MD Yamaha 5080, 5081, 5086 Tape Yamaha 5084, 5087 Tuner Yamaha 5066, 5071, 5085, 5088, 5090, 5092, 5094 XM Yamaha 5091, 5093 SIRIUS Yamaha 5064, 5067 DOCK Yamaha 5068, 5089 NET Yamaha 5076, 5079 LD Yamaha 2080 Amplifier Yamaha
-
 1
1 -
 2
2 -
 3
3 -
 4
4 -
 5
5 -
 6
6 -
 7
7 -
8
-
9
-
10
-
11
-
12
-
13
-
14
-
15
-
16
-
17
-
18
-
19
-
20
-
21
-
22
-
23
-
24
-
25
-
26
-
27
-
28
-
29
-
30
-
31
-
32
-
33
-
34
-
35
-
36
-
37
-
38
-
39
-
40
-
41
-
42
-
43
-
44
-
45
-
46
-
47
-
48
-
49
-
50
-
51
-
52
-
53
-
54
-
55
-
56
-
57
-
58
-
59
-
60
-
61
-
62
-
63
-
64
-
65
-
66
-
67
-
68
-
69
-
70
-
71
-
72
-
73
-
74
-
75
-
76
-
77
-
78
-
79
-
80
-
81
-
82
-
83
-
84
-
85
-
86
-
87
-
88
-
89
-
90
-
91
-
92
 |
 |

Owner’s Manual
AV Receiver
English for North America