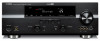
Yamaha HTR-6280 Owner's Manual - Page 22
Connecting a USB storage device, Using the VIDEO AUX jacks, Connecting the FM and AM antennas
 |
UPC - 027108933603
View all Yamaha HTR-6280 manuals
Add to My Manuals
Save this manual to your list of manuals |
Page 22 highlights
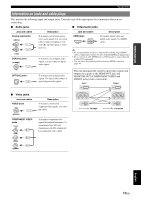
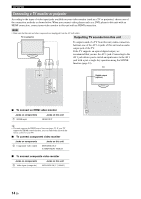
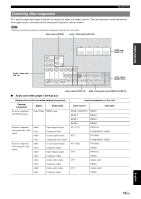
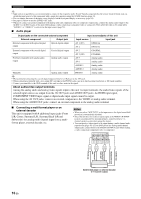
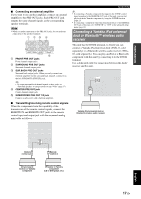
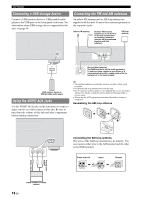
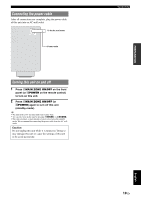
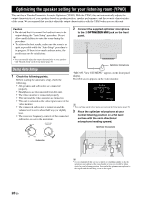
Connections Connecting a USB storage device Connect a USB memory device or USB portable audio player to the USB port on the front panel of this unit. For information about USB storage devices supported by this unit, see page 46. EMORY l PRESET h FM AM l CATEGORY h BD/DVD SCENE TV CD RADIO STRAIGHT PURE DIRECT INPUT EFFECT l TUNING/CH h OPTIMIZER MIC VOLUME VIDEO AUX USB VIDEO AUDIO USB Connecting the FM and AM antennas An indoor FM antenna and an AM loop antenna are supplied with this unit. Connect these antennas properly to the respective jacks. Indoor FM antenna Outdoor AM antenna Connect a 5 to 10 m (16 to 33 ft) vinyl-covered wire, and extend it outdoors (use the AM loop antenna together with this antenna). AM loop antenna 2 HDMI 3 HDMI 4 ANTENNA HD Radio FM GND AM REMOTE IN UNBAL. SPEAKERS EXTRA SP ZONE2/PRESENCE SINGLE CLASS 2 WIRING Ground (GND terminal) The GND terminal is not for earth grounding. To reduce noises, connect a ground bar or a vinyl-covered wire with a copper plate at its tip, and place it in the moist ground. USB memory device or USB portable audio player Using the VIDEO AUX jacks Use the VIDEO AUX jacks on the front panel to connect a game console or a video camera to this unit. Be sure to turn down the volume of this unit and other components before making connections. y • The supplied antennas are normally sensitive enough to obtain good reception. • Position the AM loop antenna away from this unit. • If you cannot get good reception, we recommend that you use an outdoor antenna. For details, consult the nearest authorized Yamaha dealer or service center. • Always use the AM loop antenna even when the outdoor antenna is connected. Assembling the AM loop antenna EMORY l PRESET h FM AM l CATEGORY h BD/DVD SCENE TV CD RADIO STRAIGHT PURE DIRECT INPUT EFFECT l TUNING/CH h OPTIMIZER MIC VOLUME VIDEO AUX USB VIDEO AUDIO VIDEO L AUDIO R V L R Connecting the AM loop antenna The wires of the AM loop antenna have no polarity. You can connect either wire to the AM terminal and the other to the GND terminal. Press and hold Insert Release Analog audio output Video output 18 En Game console or video camera
-
 1
1 -
2
-
3
-
4
-
5
-
6
-
7
-
8
-
9
-
10
-
11
-
12
-
13
-
14
-
15
-
16
-
 17
17 -
 18
18 -
 19
19 -
 20
20 -
 21
21 -
 22
22 -
 23
23 -
 24
24 -
 25
25 -
 26
26 -
 27
27 -
28
-
29
-
30
-
31
-
32
-
33
-
34
-
35
-
36
-
37
-
38
-
39
-
40
-
41
-
42
-
43
-
44
-
45
-
46
-
47
-
48
-
49
-
50
-
51
-
52
-
53
-
54
-
55
-
56
-
57
-
58
-
59
-
60
-
61
-
62
-
63
-
64
-
65
-
66
-
67
-
68
-
69
-
70
-
71
-
72
-
73
-
74
-
75
-
76
-
77
-
78
-
79
-
80
-
81
-
82
-
83
-
84
-
85
-
86
-
87
-
88
-
89
-
90
-
91
-
92
-
93
-
94
-
95
-
96
-
97
-
98
-
99
-
100
-
101
-
102
 |
 |
