Yamaha LS9 Quick Start Guide - Page 21
Assign Monitor On Master Fader To A User Defined Key In The User Defined Key - copy channel
 |
View all Yamaha LS9 manuals
Add to My Manuals
Save this manual to your list of manuals |
Page 21 highlights
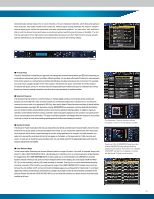
consoles such as the DM2000, 02R96, or DM1000. Refer to pages 58 and 67 of the Owner's Manual for details. What is a "Scene Memory"? Complete console setups including mix parameters and I/O port patches can be given a name and saved in memory for instant recall whenever needed. The LS9 provides a total of 300 scene memories. Refer to page 129 of the Owner's Manual for details. What's a good use for the Recall Safe function? Use this function to prevent specified parameters from being changed when a scene is recalled. For example, if you've spent a lot of time setting up the head amp gain and EQ for one or more microphone channels, you won't want those settings to be changed if a previously saved scene is recalled. In this case you'd assign Recall Safe status to the gain and EQ parameters. Refer to page 140 of the Owner's Manual for details. I recalled scene 000, but the faders and other parameters aren't reset. Maybe the Recall Safe function is engaged. Use the CHANNEL JOB key to open the RECALL SAFE display and check the Recall Safe settings. Disengage all recall Safe settings by clicking the [CLEAR ALL] button, then try recalling scene 000 again. What's a good use for the Scene Focus function? This function allows you to specify settings that you want to be recalled with a scene. Unlike Recall Safe, Scene Focus can be specified for each individual scene. You could use this function to set up a scene so that all parameters other than the output settings are recalled. Refer to page 139 of the Owner's Manual for details. What is the Channel Link function? The faders, EQ, on/off status and other functions of input channels can be linked for simultaneous control. A group of linked channels is known as a "link group", and multiple link groups can be operational at the same time. Refer to page 124 of the Owner's Manual for details. What's the difference between channel linking and a channel pair? The channel linking function can be used to link the gain, EQ, fader, send levels, and other parameters of multiple channels. Of course you can also link two channels to conveniently handle stereo sources. Refer to page 124 of the Owner's Manual for details. Does the LS9 have a VCA function? Multiple channels can be linked so that the level relationship is retained between their faders when any channel in the link group is adjusted. Refer to page 124 of the Owner's Manual for details. Does the LS9 have dedicated stereo inputs? Any specified input connectors and the return signal from the internal effects can be assigned to the stereo inputs. With the initial default settings the stereo returns from Virtual Rack modules 5 ~ 8 are patched to ST IN channels 1 ~ 4. Refer to page 99 of the Owner's Manual for details. How are the stereo channels used? With the initial default settings the stereo returns from Virtual Rack modules 5 ~ 8 are patched to ST IN channels 1 ~ 4. With these settings they can be used as return channels for the internal effects. Refer to page 99 of the Owner's Manual for details. What do the USER DEFINED KEYS do? You can specify the functions that are assigned to the keys, and then operate the assigned functions by simply pressing the corresponding key. You can, for example, assign keys to start and stop the recorder, engage and disengage mute groups, or recall display pages you use frequently. Refer to page 196 of the Owner's Manual for details. I can't get back to the Selected Channel View. Press the HOME key. Where are the monitor outputs? The monitor signals need to be assigned to the rear-panel OMNI OUT connectors. Press the MONITOR key in the DISPLAY ACCESS section to access the monitor out port settings (below the level meters). Refer to page 146 of the Owner's Manual for details. Can the monitor output level be adjusted by any means other than via the display? Assign MONITOR ON MASTER FADER to a USER DEFINED KEY in the USER DEFINED KEY SETUP display. Then when the assigned key is pressed you can use the STEREO Master section [ON] key and fader turn monitor output on and off and adjust the monitor level. Refer to page 18 of the Owner's Manual for details. You can also assign faders to monitor level control via the custom fader layer. Refer to page 93 of the Owner's Manual for details. How do I switch between the MIX bus PRE and POST settings? After pressing the HOME key, position the cursor at the target MIX bus and press the ENTER key. A pop-up window will appear in which you can select PRE or POST. ALL Pre and ALL Post buttons are also provided so you can set all buses to PRE or POST with one quick operation. Refer to page 64 of the Owner's Manual for details. I want to use AUX sends to feed the stage monitors. How do I assign the signal to the OMNI OUT connectors? The MIX buses are usually used for AUX send type operation. MIX buses can be assigned to the OMNI OUT connectors either via SYSTEM SETUP -> OUT PORT SETUP, or via PATCH in the MIX display accessible from the MASTER Layer HOME display. I want to copy MIX bus send settings to a different channel. Copy the channel parameters with the WITH MIX SEND/WITH MATRIX SEND button checked. Refer to page 126 of the Owner's Manual for details. How can I set up port delay? Press the SETUP key as many times as necessary until the SYSTEM SETUP display appears. Click the button in the OUTPUT PORT SETUP field that includes the desired port. The OUTPORT popup window will open. The output port delay time can be set here. The delay time increments can be specified via the DELAY SCALE parameter. Are there any handy shortcut functions? • 8-module Virtual Rack display: RACK [1-4] + [5-8] keys. • Flat EQ response in band groups: [Q] + [GAIN] keys. • EQ all flat: EQ [HI] + [LOW] keys. • Activate SENDS ON FADER mode: Pres MIX select key twice. • Display contrast adjustment: [HOME] key + jog dial. • Display tab selection: Long press to reverse direction. How can the custom fader layer be used? Both input and output signals can be assigned to the custom fader layer. You can assign inputs and outputs that you need to adjust frequently to the custom fader layer so you have direct, quick access. This can eliminate the need for input channel layer switching, and you can assign any one fader from a link group that will be used to control the entire group. Refer to page 91 of the Owner's Manual for details. Can the LS9-16 MATRIX signals be adjusted without assigning them to the custom fader layer? Position the cursor at the CH section of the HOME display and use the jog dial to select a MATRIX and open the related MATRIX display. How can external signals be fed to STEREO inputs 1~4? Signals received at the rear-pane XLR inputs or the expansion slots can be patched to the STEREO inputs. With the initial default settings the returns from the internal effects are patched to the STEREO inputs, so you'll need to change these settings via the PATCH display. Refer to page 99 of the Owner's Manual for details. Is there an easy way to set up input patching? With the input patching display open you can press any [SEL] key to call the patch display for the corresponding channel. Make the required patch settings in the pop-up window, then when you close the pop-up window there's no need re-select the channel. How is the phantom power supply turned on? The phantom power ON/OFF parameters for individual channels can be accessed via the HA setup item. The SETUP -> SYSTEM SETUP display includes a [+48V] master on/off switch for the entire console. Refer to page 49 of the Owner's Manual for details. Can channels in different layers be linked? Both mono and stereo channels can be linked between layers. Refer to page 125 of the Owner's Manual for details. How can the console be initialized? To completely reset the console to it's factory settings and clear the password if one has been set, turn the power on while holding the SCENE MEMORY key. Refer to page 222 of the Owner's Manual for details. Where should a talkback microphone be connected?? Use any convenient input connector. There's a dedicated TALKBACK display page that includes phantom power and gain settings. Refer to page 151 of the Owner's Manual for details. Is the LS9 RoHS compliant? Yes. As of 2006 all Yamaha products are RoHS compliant. How are firmware updates implemented? Can I update the firmware myself? Firmware updates can be downloaded from the Yamaha Pro Audio website when they become available. Simply copy the downloaded "LS9Px_xx.PGM" file ("x_xx" is the version number) to the root directory of a USB memory (don't put it in a folder), and connect the USB memory to the LS9 USB connector while the LS9 power is off. Then when you turn on the power the "Start Loading? CANCEL [DEC]/OK [INC]" message will appear. Press the [INC] key to begin the automatic firmware update process. 21
-
 1
1 -
2
-
3
-
4
-
5
-
6
-
7
-
8
-
9
-
10
-
11
-
12
-
13
-
14
-
15
-
 16
16 -
 17
17 -
 18
18 -
 19
19 -
 20
20 -
 21
21 -
 22
22 -
 23
23
 |
 |