Yamaha MGP24X Owner's Manual - Page 28
Using Graphic EQ, About the graphic EQ (GEQ), Setting the GEQ - reset
 |
View all Yamaha MGP24X manuals
Add to My Manuals
Save this manual to your list of manuals |
Page 28 highlights
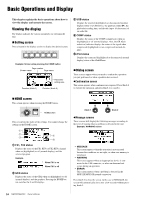
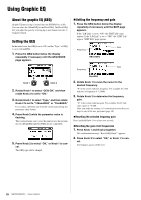
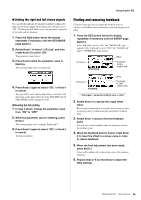
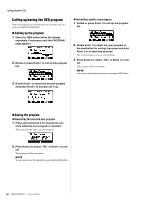
Using Graphic EQ About the graphic EQ (GEQ) Graphic EQ processing is inserted into the STEREO bus (L/R). You can select the 14bandGEQ or the Flex9GEQ. The Flex9GEQ lets you adjust the gain by selecting up to nine bands from the 31 frequency bands. Setting the GEQ In the initial state, the GEQ is set to ON, and the "Type" of GEQ is set to 14bandGEQ. 1. Press the GEQ button below the display repeatedly if necessary until the GEQ MODE page appears. Setting the frequency and gain 1. Press the GEQ button below the display repeatedly if necessary until the EDIT page appears. If the "L/R Link" is set to "ON," the "EDIT L/R" page appears. If the "L/R Link" is set to "OFF," the "EDIT Lch" page or "EDIT Rch" page appears. Frequency 14BandGEQ Gain Frequency Gain Knob 1 Knob 2 2. Rotate Knob 1 to select "GEQ ON," and then rotate Knob 2 to set to "ON." 3. Rotate Knob 1 to select "Type," and then rotate Knob 2 to set to "14BandGEQ" or "Flex9GEQ." If you select a different type from the current type setting, the parameter value flashes. 4. Press Knob 2 while the parameter value is flashing. The screen prompts you to reset the gain because the parameters of 14BandGEQ and Flex9GEQ are not compatible. 5. Press Knob 2 to select "OK," or Knob 1 to can- cel. The GEQ type will be changed. Flex9GEQ 2. Rotate Knob 1 to move the cursor to the desired frequency. "F" in the screen indicates frequency. For example, F=1.25k indicates a frequency of 1.25kHz. 3. Rotate Knob 2 to determine the frequency gain. "G" in the screen indicates gain. For example, G=4.5 indicates a gain of +4.5dB. After you make the settings, it is convenient to save these settings to one of the user programs (page 30). Resetting the selected frequency gain Press and hold Knob 1 for at least two seconds. Resetting the gain of all frequencies 1. Press Knob 1 and Knob 2 together. The confirmation message "Reset GEQ Gains?" appears. 2. Press Knob 2 to select "OK," or Knob 1 to can- cel. All frequency gains will be reset. 28 MGP32X/MGP24X Owner's Manual
-
 1
1 -
2
-
3
-
4
-
5
-
6
-
7
-
8
-
9
-
10
-
11
-
12
-
13
-
14
-
15
-
16
-
17
-
18
-
19
-
20
-
21
-
22
-
 23
23 -
 24
24 -
 25
25 -
 26
26 -
 27
27 -
 28
28 -
 29
29 -
 30
30 -
 31
31 -
 32
32 -
 33
33 -
34
-
35
-
36
-
37
-
38
-
39
-
40
-
41
-
42
-
43
-
44
-
45
-
46
-
47
-
48
-
49
-
50
-
51
-
52
-
53
-
54
-
55
-
56
 |
 |
