Yamaha MSP3 Owner's Manual - Page 5
Front panel/Rear panel - used
 |
UPC - 086792637419
View all Yamaha MSP3 manuals
Add to My Manuals
Save this manual to your list of manuals |
Page 5 highlights
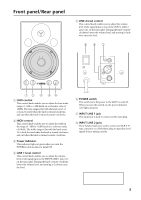
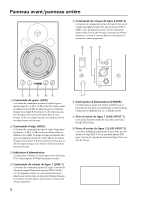
Front panel/Rear panel 5 LINE 2 level control This control knob enables you to adjust the volume level of the signal input at one of the INPUT LINE 2 jacks (8) on the rear panel. Turning the knob counterclockwise lowers the volume level, and turning it clockwise raises the level. 687 POWER ON OFF INPUT LINE 1 (-10dB) PARALLEL LINE 2 (+4dB) LOW HIGH 1 LINE 2 12 3 45 1 LOW control This control knob enables you to adjust the bass in the range of -3dB to +3dB based on a reference value of 100Hz. The bass range is flat with the knob set at 12 o'clock, boosted when the knob is turned clockwise, and cut when the knob is turned counter-clockwise. 2 HIGH control This control knob enables you to adjust the treble in the range of -3dB to +3dB based on a reference value of 10kHz. The treble range is flat with the knob set at 12 o'clock, boosted when the knob is turned clockwise, and cut when the knob is turned counter-clockwise. 3 Power indicator This indicator lights up green when you turn the POWER switch on the rear panel ON. 4 LINE 1 level control This control knob enables you to adjust the volume level of the signal input at the INPUT LINE 1 jack (7) on the rear panel. Turning the knob counter-clockwise lowers the volume level, and turning it clockwise raise the level. 6 POWER switch This switch turns the power to the MSP3 on and off. When you turn this switch on, the power indicator (3) lights up green. 7 INPUT LINE 1 jack This input jack is used to connect an RCA pin plug. 8 INPUT LINE 2 jacks These balanced jacks are used to connect an XLR-3-31 type connector or a TRS phone plug to input line-level signals from a mixing console. CAUTION TO PREVENT ELECTRIC SHOCK, MATCH WIDE BLADE OF PLUG TO WIDE SLOT, FULLY INSERT. 5
-
 1
1 -
 2
2 -
 3
3 -
 4
4 -
 5
5 -
 6
6 -
 7
7 -
 8
8 -
 9
9 -
 10
10 -
 11
11 -
12
-
13
-
14
-
15
-
16
-
17
-
18
-
19
-
20
-
21
-
22
-
23
 |
 |
