Yamaha N-100 Owner's Manual - Page 29
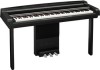
Attach D., Raise A., Connect the AC power cord., Lower B slowly.
 |
View all Yamaha N-100 manuals
Add to My Manuals
Save this manual to your list of manuals |
Page 29 highlights
ENGLISH 3-3 While holding B with your hands, fix B to A using four short screws (6x16mm). At this time, be careful not to pinch the pedal cord and power cord between the bracket on B and the bottom of A. Be sure not to scratch the speaker net (cloth cover) when you fix B to A. A B A B Keyboard Stand Assembly 5. Raise A. Use B as support to raise A. A B A B 3-4 Lower B slowly. 6. Connect the AC power cord. Insert the AC power cord plug into the AC INLET. A B 4. Attach D. Fix D to the bottom of A, using four short screws (6x16mm) on each leg. A D D If the screw holes do not align, loose the other screws and adjust the position of D. N-100 Owner's Manual 29
-
 1
1 -
2
-
3
-
4
-
5
-
6
-
7
-
8
-
9
-
10
-
11
-
12
-
13
-
14
-
15
-
16
-
17
-
18
-
19
-
20
-
21
-
22
-
23
-
 24
24 -
 25
25 -
 26
26 -
 27
27 -
 28
28 -
 29
29 -
 30
30 -
 31
31 -
 32
32 -
 33
33 -
 34
34 -
35
-
36
-
37
-
38
-
39
-
40
-
41
-
42
 |
 |

Keyboard Stand Assembly
N-100
Owner’s Manual
ENGLISH
29
3-3
While holding B with your hands, fix B to A using
four short screws (6x16mm).
At this time, be careful not to pinch the pedal
cord and power cord between the bracket on B
and the bottom of A.
Be sure not to scratch the speaker net (cloth
cover) when you fix B to A.
3-4
Lower B slowly.
4.
Attach D.
Fix D to the bottom of A, using four short screws
(6x16mm) on each leg.
If the screw holes do not align, loose the other
screws and adjust the position of D.
5.
Raise A.
Use B as support to raise A.
6.
Connect the AC power cord.
Insert the AC power cord plug into the AC INLET.
B
A
A
B
A
B
A
D
D
D
D
B
A
B
A
B
A