Yamaha NS-A1738 Owners Manual - Page 2
Cautions, Before, Operating, Connections, Amplifier, Receiver
 |
View all Yamaha NS-A1738 manuals
Add to My Manuals
Save this manual to your list of manuals |
Page 2 highlights
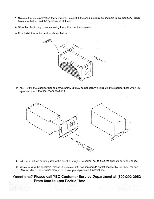
CAUTIONS: READ THIS BEFORE OPERATING YOUR UNIT CONNECTIONS TO THE AMPLIFIER • Please read Unpacking Procedure first. • These speakers feature a magnetically shielded design, but there is still a chance that placing them too close to a TV set might impair the picture colors. Should this happen, place the speaker away from the TV set. • In order to maintain the speaker cabinet's finish, prevent it from coming into contact with water vapor, alcohol, benzene, insecticide, etc. To clean, wipe with a dry, soft cloth. • To prevent the enclosure from warping or discoloring, do not place the speaker in places where it will be exposed to direct sunlight or excessive humidity. • Do not place the speakers where they are liable to be knocked over or struck by falling objects. Stable placement will also ensure better sound performance. Please install stabilizer bars. • Never touch the speakers under the grille cloth with your hands or expose them to excessive shocks. If they are dented or bent, the sound will be distorted as well. • When an amplifier with a rated output power higher than the recommended power of the speaker system is used, care should be taken never to exceed the speaker's maximum input. • Lower the power amplifier/receiver volume control before changing input sources. Never change input sources (for example, FM to CD) at high listening levels. Always turn the receiver/amplifier unit off when installing or removing input cables. • Anytime you note distortion, reduce the volume control on your power amplifier/receiver to a lower setting. Never allow your power amplifier to be driven into "clipping." • Connections to the amplifier speaker terminals depend on the particular amplifier you are using. Please check the amplifier's owner's manual before making speaker connections. • Before making any connections to the speaker system or amplifier, make sure to turn off the power of the amplifier to avoid any damage. TYPE OF AMPLIFIER / RECEIVER These Natural Sound Home Theater Entertainment Speakers are designed to compliment any of Yamaha's receivers or amplifiers. To assure low distortion on program peaks, the amplifier or receiver should be capable of delivering at least 10 watts (continuous sine-wave power) per channel. These speakers can be used safely with amplifiers rated at up to the maximum wattage shown in the specifications table. Amplifiers rated at higher than the recommended maximum power per channel may be used with care. Program material is not a continuous sine-wave input, and even with a 100 watt amplifier, average levels will remain somewhere between 1/10-watt and 10 watts. If you do use a large amplifier, be careful never to change input sources before reducing the volume level to prevent transients from damaging your speaker. • Before making connections, make sure that the receiver/amplifier is switched off. • CONNECTIONS FOR SINGLE PAIR OF SPEAKER CABLES (WIRES) Note: 10 feet of speaker cable is supplied for each speaker. However, for longer cable needs (up to 20 feet), it is recommended to use a minimum of 14 gauge high quality speaker cable/wire. Please consult your retailer for your particular installation requirements. • Using speaker cable, connect the output terminals of the receiver/amplifier and the input terminal of the speakers. • Connect the (+) terminals on both receiver/amplifier and speaker. Connect the (-) terminals on both receiver/amplifier and speaker. • Reversing polarity (+/-) will result in unnatural sound reproduction. • PROCEDURE 1. Loosen the speaker terminals by turning the knobs counterclockwise. 2. Insert the lead portions of the speaker cable into the terminal holes. 3. Tighten the speaker terminals by turning the knobs clockwise. 4. Lightly pull the speaker cable to make sure connections are secure. 5. Repeat for all cables. (Note: For receiver/amplifier connections, please refer to the proper owners' manuals.) Note: Keep the NS-A1738 gold plated jumpers in place and make the connections on either the top or bottom pair of connectors. Be sure the jumpers remain securely connected between the two pair of binding posts. RED:pwive 1.1 8LK.repatve I ) CONNECTOR NUTS GOLD PLATED JUMPERS • 13143 1W 00 en:le 01 ilpeake, twee ,meet Neninals • Inept spealw ttkes. Ogg., Isnrinals Speaker Wrong NOTE. USE TOP OR BOTTOM CONNECTORS. LEAVE JUMPERS SECURELY IN PLACE NS-A I738011JA RECEIVER /AMPLIFIER BACK PANEL II CONNECTIONS FOR BI-WIRING (NS-A1738 ONLY!) The NS-A1738 is designed to work with a single set of speaker cables, however some may prefer to bi-wire their speaker system. The concept of bi-wiring is that higher sonic performance is achieved by utilizing two sets of wires to connect the mid/hi frequency input (top connectors) and the other to the low frequency input (bottom connectors). Bi amplification is the use of multiple amps to handle different fre- quency ranges. To bi-amp the NS-A1738, first remove the gold jumpers by loosening the con- Jhrallig- nector nuts on the back of the speaker. Next, connect the speaker cables. Make sure that both the red (+) mid/hi input and red (+) low /41•AiliPON wNao.dre.la.n. ii frequency (subwoofer) input of the left speaker isOirea.Or • are connected to the red (+) terminal of the left channel of your receiver and amplifier (or LORINICUINGN receives 2nd speaker input). Repeat procedure for the right channel. (See diagram on right) 'WORMY: WARNMCOPING, MARRY M Nine, WICIIMIRAORmilw onielhae P/N 410017 265364 II WINO MAIM CaLl• 2.
-
 1
1 -
 2
2 -
 3
3 -
 4
4 -
 5
5 -
 6
6 -
 7
7
 |
 |
