Yamaha NS-AW1 Owners Manual - Page 2
NS-AW1/NS-AW1W
 |
View all Yamaha NS-AW1 manuals
Add to My Manuals
Save this manual to your list of manuals |
Page 2 highlights
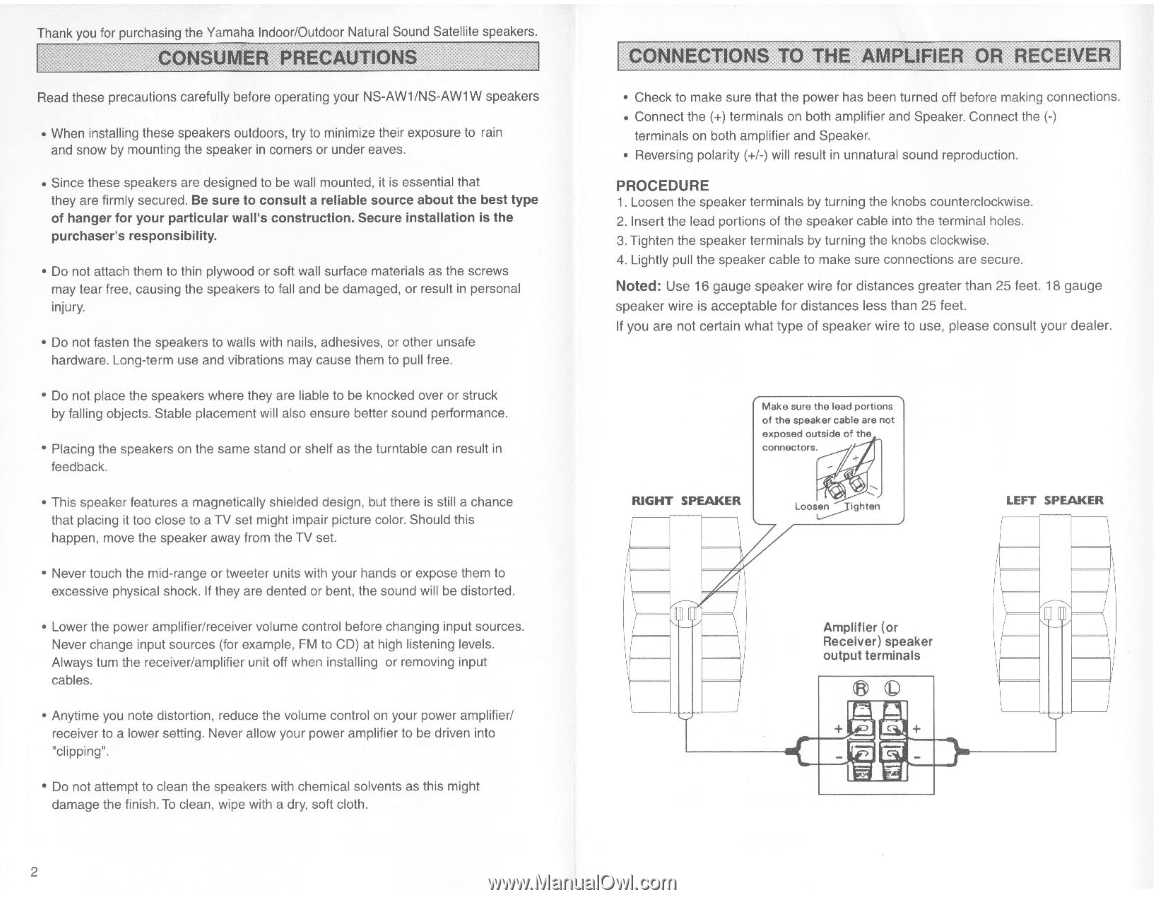
Thank you for purchasing the Yamaha Indoor/Outdoor Natural Sound Satellite speakers. Read these precautions carefully before operating your NS-AW1/NS-AW1W speakers • When installing these speakers outdoors, try to minimize their exposure to rain and snow by mounting the speaker in corners or under eaves. • Since these speakers are designed to be wall mounted, it is essential that they are firmly secured. Be sure to consult a reliable source about the best type of hanger for your particular wall's construction. Secure installation is the purchaser's responsibility. • Do not attach them to thin plywood or soft wall surface materials as the screws may tear free, causing the speakers to fall and be damaged, or result in personal injury. • Do not fasten the speakers to walls with nails, adhesives, or other unsafe hardware. Long-term use and vibrations may cause them to pull free. • Do not place the speakers where they are liable to be knocked over or struck by falling objects. Stable placement will also ensure better sound performance. • Placing the speakers on the same stand or shelf as the turntable can result in feedback. • This speaker features a magnetically shielded design, but there is still a chance that placing it too close to a TV set might impair picture color. Should this happen, move the speaker away from the TV set. • Never touch the mid-range or tweeter units with your hands or expose them to excessive physical shock. If they are dented or bent, the sound will be distorted. • Lower the power amplifier/receiver volume control before changing input sources. Never change input sources (for example, FM to CD) at high listening levels. Always tum the receiver/amplifier unit off when installing or removing input cables. • Anytime you note distortion, reduce the volume control on your power amplifier/ receiver to a lower setting. Never allow your power amplifier to be driven into "clipping". • Do not attempt to clean the speakers with chemical solvents as this might damage the finish. To clean, wipe with a dry, soft cloth. 2 E1V • Check to make sure that the power has been turned off before making connections. • Connect the (+) terminals on both amplifier and Speaker. Connect the (-) terminals on both amplifier and Speaker. • Reversing polarity (+/-) will result in unnatural sound reproduction. PROCEDURE 1. Loosen the speaker terminals by turning the knobs counterclockwise. 2. Insert the lead portions of the speaker cable into the terminal holes. 3. Tighten the speaker terminals by turning the knobs clockwise. 4. Lightly pull the speaker cable to make sure connections are secure. Noted: Use 16 gauge speaker wire for distances greater than 25 feet. 18 gauge speaker wire is acceptable for distances less than 25 feet. If you are not certain what type of speaker wire to use, please consult your dealer. Make sure the lead portions of the speaker cable are not exposed outside of the connectors. 4- RIGHT SPEAKER Loosen lighten LEFT SPEAKER ••~-^^^- 11 1 Amplifier (or Receiver) speaker output terminals I
-
 1
1 -
 2
2 -
 3
3 -
 4
4
 |
 |