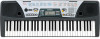
Yamaha PSR-175 Owner's Manual - Page 17
Step 4 Lesson, Lesson 1 - Timing, Lesson 3 - Minus One, Lesson 4 - Both Hands - keyboard
 |
View all Yamaha PSR-175 manuals
Add to My Manuals
Save this manual to your list of manuals |
Page 17 highlights
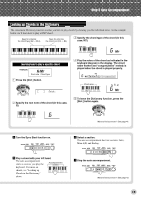
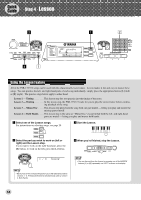
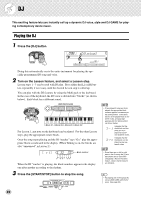
Step 4 Lesson Lesson 1 - Timing This step lets you work on the timing of the notes. In Lesson 1, the particular note you play on the keyboard is unimportant. The PSR-175/172 checks your timing and how rhythmically "tight" your playing is. r1 Timing Grade The PSR-175/172 has a built-in evaluation function that monitors your practicing and - like a real teacher - tells you how well you did each exercise. Four grades are assigned, depending on your performance: "OK," "Good," "Very Good," and "Excellent." Want to find out more? See page 39. Want to find out more? See page 36. Lesson 2 - Waiting In Lesson 2, you practice playing the notes correctly as they appear in the display notation. The accompaniment pauses and waits for you to play the notes correctly before it continues. r2 Waiting Want to find out more? See page 37. Talking This feature "talks" to you through the speakers, "announcing" the Grade comments as well as the titles of the Lesson steps. Want to find out more? See page 40. Changing the Tempo Naturally, you can change the tempo (speed) of the song to your liking, letting you slow down difficult passages and bring up the tempo gradually until you master them at normal speed. z Press the [TEMPO/TAP] button. Lesson 3 - Minus One In Lesson 3, one of the parts is muted, and you practice the missing part in time with the rhythm. r3 MinusOne 116 TEMPO x Use the numeric keypad to set the desired tempo. Want to find out more? See page 37. Lesson 4 - Both Hands Lesson 4 is just like Lesson 3, except that the parts for both hands are muted, letting you practice the missing parts in time with the rhythm. Lr4 BothHand • The PSR-175/172 also has a convenient Tap Tempo function that allows you to "tap" a new tempo in real time. (See page 44.) Want to find out more? See page 38. 17
-
 1
1 -
2
-
3
-
4
-
5
-
6
-
7
-
8
-
9
-
10
-
11
-
 12
12 -
 13
13 -
 14
14 -
 15
15 -
 16
16 -
 17
17 -
 18
18 -
 19
19 -
 20
20 -
 21
21 -
 22
22 -
23
-
24
-
25
-
26
-
27
-
28
-
29
-
30
-
31
-
32
-
33
-
34
-
35
-
36
-
37
-
38
-
39
-
40
-
41
-
42
-
43
-
44
-
45
-
46
-
47
-
48
-
49
-
50
-
51
-
52
-
53
-
54
-
55
-
56
-
57
-
58
-
59
-
60
-
61
-
62
-
63
-
64
 |
 |
