Yamaha PSR-240 Owner's Manual - Page 7
MAIN A/B AUTO FILL, Fast Forward, CHORD GUIDE, MELODY GUIDE button - portatone
 |
View all Yamaha PSR-240 manuals
Add to My Manuals
Save this manual to your list of manuals |
Page 7 highlights
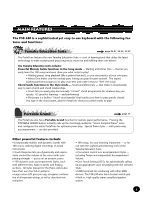
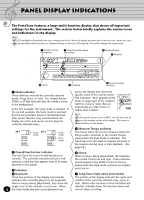
Panel Controls and Terminals ³ Power switch (STANDBY/ON) · MASTER VOLUME dial This determines the overall volume of the PortaTone. » OVERALL buttons (s, t, +, -) These are for selecting the various "overall" functions and setting their values. (See page 23.) ¿ SONG button This selects the Song mode. (See page 20.) ᕥ STYLE button This selects the Style mode. (See page 28.) ᕦ VOICE button This selects the Voice mode. (See page 15.) ¶ Numeric keypad, +/- buttons These are for selecting songs, voices, and styles. (See page 16.) They are also used for entering certain values, such as the time signature for the Metronome (page 14), and the key signature for the Smart Chord function (page 38). º ACMP ON/OFF button When the Style mode is selected, this turns the auto accompaniment on and off. (See page 31.) This button has no function in the Song mode. ¾ SYNC-START, Pause (ƒ ƒ) button When the Style mode is selected, this turns the Sync-Start function on and off. (See page 29.) When the Song mode is selected, this alternately pauses and starts song playback. (See page 24.) µ START/STOP (>/s) button When the Style mode is selected, this alternately starts and stops the auto accompaniment. (See page 29.) When the Song mode is selected, this alternately starts and stops song playback. (See page 24.) ¸ INTRO/ENDING, button When the Style mode is selected, this is used to control the Intro and Ending functions. (See pages 29, 30.) When the Song mode is selected, this is used to control the A/B Repeat function. (See page 24.) ¹ MAIN A/B (AUTO FILL), Fast Forward (f)/Rewind (r) buttons When the Style mode is selected, these are used to change auto accompaniment sections and control the Auto Fill function. (See page 32.) When the Song mode is selected, these are used to respectively fast forward and rewind during song playback. When Song playback is stopped, they can be used to advance or reverse to specific measure numbers in the song. (See page 24.) Ƹ OTS, VOICE CHANGE button When the Style mode is selected, this is used to turn the One Touch Setting (OTS) function on and off. (See page 36.) When the Song mode is selected, this is used to turn the Voice Change function on and off. (See page 27.) ƹ CHORD GUIDE, MELODY GUIDE button When the Style mode is selected, this is used to control the Chord Guide functions. (See page 37.) When the Song mode is selected, this is used to control the Melody Guide function. (See page 26.) ƺ PORTABLE GRAND button This instantly changes to the Voice mode and calls up the Grand Piano voice. (See page 13.) ƻ METRONOME button This turns the metronome on and off. (See page 13.) Ƽ MULTI PAD buttons These are used to automatically play pre-programmed musical phrases. (See page 40.) ƽ DEMO button This is used to play the Demo songs. (See page 11.) ƾ TOUCH button This turns the Touch Response function on and off. It also lets you set the Touch Sensitivity setting. (See page 19.) 7
-
 1
1 -
 2
2 -
 3
3 -
 4
4 -
 5
5 -
 6
6 -
 7
7 -
 8
8 -
 9
9 -
 10
10 -
 11
11 -
 12
12 -
13
-
14
-
15
-
16
-
17
-
18
-
19
-
20
-
21
-
22
-
23
-
24
-
25
-
26
-
27
-
28
-
29
-
30
-
31
-
32
-
33
-
34
-
35
-
36
-
37
-
38
-
39
-
40
-
41
-
42
-
43
-
44
-
45
-
46
-
47
-
48
-
49
-
50
-
51
-
52
 |
 |