Yamaha PSR-282 Owner's Manual
Yamaha PSR-282 Manual
 |
View all Yamaha PSR-282 manuals
Add to My Manuals
Save this manual to your list of manuals |
Yamaha PSR-282 manual content summary:
- Yamaha PSR-282 | Owner's Manual - Page 1
- Yamaha PSR-282 | Owner's Manual - Page 2
power supply (adapter). DO NOT connect this product to any power supply or adapter other than one described in the manual, on the name plate, or specifically recommended by Yamaha. This product should be used only with the components supplied or; a cart, rack, or stand that is recommended by Yamaha - Yamaha PSR-282 | Owner's Manual - Page 3
power switch, disconnect the adaptor plug from the outlet, and have the instrument inspected by qualified Yamaha service personnel. • Use the specified adaptor (PA-3B or an equivalent recommended by Yamaha) only. Using the wrong adaptor the panel or keyboard. • Do not rest your weight on, or place - Yamaha PSR-282 | Owner's Manual - Page 4
of the Yamaha PSR-282 PortaTone! You now own a portable keyboard that combines advanced functions, great sound and exceptional ease-of-use in a highly compact package. Its outstanding features also make it a remarkably expressive and versatile instrument. Read this Owner's Manual carefully while - Yamaha PSR-282 | Owner's Manual - Page 5
Recording 55 • Recording a User Song MIDI Functions 67 • What Is MIDI 67 • Connecting to a Personal Computer 69 • Controlling PSR-282 Playback from an External Device - External Clock 70 • Using Bulk Dump Send to Save Data 71 • Using Initial Setup Send with a Sequencer...... 73 Troubleshooting - Yamaha PSR-282 | Owner's Manual - Page 6
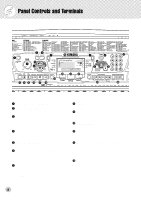
functions, settings, and operations of the PSR-282, including effects, transpose, tuning, and MIDI. (See page 29.) i [DEMO] button This is used to play the Demo songs. (See page 12.) o [Piano] button This instantly calls up the Grand Piano voice, plus a special piano song and style. (See page 10 - Yamaha PSR-282 | Owner's Manual - Page 7
control over sustain, just like the damper pedal on a piano. (See page 9.) @7 PHONES/OUTPUT jack This is for connection to a set of stereo headphones or to an external amplifier/speaker system. (See page 9.) @8 DC IN 10-12V jack This is for connection to a PA-3B AC power adaptor. (See page 8.) 7 - Yamaha PSR-282 | Owner's Manual - Page 8
6 • Never interrupt the power supply (e.g. remove the batteries or unplug the AC adaptor) during any PSR-282 record operation! Doing so can result in a loss of data. • Use ONLY a Yamaha PA-3B AC Power Adaptor (or other adaptor specifically recommended by Yamaha) to power your instrument from the AC - Yamaha PSR-282 | Owner's Manual - Page 9
footswitch while turning the power on. Doing this changes the recognized polarity of the footswitch, resulting in reversed footswitch operation. s Using the MIDI Terminals The PSR-282 also features MIDI terminals, allowing you to interface the PSR282 with other MIDI instruments and devices. (For - Yamaha PSR-282 | Owner's Manual - Page 10
Guide Step 1 Voices w 000 GrandPno z w q zq Playing the Piano Simply by pressing the [Piano] button, you can automatically reset the entire PSR-282 for piano play. z Press the [Piano] button. 000 GrandPno Playing along with the Metronome z Press the [METRONOME] button. x Play the keyboard - Yamaha PSR-282 | Owner's Manual - Page 11
PSR-282 has a huge total of 256 dynamic and realistic instrument voices. Let's try a few of them out now... q Press the [VOICE] button. w Select a voice. 000 GrandPno 002 BritePno e Play the keyboard Music Box SPLIT Strings/Grand Piano Grand Piano/Violin DX Electric Piano/ Harmonica Grand Piano/ - Yamaha PSR-282 | Owner's Manual - Page 12
Quick Guide Step 2 Songs 000 GrandPno zx xq xcr z w Playing the Songs The PSR-282 is packed with a total of 105 songs, including five User songs to which you can record your own performances, plus 100 songs that not only showcase the high-quality sound of the PSR-282 but can also be used with - Yamaha PSR-282 | Owner's Manual - Page 13
Much like a multi-track tape recorder, the PSR-282 lets you play and record the individual parts of your own song in real time. q Select the desired User song (101 - 105) for recording. e Start recording by playing a melody on the key- board. The PSR-282 starts recording as soon as you play the - Yamaha PSR-282 | Owner's Manual - Page 14
Quick Guide Step 3 Auto Accompaniment zb x 000 GrandPno c vm n z Using the Auto Accompaniment The powerful yet easy-to-use Auto Accompaniment features give you professional instrumental backing for your performances. Simply play chords with your left hand - and the PSR-282 automatically - Yamaha PSR-282 | Owner's Manual - Page 15
[Dict.] button again Want to find out more? See page 45. v Turn the Sync Start function on. b Play a chord with your left hand. The auto accompaniment starts as soon as you play the Accompaniment section keyboard. For more on chords, see "Looking up Chords in the Dictionary" above. n Select - Yamaha PSR-282 | Owner's Manual - Page 16
as "Minus One," except in that both the left- and right-hand parts are muted - letting you play and master both hands. z Select one of the Lesson songs. For instructions on selecting songs, see page 50. c Start the Lesson. x Select the part you wish to work on (left or right) and the Lesson step - Yamaha PSR-282 | Owner's Manual - Page 17
4 Lesson Lesson 1 - Timing This step lets you work on the timing of the notes. In Lesson 1, the particular note you play on the keyboard is unimportant. The PSR-282 checks your timing and how rhythmically "tight" your playing is. r1 Timing Want to find out more? See page 62. Lesson 2 - Waiting In - Yamaha PSR-282 | Owner's Manual - Page 18
On indicator e Notation r Keyboard t Measure o Song track indicators u Chord y Beat marks q Indicators These indicate the operating condition of the PSR-282 as shown below: Using the numeric keypad selects voice numbers. Pressing the [START/STOP] button starts song playback. Using the numeric - Yamaha PSR-282 | Owner's Manual - Page 19
chords played in the ACMP section of the keyboard when the Style mode and auto accompaniment are recording and playback, these indicate the status of the tracks. (See page 56.) Music Stand Insert the bottom edge of the included music stand into the slot located at the top rear of the PSR-282 - Yamaha PSR-282 | Owner's Manual - Page 20
is designed also for playing with the special Pianist styles (#086 - #100). When auto accompaniment is turned on, these provide piano-only accompaniment in a variety of music styles. Using the Metronome 1 Call up the Tempo setting. Press the [TEMPO/TAP] button. Current Tempo value 068 TEMPO - Yamaha PSR-282 | Owner's Manual - Page 21
) Indicates current beat number 2 TIME SIG Adjusting the Metronome Volume You can adjust the volume of the Metronome sound independently of the other PSR-282 sounds. The volume range is 000 - 127. 1 Call up the Metronome Volume setting. Press the right Overall button until "MTR VOL" appears in - Yamaha PSR-282 | Owner's Manual - Page 22
up a dynamic DJ voice and style for playing contemporary dance music. Playing the DJ 1 Press the [DJ] button. 000 Lesson 1, any note on the keyboard can be played. For the other Lesson steps, play "F" in the appropriate octave block. Once the song starts playing, play the appropriate block as - Yamaha PSR-282 | Owner's Manual - Page 23
PSR-282 features a total of 256 authentic voices - all of which have been created with Yamaha's sophisticated AWM (Advanced Wave Memory) tone generation system. These include 128 General MIDI sections of the keyboard - for example, playing a bass voice with your left hand and a piano voice with your - Yamaha PSR-282 | Owner's Manual - Page 24
(as indicated by the illustration in the display), you can also play styles or songs, respec- tively, in the Voice mode by simply pressing the [START/STOP] button. The last selected style or song will be played. 24 - Yamaha PSR-282 | Owner's Manual - Page 25
GM Voices Keep in mind that the PSR-282 has two separate sets of voices: 128 Panel voices and 128 GM (General MIDI) Voices. The GM Voices can also on the keyboard. 121 122 123 119 Std.Kit1 124 125 126 127 128 Name Standard Kit 1 Standard Kit 2 Room Kit Rock Kit Electronic Kit Analog Kit - Yamaha PSR-282 | Owner's Manual - Page 26
bass/chord accompaniment of the selected style. It also determines the pitch of the songs. This allows you to easily match the pitch of the PSR-282 to other instruments or singers, or play in a different key without changing your fingering. The Transpose settings can be adjusted over a range of ± 12 - Yamaha PSR-282 | Owner's Manual - Page 27
Playing Voices s Tuning Tuning determines the fine pitch setting of both the main voice and the bass/chord accompaniment of the selected style. It also determines the pitch of the songs. This allows you to accurately match the tuning with that of other instruments. The Tuning settings can be - Yamaha PSR-282 | Owner's Manual - Page 28
playing strength. Turn the Touch function on or off as desired by pressing the [TOUCH] button. Touch Sensitivity lets you set how the PSR-282 responds to your playing strength, allowing you to customize this expressive function to suit your own playing style. 1 Select the Touch Sensitivity control - Yamaha PSR-282 | Owner's Manual - Page 29
• Twelve additional Reverb Types are available when controlling the PSR-282 from a MIDI device. (For details, see page 86.) Indicates Reverb is the Reverb effect off, select Reverb Type #9. • Each style of the PSR-282 has its own independent Reverb setting. Restoring the Default Reverb Type If - Yamaha PSR-282 | Owner's Manual - Page 30
32.) To turn the DSP effect off, select DSP Type #39. • Each voice of the PSR-282 has its own independent DSP setting. • Fifty-one additional DSP Types are available when controlling the PSR-282 from a MIDI device. (For details, see page 86.) Restoring the Default DSP Type If you've changed the - Yamaha PSR-282 | Owner's Manual - Page 31
, Block, Country, and Octave), chords must be played in the Accompaniment section of the keyboard. • The speed of the Trill, Tremolo, and Echo effects depends on the Tempo setting (page 33). • Each voice of the PSR-282 has its own independent Harmony setting. 3 Set the Harmony Type, if desired. Use - Yamaha PSR-282 | Owner's Manual - Page 32
Rich Tremolo effect with both volume and pitch modulation. Simulated electric guitar tremolo. Several panning effects that automatically shift the sound boosts both high and low frequencies, as is typical in most disco music. Equalizer effect that cuts both high and low frequencies, to simulate the - Yamaha PSR-282 | Owner's Manual - Page 33
the single-note melody played in the right hand. These types only sound when chords are played in the auto accompaniment section of the keyboard. Types 6 - 26 are rhythm-based effects and add embellishments or delayed repeats in time with the auto accompaniment. These types sound whether the auto - Yamaha PSR-282 | Owner's Manual - Page 34
the chords you play. Auto accompaniment effectively splits the keyboard into two sections: The upper is used for playing a melody line, and the lower (set by default to keys F#2 and lower) is for the auto accompaniment function. The PSR-282 also features the convenient Dictionary function (page 45 - Yamaha PSR-282 | Owner's Manual - Page 35
this button alternately enables and cancels the bass and chord accompaniment. (See below.) Pressing this button alternately enables and cancels the Sync Start function. (See page 36.) This controls the Intro and Ending sections. (See pages 36, 38.) Pressing this button alternately enables and - Yamaha PSR-282 | Owner's Manual - Page 36
desired tempo. s Using Sync Start The PSR-282 also has a Sync Start function that allows you to start the rhythm/accompaniment by simply pressing a key on the keyboard. To use Sync Start, first press the [SYNC START] button (the beat marks all flash to indicate Sync Start stand-by), then press any key - Yamaha PSR-282 | Owner's Manual - Page 37
or B). MAIN A 2) Press the [INTRO/ENDING] button. Indicates Intro standby. INTRO≥A 3) Press the [SYNC START] button to enable Sync Start, and start the Intro section and accompaniment by playing any key on the keyboard. (When auto accompaniment is on, play a key or chord in the auto accompaniment - Yamaha PSR-282 | Owner's Manual - Page 38
stops the accompaniment and automatically enables Sync Start, letting you re-start the accompaniment by simply playing a chord or key in the auto accompaniment section of the keyboard. • Chords played in the auto accompaniment section of the keyboard are also detected and played when the - Yamaha PSR-282 | Owner's Manual - Page 39
or solo with your right hand. 1 Press the [SYNC STOP] button. Setting Sync Stop to on before starting the auto accompaniment automatically sets Sync Start to on as well, letting you immediately start the accompaniment by playing the keyboard. Indicates that Sync Stop is on. 2 Play a chord on the - Yamaha PSR-282 | Owner's Manual - Page 40
, followed by the Main B section. (See illustration on page 41.) You can also select either the Main A or B section to start by pressing the [MAIN/ AUTO FILL] button before starting the style. This appears while the fill-in pattern is playing. Fill A≥B • Rhythm sounds and fill-in sections are not - Yamaha PSR-282 | Owner's Manual - Page 41
Auto Accompaniment About the Fill-in Patterns If you press the [MAIN/AUTO FILL] button before beat 4... ...a fill-in pattern plays immediately until the end of the measure... ...and the Main A or B section begins here. beat 1 1st measure 234 2nd measure 1234 3rd measure 123 If you press the - Yamaha PSR-282 | Owner's Manual - Page 42
chords of the accompaniment by playing keys in the auto accompaniment section of the keyboard using either the "Single Finger" or "Fingered" method. With Single Finger the notes of the chord. Whichever method you use, the PSR-282 "understands" what chord you indicate and then automatically generates - Yamaha PSR-282 | Owner's Manual - Page 43
Auto Accompaniment Chord Name/[Abbreviation] Major [M] Add ninth [(9)] Sixth [6] Sixth ninth [6(9)] Major seventh [M7] Major seventh ninth [M7(9)] Major seventh add sharp eleventh [M7(#11)] Flatted fifth [(b5)] Major seventh flatted fifth [M7b5] Suspended fourth [sus4] Augmented [aug] Major seventh - Yamaha PSR-282 | Owner's Manual - Page 44
/OFF] button until "S_POINT"appears in the display. Current Split Point value 054 S-POINT The current Split Point is also shown in the keyboard section of the display. 2 Change the value. Use the numeric keypad or [+]/[-] buttons to set the desired value: 0 (C-2) - 127 (G8). Restoring the Default - Yamaha PSR-282 | Owner's Manual - Page 45
of the chord (major, minor, seventh, etc.). Press the key on the keyboard that corresponds to the desired chord type (as printed on the panel). Pressing this of the chord, and the individual notes - both in notation and on the keyboard diagram. • For a few specific chords, not all notes may be shown - Yamaha PSR-282 | Owner's Manual - Page 46
(as indicated in the display) in the auto accompaniment section of the keyboard. The chord name flashes in the display (and a "congratualtions" melody are made up of three notes and are the most basic and common chords in most music. In this triad, the lowest note is the "root." The root is the most - Yamaha PSR-282 | Owner's Manual - Page 47
use of intervals and chords is one of the most important elements in music. A wide variety of emotions and feelings can be created depending on the the number being the distance of the note from the root. (See the keyboard diagram below.) For example, the minor 6th chord includes the 6th note of the - Yamaha PSR-282 | Owner's Manual - Page 48
Split Point • Style number, and style-related settings: Accompaniment On/Off and Split Point Recording a Registration Memory Preset 1 Make all desired settings for the PSR-282. Virtually all of the PSR-282's settings can be saved to a Registration Memory button. 2 Select the desired bank. Press the - Yamaha PSR-282 | Owner's Manual - Page 49
Registration Memory Recalling a Registration Memory Preset 1 Select the appropriate Registration Memory bank. 1 BANK 2 Press the desired Registration Memory preset button ([1] or [2]). 1 REGIST1 49 - Yamaha PSR-282 | Owner's Manual - Page 50
by pressing the [DEMO] button. Moreover, there are five special User songs to which you can record your own performance. The User songs are "empty" and cannot be played until something has been recorded to them. (For instructions on recording your own songs, see page 55.) q Song Playback Display - Yamaha PSR-282 | Owner's Manual - Page 51
play or practice along with it. 1 While playing a song, set point A (the start point). During playback, press the [A-B REPEAT] button once, at the beginning point to be to an appropriate speed to make it easier to play and master the part. You may also want to slow down the Tempo while setting the - Yamaha PSR-282 | Owner's Manual - Page 52
START/STOP] button. Stopping playback does not cancel the set A/B points or the A-B Repeat function. 4 Turn off the A-B Repeat function. Press the [A-B REPEAT] button. Melody Voice Change The PSR-282 lets you play a melody on the keyboard the flute melody voice to piano. 1 Select the desired song. - Yamaha PSR-282 | Owner's Manual - Page 53
Selecting and Playing Songs 3 Press and hold down the [VOICE] button for at least one second. "MELODY VOICE CHANGE" appears in the display, indicating that the selected panel voice has replaced the song's original melody voice. MELODY V Changing the Tempo The tempo of song playback can be adjusted - Yamaha PSR-282 | Owner's Manual - Page 54
Selecting and Playing Songs Adjusting the Song Volume The playback volume of the song can be adjusted. This volume control affects only the song volume. The volume range is 000 - 127. 1 Select the Song Volume function. Press the right Overall button, repeatedly if necessary, until "SONG VOL" - Yamaha PSR-282 | Owner's Manual - Page 55
The PSR-282 features powerful and easy-to-use song recording features that let you record your keyboard performances - using up to six independent tracks (including one track for accompaniment) - for creating your own complete, fully orchestrated compositions. You can record and save up to five User - Yamaha PSR-282 | Owner's Manual - Page 56
Song Recording 2 Select a User song for recording. Use the numeric keypad to select the desired song: 101 - 105. If no song is manually selected, the PSR-282 automatically selects the first available empty song number. 102 User 2 • User song numbers can be selected in the same way as with the - Yamaha PSR-282 | Owner's Manual - Page 57
Chord track and one of the Melody tracks simultaneously. 4 Start recording. When the beat marks and track number start flashing, you can start recording simply by playing the keyboard (or by pressing the [START/STOP] button). rEC User 2 Indicates the current measure If you want to rehearse your - Yamaha PSR-282 | Owner's Manual - Page 58
erases all recorded data on all tracks of a selected User song. Use this operation only when you're sure you want to erase a song and record a - 105). • Songs 001 - 100 cannot be selected for this operation. 102 User 2 2 While holding down the [A] button, press SONG MEMORY button [1]. All track - Yamaha PSR-282 | Owner's Manual - Page 59
recorded data on a selected track of a selected User song, leaving the other tracks intact. Use this operation only when you're sure you want to erase a track and record • Songs 001 - 100 cannot be selected for this operation. 102 User 2 2 Press and hold down the button corresponding to the track - Yamaha PSR-282 | Owner's Manual - Page 60
use way to learn how to read music and play the keyboard. There are a total of 100 PSR-282 waits for you to play the correct notes before continuing playback of the song. s Lesson 3 - Minus One This lesson step plays back the song with one part muted, letting you play and master the missing part - Yamaha PSR-282 | Owner's Manual - Page 61
right) and the Lesson step. If you want to work on the right-hand part, press the [R] button; to work on the left, press the [L] button r1 * * * * 4 Press the [START/STOP] button to stop the Lesson. • When the Talking function (page 66) is on, the PSR-282 "announces" the current Lesson step. • When - Yamaha PSR-282 | Owner's Manual - Page 62
song starts automatically, and the appropriate notes appear in the display. In Lesson 1, simply play one note repeatedly in time with the music. Regarding chords and the use of the left hand, the PSR-282 actually hand in the auto accompaniment section of the keyboard. Auto accompaniment section 62 - Yamaha PSR-282 | Owner's Manual - Page 63
song starts automatically, and the appropriate notes appear in the display. In Lesson 2, play the correct notes at your own pace, until you can master playing them in rhythm. Lesson 3 - Minus One This lesson step lets you practice one part of the song in rhythm at the proper tempo. The PSR-282 plays - Yamaha PSR-282 | Owner's Manual - Page 64
that Lesson 4 is indicated. Lr4 BothHand 3 Play both the left- and right-hand parts with the song. After the lead-in, the song starts automatically, and the appropriate notes appear in the display. In Lesson 4, both parts (left and right) are muted, letting you play the entire song by yourself. 64 - Yamaha PSR-282 | Owner's Manual - Page 65
are assigned, depending on your performance: "OK," "Good," "Very Good," and "Excellent." When the Talking function (page 66) is on, the PSR-282 also "announces" your grade. on Excellen 1 Select the Grade function. Press the left Overall button, repeatedly if necessary, until "GRADE" appears in the - Yamaha PSR-282 | Owner's Manual - Page 66
Talking This feature "talks" to you through the speakers, "announcing" the Grade comments as well as the titles of the Lesson steps and the names of certain functions. on TALKING 1 Select the Talking function. Press the left Overall button, repeatedly if necessary, until "TALKING" appears in the - Yamaha PSR-282 | Owner's Manual - Page 67
an addition to the MIDI standard which ensures that any GM-compatible music data can be accurately played by any GM-compatible tone generator, regardless of manufacturer. The GM mark is affixed to all software and hardware products that support GM System Level 1. The PSR-282 supports GM System Level - Yamaha PSR-282 | Owner's Manual - Page 68
PSR-282 are located on the rear panel. MIDI IN MIDI OUT Receives MIDI data from another MIDI device. Transmits the PSR-282's keyboard information as MIDI data to another MIDI device. • Special MIDI cables (sold separately) must be used for connecting to MIDI devices. They can be bought at music - Yamaha PSR-282 | Owner's Manual - Page 69
a wide variety of music software. When using a MIDI interface device installed in the personal computer, connect the MIDI terminals of the personal computer and the PSR-282. Use only special MIDI cables when connecting MIDI devices. q Connect the MIDI terminals of the PSR-282 to the MIDI termi- nals - Yamaha PSR-282 | Owner's Manual - Page 70
, such as playing back song data on a sequencer using the voices of the PSR-282, or playing the PSR-282 voices from a separate MIDI keyboard or controller. When you want to control playback of the PSR-282's styles or songs from an external MIDI device, you'll have to change the clock setting on the - Yamaha PSR-282 | Owner's Manual - Page 71
your particular equipment and software. For example, if you are using the Yamaha MDF3 MIDI Data Filer: 1) Make the appropriate MIDI connections. PSR-282 MIDI OUT MIDI IN MDF3 2) Set up the MDF3 for recording MIDI data. (Refer to the MDF3 Owner's Manual.) 2 Select the MIDI operations. Press the - Yamaha PSR-282 | Owner's Manual - Page 72
and software. For example, if you are using the Yamaha MDF3 MIDI Data Filer: 1) Make the appropriate MIDI connections. PSR-282 MIDI IN MIDI OUT MDF3 2) Insert the appropriate floppy disk (containing the desired data) into the MIDI Data Filer. 2 Start sending the data from the connected MIDI - Yamaha PSR-282 | Owner's Manual - Page 73
of a song - for example, completely changing the PSR-282 settings for the next section of the song. s Sending Initial Setup Data 1 First, set up the sequencer for recording. The actual procedure may differ depending on your particular equipment and software. Ideally, you should leave two or more - Yamaha PSR-282 | Owner's Manual - Page 74
MIDI Functions 3 Select the Initial Setup Send operation. Press "2" on the numeric keypad or use the [+]/[-] buttons to select operation #2, Initial Setup Send. 2 INIT SND 4 Press the [START/STOP] button. Start the Initial Setup Send operation. 5 Start recording on the sequencer, then send the - Yamaha PSR-282 | Owner's Manual - Page 75
Troubleshooting Problem Possible Cause and Solution When the PSR-282 is turned on or off, a popping This is normal and indicates that the PSR-282 is receiving electrical sound is temporarily produced. power. When using a mobile phone, noise is produced. Using a mobile phone in close proximity - Yamaha PSR-282 | Owner's Manual - Page 76
Except for the data listed below, all PSR-282 panel settings are reset to their initial settings whenever the power is turned on. The data listed below are backed up - i.e. retained in memory - as long as an AC adaptor is connected or a set of batteries is installed. • User Song Data • Song Volume - Yamaha PSR-282 | Owner's Manual - Page 77
of available notes for playing on the keyboard is correspondingly reduced. The same applies to the Split Voice and Song functions. • The Voice List includes MIDI program change numbers for each voice. Use these program change numbers when playing the PSR-282 via MIDI from an external device. • Some - Yamaha PSR-282 | Owner's Manual - Page 78
Kit 127 0 16 Rock Kit 127 0 24 Electronic Kit 127 0 25 Analog Kit 127 0 27 Dance MIDI Program Voice Name Change# PIANO 0 0 0 Acoustic Grand Piano 0 0 1 Bright Acoustic Piano 0 0 2 Electric Grand Piano 0 0 3 Honky-tonk Piano 0 0 4 Electric Piano 1 0 0 5 Electric Piano - Yamaha PSR-282 | Owner's Manual - Page 79
198 199 200 201 228 229 230 231 232 Bank Select MSB LSB MIDI Program Voice Name Change# 0 0 51 Synth Strings 2 0 72 Piccolo 0 0 73 Flute 0 0 74 Recorder 0 0 75 Pan Flute 0 0 76 Blown Bottle 127 0 16 Rock Kit 127 0 24 Electronic Kit 127 0 25 Analog Kit 127 0 - Yamaha PSR-282 | Owner's Manual - Page 80
B4 C5 C # 5 D5 D # 5 E5 F5 F # 5 G5 G # 5 A5 A # 5 B5 C6 MIDI Bank Select MSB LSB 0 123 0 123 0 123 0 123 0 123 0 123 0 123 0 123 0 123 0 123 ) Saw Lead (D3) 122 Kick Clap Ohh 2 Huh! 123 Piano F Piano G Orch. Hit Clap 124 Signal Omen-FX FMTB2 FMTB1 125 Organ - Yamaha PSR-282 | Owner's Manual - Page 81
2 8Beat Uptempo 8Beat Standard Folkrock Pop Rock 8Beat Medium 16BEAT 16Beat Shuffle 1 16Beat Shuffle 2 16Beat Pop Funk 1 BALLAD 8Beat Ballad Epic Ballad Piano Ballad 16Beat Ballad 1 16Beat Ballad 2 Soul Ballad Slow Rock 1 Slow Rock 2 6/8 Ballad 1 DANCE Hip House Pop Reggae Ragga Digital Rock Supabad - Yamaha PSR-282 | Owner's Manual - Page 82
Voice# 119 Bank MSB# 127 Bank LSB# 0 Program Change# 0 Keyboard MIDI Key Alternate Note# Note Note# Note off assign Standard Kit 1 25 4 Room Tom 5 Room Tom 6 122 127 0 16 Rock Kit 123 127 0 24 Electronic Kit 124 127 0 25 Analog Kit 125 127 0 27 Dance Kit Reverse Cymbal SD Elec - Yamaha PSR-282 | Owner's Manual - Page 83
Drum Kit List Voice# 119 Bank MSB# 127 Bank LSB# 0 Program Change# 0 Keyboard MIDI Key Alternate Note# Note Note# Note off assign Standard Kit 1 25 C# 0 13 C# -1 3 Surdo Mute 26 D 0 14 D -1 3 Surdo Open 27 D# 0 15 D# -1 Hi-Q 28 E 0 16 E -1 Whip 29 F 0 - Yamaha PSR-282 | Owner's Manual - Page 84
Implementation Chart YAMAHA [ Portable Keyboard ] Model PSR-282 MIDI Implementation Chart Date:26-JAN-2000 Version : 1.0 Function... Transmitted Recognized Remarks Basic Default Channel Changed 1 - 16 1 - 16 1 - 16 *1 1 - 16 *1 Mode Default Messages Altered 3 x Note 0 - 127 - Yamaha PSR-282 | Owner's Manual - Page 85
MIDI Master Tuning • System exclusive messages for changing the Reverb Type, Chorus Type, and DSP Type. *2 Messages for these control change numbers cannot be transmitted from the PSR-282 for saving (recording) User data (User songs and Registration When the accompaniment is started, an FAH message - Yamaha PSR-282 | Owner's Manual - Page 86
MIDI Implementation Chart s Effect map * If the received value does not contain an effect parameter changes, you can select the Reverb, Chorus and DSP effect types which are not accessible from the PSR-282 panel itself. When one of the effects is selected by the external sequencer, " - " will be - Yamaha PSR-282 | Owner's Manual - Page 87
129 mm (36-3/4" x 14-5/8" x 5-1/6") Weight • 5.5 kg (12 lbs., 2 oz.) Supplied Accessories • Music Stand • Owner's Manual • Song Book Optional Accessories • Headphones : HPE-150 • AC power adaptor : PA-3B • Footswitch : FC4, FC5 • Keyboard stand : L-2L, L-2C * Specifications and descriptions - Yamaha PSR-282 | Owner's Manual - Page 88
A/B 40 Metronome 20 MIDI 67 MIDI channels 68 MIDI Implementation Chart 84 MIDI terminals 68 Multi Fingering 42 music stand 19 N numeric keypad 24 O One Touch Setting 25 Overall buttons 21 P PHONES/OUTPUT jack 7 Portable Grand 20 Q Quick Guide 10 R RECORD button 56 recording, song 55 - Yamaha PSR-282 | Owner's Manual - Page 89
products: PSR SERIES OF PORTATONE ELECTRONIC KEYBOARDS If during the first 90 days that immediately follows the purchase date, your new Yamaha product covered the servicing of your unit and provide a tracking system if needed. 4. Your owners manual contains important safety and operating instructions. - Yamaha PSR-282 | Owner's Manual - Page 90
Group Nakazawa-cho 10-1, Hamamatsu, Japan 430-8650 Tel: 053-460-2312 HEAD OFFICE Yamaha Corporation, Electronic Musical Instrument Division Nakazawa-cho 10-1, Hamamatsu, Japan 430-8650 Tel: 053-460-3273 Yamaha PK CLUB (Portable Keyboard Home Page) http://www.yamaha.co.jp/english/product/pk/ - Yamaha PSR-282 | Owner's Manual - Page 91
M.D.G., EMI Division, Yamaha Corporation © 2000 Yamaha Corporation V549990 00?PO???.?-01A0 Printed in China - Yamaha PSR-282 | Owner's Manual - Page 92
M.D.G., EMI Division, Yamaha Corporation © 2000 Yamaha Corporation V524150 00?PO???.?-01A0 Printed in China
-
 1
1 -
 2
2 -
 3
3 -
 4
4 -
 5
5 -
 6
6 -
 7
7 -
8
-
9
-
10
-
11
-
12
-
13
-
14
-
15
-
16
-
17
-
18
-
19
-
20
-
21
-
22
-
23
-
24
-
25
-
26
-
27
-
28
-
29
-
30
-
31
-
32
-
33
-
34
-
35
-
36
-
37
-
38
-
39
-
40
-
41
-
42
-
43
-
44
-
45
-
46
-
47
-
48
-
49
-
50
-
51
-
52
-
53
-
54
-
55
-
56
-
57
-
58
-
59
-
60
-
61
-
62
-
63
-
64
-
65
-
66
-
67
-
68
-
69
-
70
-
71
-
72
-
73
-
74
-
75
-
76
-
77
-
78
-
79
-
80
-
81
-
82
-
83
-
84
-
85
-
86
-
87
-
88
-
89
-
90
-
91
-
92
 |
 |
