Yamaha PSR-350 Owner's Manual - Page 18
Panel Display Indications
 |
View all Yamaha PSR-350 manuals
Add to My Manuals
Save this manual to your list of manuals |
Page 18 highlights
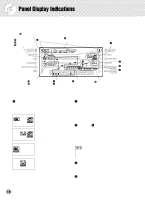
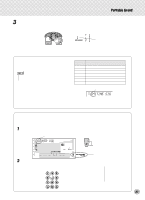
Panel Display Indications The PSR-350 features a large multi-function display that shows all important settings for the instrument. The section below briefly explains the various icons and indications in the display. !6 Battery Level indicator !0 Touch indicator !1 Harmony indicator !2 Dual indicator w Overall indicator i Song/Voice/Style name and number, Tempo 001 GrandPno q Indicators t Measure y Beat marks u Chord !3 Sync Stop indicator !4 Accompaniment On indicator e Notation r Keyboard o Song track indicators !5 Octave indicator q Indicators These indicate the operating condition of the PSR-350 as shown below: Using the numeric keypad selects voice numbers. Pressing the [START/STOP] button starts song playback. Using the numeric keypad selects voice numbers. Pressing the [START/STOP] button starts style playback. Using the numeric keypad selects song numbers. Pressing the [START/STOP] button starts song playback. Using the numeric keypad selects style numbers. Pressing the [START/STOP] button starts style playback. w Overall indicator The Overall buttons (on either side of the LCD) let you access the Function operations and settings of the PSR-350. The currently selected setting is indicated by a dark bar that appears next to its name (printed on the panel). e Notation / r Keyboard These two portions of the display conveniently indicate notes. When a song is being played back, they show the melody or chord notes in succession. When you play the keyboard yourself, the display shows the notes you play. • For a few specific chords, not all notes may be shown in the notation section of the display. This is due to space limitations in the display. t Measure These show the current measure during playback of a song or style. y Beat marks These marks (one large, three small) flash in sequence and in time with the song or style. The large arrow indicates the first beat of the measure. 18
-
 1
1 -
2
-
3
-
4
-
5
-
6
-
7
-
8
-
9
-
10
-
11
-
12
-
 13
13 -
 14
14 -
 15
15 -
 16
16 -
 17
17 -
 18
18 -
 19
19 -
 20
20 -
 21
21 -
 22
22 -
 23
23 -
24
-
25
-
26
-
27
-
28
-
29
-
30
-
31
-
32
-
33
-
34
-
35
-
36
-
37
-
38
-
39
-
40
-
41
-
42
-
43
-
44
-
45
-
46
-
47
-
48
-
49
-
50
-
51
-
52
-
53
-
54
-
55
-
56
-
57
-
58
-
59
-
60
-
61
-
62
-
63
-
64
-
65
-
66
-
67
-
68
-
69
-
70
-
71
-
72
-
73
-
74
-
75
-
76
-
77
-
78
-
79
-
80
-
81
-
82
-
83
-
84
-
85
-
86
-
87
-
88
-
89
-
90
-
91
-
92
-
93
-
94
-
95
-
96
-
97
-
98
-
99
-
100
-
101
-
102
-
103
-
104
-
105
 |
 |
