Yamaha PSR-S710 Installation Guide - Page 4
Software Installation - and midi
 |
View all Yamaha PSR-S710 manuals
Add to My Manuals
Save this manual to your list of manuals |
Page 4 highlights
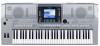
4 English Software Installation Uninstall (Removing the installed application) To remove any installed application software: Select [Start] → [Settings] → [Control Panel] → [Add/ Remove Programs] → [Change or Remove Programs], then select the application to be removed and click [Remove]. Follow the on-screen instructions to uninstall the application. n n The button names or menus may differ depending on the computer OS. For instructions on uninstalling the USB-MIDI driver, refer to "How can I remove the driver?" in the "Troubleshooting" section (page 7). USB-MIDI Driver To operate the instrument from your computer via USB, you'll need to install the appropriate driver software. The USB-MIDI driver is software that transfers MIDI data back and forth between sequence software and the instrument via a USB cable. Computer Sequence Software MIDI instrument (Clavinova, Digital Workstation, etc.) USB cable Driver For Windows XP: See the column at right. For Windows 2000: See page 5. For Windows Vista: See page 5. n See the Yamaha Download page at the following URL for up-to-date news on USB-MIDI driver: http://music.yamaha.com/download/ Check the drive name of the CD-ROM drive you will be using (D:, E:, Q:, etc.) The drive name is displayed beside the CDROM icon in your "My Computer" folder. The root directory of the CD-ROM drive will be D:\ , E:\ , or Q:\ , respectively. Installing the driver on Windows XP 1 Start the computer and use the "Administrator" account to log on to Windows XP. 2 Select [Start] → [Control Panel]. If the control panel appears as "Pick a category", click "Switch to Classic View" in the upper left of the window. All control panels and icons will be displayed. 3 Go to [System] → [Hardware] → [Driver Signing] and check the radio button to the left of "Ignore-Install the software anyway and don't ask for my approval" and click [OK]. n After completing the driver installation, make sure to restore the original setting if necessary. 4 Click the [OK] button to close System Properties, and then click "X" in the upper right of the window to close the Control Panel. 5 Insert the included CD-ROM into the CD-ROM drive. The Start window will appear automatically. 6 First, make sure the instrument is turned off, then use a USB cable to connect the USB connector of the computer to the USB TO HOST connector of the instrument. When the instrument is turned on, the computer automatically displays the "Found New Hardware Wizard." If the Wizard window is not displayed automatically, refer to "Troubleshooting." If the system displays "Found New Hardware" in the lower right corner, wait until "Found New Hardware Wizard" is displayed. (The Wizard window may take a while to display on some computers.) If the Wizard window prompts you to specify whether or not to connect to Windows Update, select the radio button for "No, not this time," then click [Next]. n Refer to the Owner's Manual of the instrument to connect the instrument to the computer. 7 Check the radio button to the left of "Install the software automatically (Recommended)," then click [Next]. The system starts the installation. n If during the installation the system displays "...has not passed Windows Logo testing to verify its compatibility with Windows XP," click [Continue Anyway]. 8 When the installation is complete, the system displays "Completing the Found New Hardware Wizard." Click [Finish]. (The Wizard window may take a while to display on some computers.) 9 Restart the computer. If the system displays "Found New Hardware" in the lower right corner, wait until "System Settings Change" is displayed. (The Wizard window may take a while to display on some computers.) n This Wizard window will not appear when using Windows XP Professional x64 Edition. There is no need to restart the computer. The USB-MIDI driver installation is complete. 4 Accessory CD-ROM for Windows Installation Guide
-
 1
1 -
 2
2 -
 3
3 -
 4
4 -
 5
5 -
 6
6 -
 7
7 -
 8
8 -
 9
9 -
 10
10 -
11
-
12
-
13
-
14
-
15
-
16
-
17
-
18
-
19
-
20
-
21
-
22
-
23
-
24
-
25
-
26
-
27
-
28
-
29
-
30
-
31
-
32
 |
 |