Yamaha PSR-S710 Reference Manual - Page 70
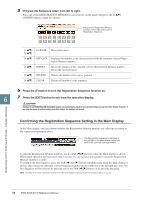
Confirming the Registration Sequence Setting in the Main Display
 |
View all Yamaha PSR-S710 manuals
Add to My Manuals
Save this manual to your list of manuals |
Page 70 highlights
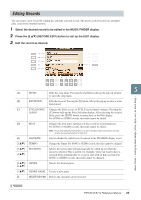
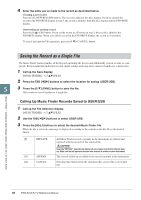
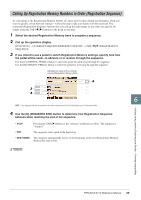
5 Program the Sequence order, from left to right. Press one of the REGISTRATION MEMORY [1]-[8] buttons on the panel, then press the [6 ▲▼] (INSERT) button to input the number. Indicates the Registration Memory numbers, in the order of the current Registration Sequence. [1 ▲▼]- CURSOR [4 ▲▼] [5 ▲▼] REPLACE [6 ▲▼] INSERT [7 ▲▼] [8 ▲▼] DELETE CLEAR Moves the cursor. Replaces the number at the cursor position with the currently selected Registration Memory number. Inserts the number of the currently selected Registration Memory number before the cursor position. Deletes the number at the cursor position. Deletes all numbers in the sequence. 6 Press the [F] button to turn the Registration Sequence function on. 6 7 Press the [EXIT] button to exit from the operation display. CAUTION Settings in the REGISTRATION SEQUENCE display are automatically saved to the instrument when you exit from this display. However, if you turn the power off without exiting from this display, the settings will be lost. Confirming the Registration Sequence Setting in the Main Display In the Main display, you can confirm whether the Registration Memory numbers are called up according to the sequence programmed above. The Registration Sequence is indicated at the top right of the Main display, letting you confirm the currently selected number. To shift the Registration Memory numbers, use the TAB [E][F] buttons when the Main display is shown. When pedal operation has been set in step 3 on page 69, you can also use a pedal to select the Registration Memory numbers in order. To return to the first Sequence, press the TAB [E] and [F] buttons simultaneously when the Main display is shown. This cancels the currently selected Sequence number (the box indicator at the top right goes out). The first Sequence will be selected by pressing one of the TAB [E][F] buttons or by pressing the pedal. NOTE The pedal can be used for Registration Sequence no matter which display is called up (except for the display in step 3 on page 69). Registration Memory - Saving and Recalling Custom Panel Setups - 70 PSR-S910/S710 Reference Manual
-
 1
1 -
2
-
3
-
4
-
5
-
6
-
7
-
8
-
9
-
10
-
11
-
12
-
13
-
14
-
15
-
16
-
17
-
18
-
19
-
20
-
21
-
22
-
23
-
24
-
25
-
26
-
27
-
28
-
29
-
30
-
31
-
32
-
33
-
34
-
35
-
36
-
37
-
38
-
39
-
40
-
41
-
42
-
43
-
44
-
45
-
46
-
47
-
48
-
49
-
50
-
51
-
52
-
53
-
54
-
55
-
56
-
57
-
58
-
59
-
60
-
61
-
62
-
63
-
64
-
 65
65 -
 66
66 -
 67
67 -
 68
68 -
 69
69 -
 70
70 -
 71
71 -
 72
72 -
 73
73 -
 74
74 -
 75
75 -
76
-
77
-
78
-
79
-
80
-
81
-
82
-
83
-
84
-
85
-
86
-
87
-
88
-
89
-
90
-
91
-
92
-
93
-
94
-
95
-
96
-
97
-
98
-
99
-
100
-
101
-
102
-
103
-
104
-
105
-
106
-
107
-
108
 |
 |
