Yamaha PW800W Owner's Manual - Page 6
Controls and Connectors - power supply unit
 |
View all Yamaha PW800W manuals
Add to My Manuals
Save this manual to your list of manuals |
Page 6 highlights
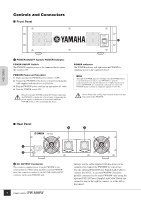
Controls and Connectors ■ Front Panel 1 1 POWER ON/OFF Switch/ POWER Indicator POWER ON/OFF Switch The PW800W supplies power to the connected device when this switch is ON. PW800W Power-on Procedure 1. Make sure that the PW800W power switch is OFF. 2. Connect the PW800W to the device to be powered using the cable supplied with the device (or PSL360). 3. Plug the PW800W power cord into an appropriate AC outlet. 4. Turn the POWER switch ON. Be sure to turn the POWER switch OFF before connecting the PW800W to the device to be powered. Connecting the power supply to the device to be powered while the POWER switch is ON can damage the device. POWER Indicator The POWER indicator will light when the PW800W is supplying power to the connected device. n Although the POWER indicator will light when the POWER switch is on while the powered device and PW800W are properly connected, please note that the indicator won't light if the powered device and PW800W are not properly connected or a fault in the PW800W results in failure to output the required 24 volts DC. Never obstruct the cooling vents located on the front and rear panels of the PW800W. ENGLISH ■ Rear Panel 3 2 4 5 2 DC OUTPUT Connector This connector supplies power from the PW800W to the connected device. When using parallel-connected PW800W units, this connector connects to the DC PARALLEL INPUT connector on the main PW800W unit. 6 Always use the cable supplied with the device to be connected to connect the PW800W to your device. Use the optional PSL360 Power Supply Link Cable to connect the M7CL. A second PW800W should be parallel-connected to the main PW800W only using the optional PSL120 Power Supply Link Cable. Rotate the connector ring to the right to connect, or to the left to disconnect.
-
 1
1 -
 2
2 -
 3
3 -
 4
4 -
 5
5 -
 6
6 -
 7
7 -
 8
8 -
 9
9 -
 10
10
 |
 |
