Yamaha RD-500 YX-500FT RD-500 Owners Manual - Page 5
Assembly
 |
View all Yamaha RD-500 manuals
Add to My Manuals
Save this manual to your list of manuals |
Page 5 highlights
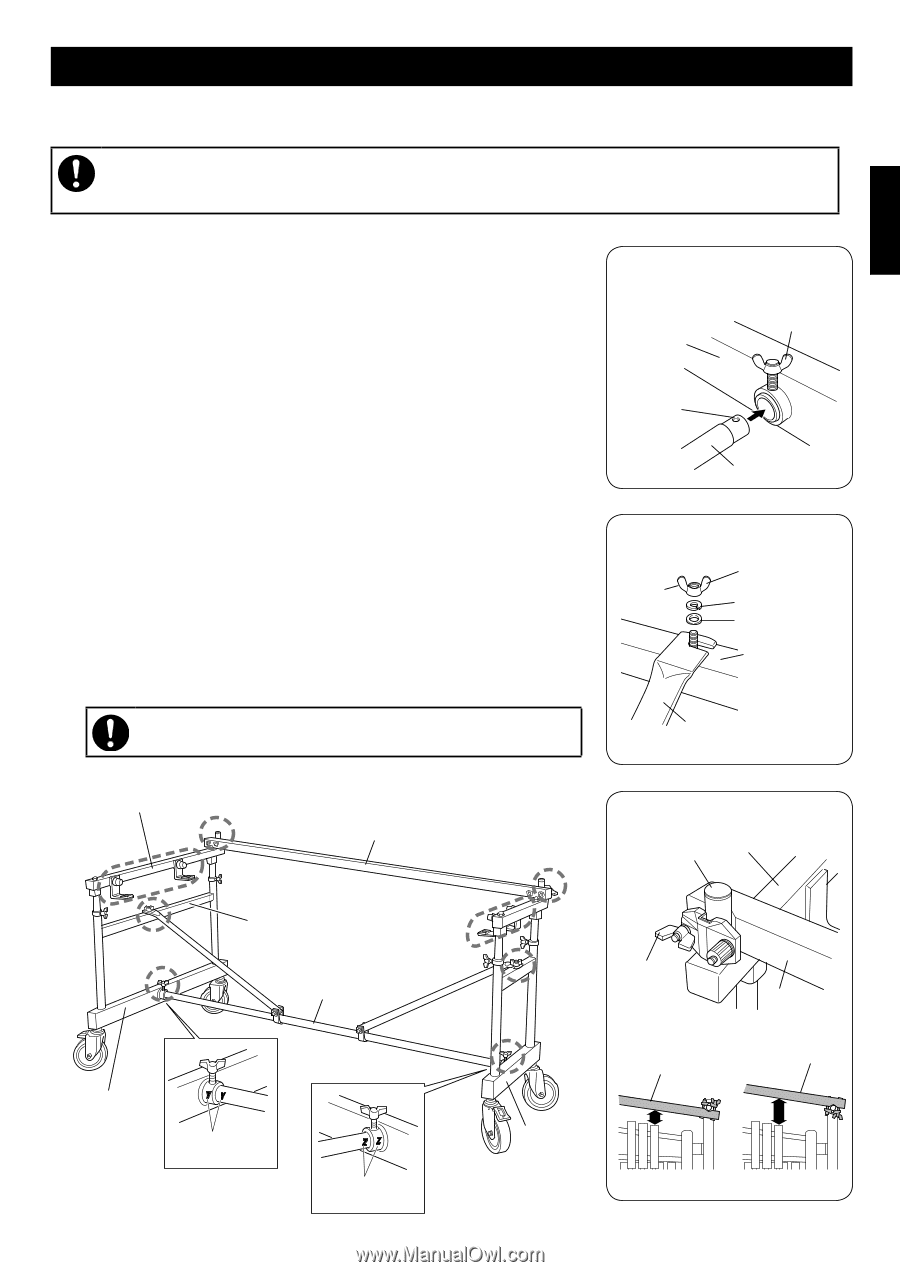
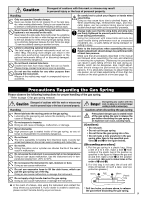
Assembly First, assemble the Multi-Frame (RD500) then attach the xylophone set (YX500FT) onto the frame. For safety reasons, make sure that assembly of the Multi-Frame and attaching of the instrument is carried out with two or more persons, and that you assemble the product in an area with adequate space. 1 Fully insert the end of stay C with its notch facing up into the joint on leg base A, then firmly tighten the wing bolt. * Pay attention to the stay's orientation when attaching. Parts are marked with letters to assist with assembly. (Refer to the diagram below.) 2 Remove the wing nut, washers, and spring washers on the center rail of the bass side leg base A, slide the C-shaped end of the diagonal stay support C onto the bolt on the center rail then tighten the wing nut firmly with washer and spring washer. 3 Use the same procedure to connect the clamp and diagonal stay support on stay C to the center rail on the treble side leg base B. 4 Loosen the clamp screws on both ends of the rack pipe D and fasten the clamps onto the poles on the upper leg section. The rack pipe can be attached so its clamp side is either on the audience side or the player's side of the pole. Decide how much space you need between the rack pipe and tone bars and attach the rack pipe accordingly. * Please make sure that the YAMAHA logo is not placed upside-down. 5 Firmly tighten all bolts. Assembly of the Multi-Frame is complete. 1,3 A (B) Leg base Notch 2,3 Tighten Wing bolt C Stay Wingnut Spring washer Washer A (B) Center rail When disassembling the multi-percussion rack, follow the assembly steps in reverse order. C Diagonal stay support Rack frame 4 6 D Rack pipe 4 4 A (B Pole Rack frame Center rail 6 2 C Stay 1 ˞ A ˞ Leg base Match "Y" Match "Z" 3 3 B Leg base Tighten D Rack pipe D Rack pipe D Rack pipe 11
-
 1
1 -
 2
2 -
 3
3 -
 4
4 -
 5
5 -
 6
6 -
 7
7 -
 8
8
 |
 |