Yamaha RX-496 Owner's Manual - Page 14
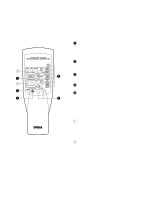
Basic Operations - receiver remote control
 |
UPC - 027108907239
View all Yamaha RX-496 manuals
Add to My Manuals
Save this manual to your list of manuals |
Page 14 highlights
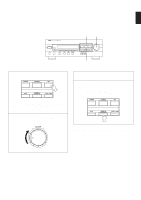
From page 14 to 25, this manual describes how to operate this unit mainly by using the front panel control parts. To operate this unit on the remote control transmitter, use the corresponding keys on the remote control transmitter. BASIC OPERATIONS TO PLAY A SOURCE 2 37 NATURAL SOUND STEREO RECEIVER STANDBY/ON PHONES A/B/C/D/E 1 2 3 4 5 6 7 8 SPEAKERS A B ON OFF BASS l 0l 2 2 3 3 4 5 4 5 TREBLE l 0l 2 2 3 3 4 5 4 5 BALANCE l 0l 2 2 3 3 4 L5 4 5R LOUDNESS l FLAT -30dB 2 l0 3 9 4 8 567 PURE DIRECT TUNER PHONO AUX TAPE 2 MONITOR FM/AM DOWN TUNING UP MEMORY EDIT TUNING MODE MAN'L/AUTO FM AUTO/MAN'L MONO CD TAPE 1/MD VOLUME l6 20 l2 28 8 40 4 60 2 0 -dB : RX-496RDS and RX-496 only 47 1, 6 1 VOLUME l6 20 l2 28 8 40 4 60 2 0 -dB Set to the "∞" position. 2 Turn the power on. STANDBY/ON 3 Select the desired input source by using the input selector buttons. TUNER PHONO CD AUX TAPE 2 MONITOR TAPE 1/MD * The name of the selected input source will appear on the display. 4 Select the speakers to be used. SPEAKERS A B ON OFF 5 Play the source. (For detailed information on the tuning operation, refer to page 17.) 6 VOLUME l6 20 l2 28 8 40 4 60 2 0 -dB Adjust to the desired output level. 7 If desired, adjust the BASS, TREBLE, BALANCE and LOUDNESS controls, or use the PURE DIRECT switch (for RX-496RDS and RX-496 only). For details, refer to page 16. Notes on using the input selector buttons q Note that pressing each input selector button selects the source which is connected to the corresponding input terminals on the rear panel. q The selection of TAPE 2 MONITOR cannot be canceled by pressing another input selector button. To cancel it, press TAPE 2 MONITOR again so that the "TAPE MON 2" indicator disappears from the display. When you select a button other than TAPE 2 MONITOR, make sure that the "TAPE MON 2" indicator is not illuminated on the display. When you finish using this unit Press the STANDBY/ON switch on the front panel again or the STANDBY/ON key on the remote control transmitter to turn this unit into the standby mode. * If you use two speaker systems, press both the A and B switches. 14
-
 1
1 -
2
-
3
-
4
-
5
-
6
-
7
-
8
-
 9
9 -
 10
10 -
 11
11 -
 12
12 -
 13
13 -
 14
14 -
 15
15 -
 16
16 -
 17
17 -
 18
18 -
 19
19 -
20
-
21
-
22
-
23
-
24
-
25
-
26
-
27
-
28
-
29
 |
 |
